Nine cut flower garden cheat sheets with illustrated diagnostic and treatment guides for beginner cut flower gardeners in Zone 7b. Pin them, print them, save them to your phone. Every cheat sheet links to its full deep-dive guide.
Save these cut flower garden cheat sheets for the next time something looks off.
These cut flower garden cheat sheets are designed to be printable and Pinterest-pinnable. Hover any image, save it to your boards, or print and tape inside your garden shed.
This post contains affiliate links. If you buy through them I may earn a small commission, at no extra cost to you. I only recommend products I actually use.
Quick answer: The simplest 7-day cut flower garden spray plan for a beginner is: Day 1 remove damaged leaves; Day 1 evening spray a 3-in-1 neem-based product after sunset; Day 2 to 3 water at soil level only; Day 4 to 5 inspect undersides and repeat the white paper test; Day 6 to 7 check for healthy new growth; repeat in 5 to 7 days if needed. Never spray oils above 85°F or in direct sun. Recovery is judged by new growth, not damaged leaves.
When you first start seeing pest or disease problems in your cut flower garden, it is easy to panic-buy every garden spray on the shelf. Neem oil. Horticultural oil. Insecticidal soap. Spinosad. Copper fungicide. Bt. Suddenly you have a cabinet full of products and still are not sure what to use.
For a beginner cut flower garden in Zone 7b with a mix of minor insect chewing, curled new growth, and fungal leaf spot, I would start much simpler. Here is the one-product-first approach I would use, plus the exact 7-day plan that pairs with it.
First: don’t spray before you inspect
Before treating the whole bed, spend a few minutes figuring out what you may be dealing with. Look for:
Holes in leaves
Brown or black spots
Curled new growth
Aphids on stems
Tiny insects under leaves
Webbing
Distorted buds
Yellowing or stunting
Then use the white paper test. Hold white paper under the affected plant and tap the stem. Tiny insects may fall onto the paper, making them easier to see. For a full walkthrough of diagnostic patterns, read my beginner pest and disease guide.
The one-product cut flower garden spray plan
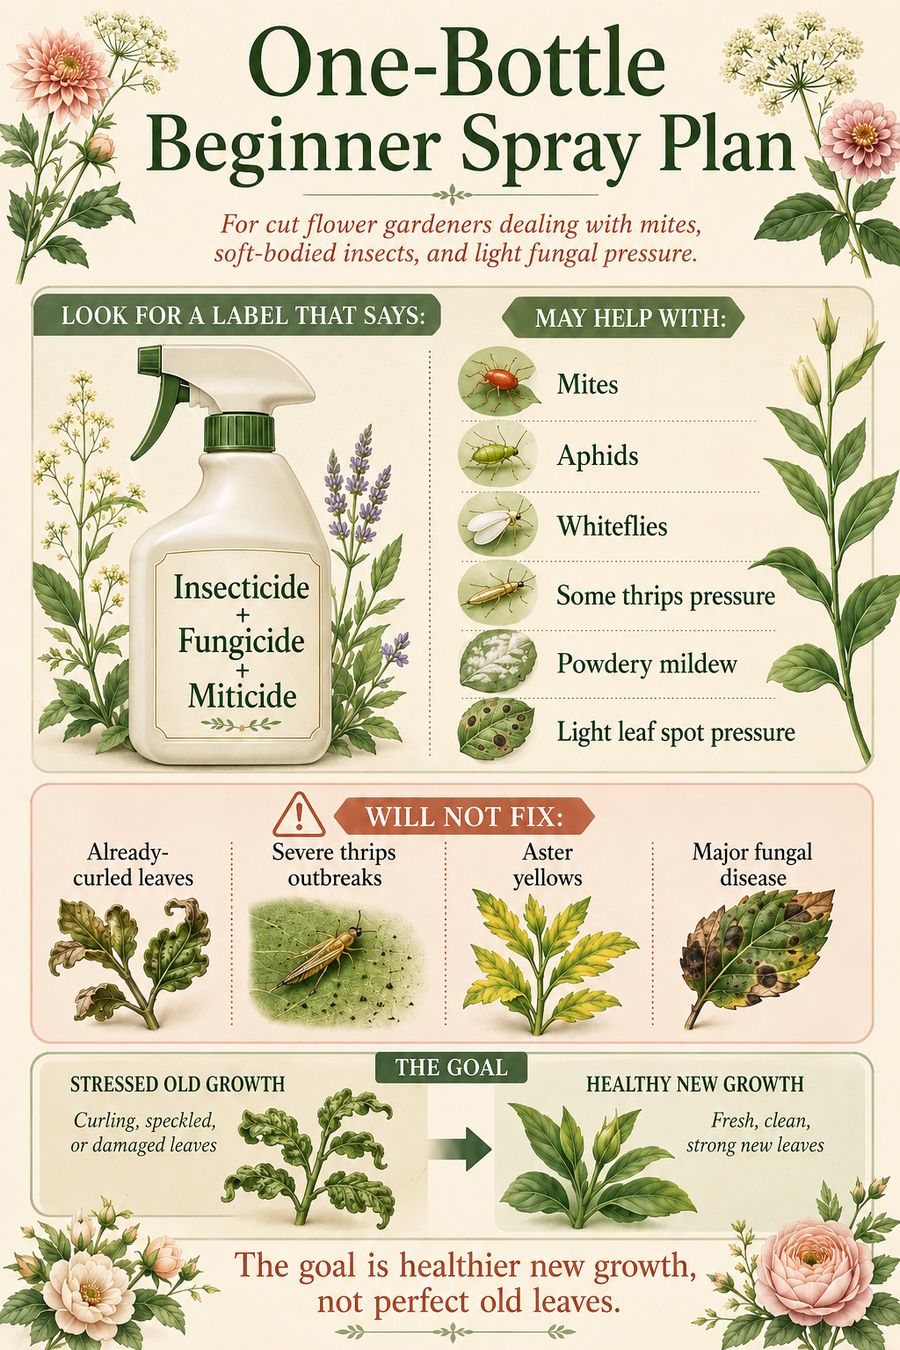
What a 3-in-1 product can and cannot do. Pin this for the next time you stand in the garden aisle.
If you want one product that covers the widest range of beginner issues, look for a spray labeled as Insecticide + Fungicide + Miticide. My go-to is Bonide Captain Jack’s Neem Max. It is a neem-based 3-in-1 that handles the bulk of beginner cut flower issues in one bottle.
It may help with:
Mites
Aphids
Whiteflies
Some thrips pressure
Powdery mildew
Some fungal leaf issues
A neem-based multi-purpose product is a reasonable first step for a beginner gardener because it covers several categories without requiring a complicated spray rotation. You will spray it with a Chapin 2-gallon pump sprayer, which gives you the pressure and reach to coat undersides and growing tips properly.
What one product cannot do
A multi-purpose neem or oil-based spray is useful, not magic. It will not fully control:
Damage that has already happened (already-curled leaves will not uncurl)
The goal is healthier new growth, not perfect old leaves.
Cut flower garden spray plan: hot weather safety rules
This matters most in the Upstate. Oil-based sprays — including neem and horticultural oils — can burn leaves in heat or full sun. This is the single biggest beginner mistake in Zone 7b.
Memorize the Do / Don’t list. Following this prevents 90 percent of spray-damage issues.
Only spray when:
After sunset
Temperatures are below 85°F
Plants are well-watered
Rain is not expected for several hours
Do not spray stressed, wilted, or drought-dry plants. Keep a garden thermometer in a shaded spot near your beds so you can verify temperature before you spray. A rechargeable headlamp keeps both hands free for evening spraying and is worth the $20.
Cut flower garden spray plan: where to spray
For pests like mites, thrips, and aphids, spraying the top of leaves is not enough. Focus on:
Undersides of leaves
Curled growing tips
New shoots
Stems
Flower buds
Lower leaves near the soil
Many pests hide where sprays do not easily reach. A pump sprayer with a thin wand lets you angle up under leaves where mites and thrips actually live.
Cut flower garden spray plan: how often to spray
For an active issue, I would typically spray every 5 to 7 days for 2 to 3 rounds, always following the product label. Then reassess. Do not spray endlessly just because you are nervous. Watch the new growth. If new leaves come out normal, the plant is recovering.
Cut flower garden spray plan: what to do alongside spraying
Sprays work better when paired with good garden habits:
Remove damaged foliage. Clip off heavily diseased or distorted leaves and trash them.
Mulch the bed. Mulch reduces soil splash and slows fungal disease.
Stop fertilizing temporarily. If pests appeared after fertilizing, pause for 3 to 4 weeks.
Improve airflow. Thin crowded plants where needed.
Water at the base. Avoid wetting leaves, especially in Zone 7b humidity.
Cut flower garden spray plan: when you might need a second product
A one-product approach is a good start, but sometimes you need something more targeted.
You may need a thrip-specific product if: you confirm thrips with the white paper test, buds are distorted, new growth continues to curl after treatment, or you see tiny sliver-shaped insects. Captain Jack’s Deadbug Brew (spinosad) is the standard escalation.
You may need a stronger fungicide strategy if: leaf spots spread rapidly, lower leaves are collapsing, zinnias are defoliating, or weather stays wet and humid for several days. Bonide Copper Fungicide is the standard escalation.
You may need a horticultural oil if: mites are confirmed via white paper test and loupe inspection. Bonide All-Seasons horticultural oil suffocates mite eggs and adults in one application.
For aphids-only pressure (large clusters of soft-bodied insects), Garden Safe insecticidal soap is the simpler answer than escalating to a 3-in-1.
You may need to remove plants if: aster yellows is suspected, flowers are severely deformed, the plant is stunted and worsening, or only one or two plants are affected and you want to protect the rest.
Key takeaways
One bottle to start: a 3-in-1 insecticide/fungicide/miticide (Captain Jack’s Neem Max).
Always inspect before you spray. The white paper test confirms thrips and mites in 60 seconds.
Never spray oil above 85°F or in direct sun. Wait until after sunset.
Focus on undersides, growing tips, and lower leaves — that’s where pests live.
Repeat every 5 to 7 days for 2 to 3 rounds. Then reassess.
Escalate to Captain Jack’s Deadbug Brew (spinosad) for confirmed thrips.
Escalate to Bonide Copper Fungicide for spreading leaf spot.
Recovery is judged by new growth, not damaged leaves.
Frequently asked questions
What is the best all-purpose spray for a beginner cut flower garden?
A neem-based 3-in-1 insecticide + fungicide + miticide like Bonide Captain Jack’s Neem Max. It handles the most common beginner problems (mites, aphids, whiteflies, light fungal pressure) in one bottle without requiring a complicated rotation.
Can you spray neem oil in hot weather?
Only with strict timing. Spray neem and other oil-based products after sunset when temperatures drop below 85°F. Spraying in direct sun or hot temperatures causes leaf burn (phytotoxicity) on tender cut flowers. This rule matters most in Zone 7b summers.
How often should you spray cut flowers for pests?
Every 5 to 7 days for 2 to 3 rounds during an active issue, then reassess. Continued spraying without reassessment wastes product and stresses plants. Watch the new growth; if it emerges normal, the plant is recovering and treatment can stop.
What kills thrips on flowers?
Spinosad-based products (Captain Jack’s Deadbug Brew) are the most effective home garden thrips control. Two to three applications 5 to 7 days apart usually clear an infestation. Spray in the evening, focusing on growing tips and flower buds where thrips hide.
Why didn’t my neem oil work?
Three usual reasons: timing (sprayed in direct sun, oil broke down), coverage (didn’t reach undersides where pests live), or wrong pest (neem suppresses mites and soft-bodied insects but is weak on heavy thrips and severe fungal disease). Escalate to spinosad for thrips or copper fungicide for serious leaf spot.
Should I rotate sprays?
For most beginners with low-to-moderate pressure, one rotation between a 3-in-1 (neem-based) and a targeted product (spinosad or copper) is plenty. Heavy rotation matters mostly for commercial growers managing chemical resistance over multiple seasons.
About Anna Katherine
I am Anna Katherine Page. I share garden, home, beauty, and resale tips from my home in Seneca, South Carolina (USDA Zone 7b). Follow along on TikTok and YouTube.
This post contains affiliate links. If you buy through them I may earn a small commission, at no extra cost to you. I only recommend products I actually use.
Quick answer: Curled aster leaves are usually caused by thrips, broad mites, aphids, herbicide drift, or aster yellows disease. If the newest growth is twisted, thick, and puckered and no herbicide was used nearby, mites or thrips are the most likely cause. Use the white paper test to confirm. Aster yellows shows up as stunting plus strange green flowers and cannot be cured — the plant must be removed.
Asters are beautiful cut flowers, but they can be a little dramatic when something goes wrong. One of the most confusing symptoms is when the leaves start curling, twisting, puckering, or drying up at the tips.
If your asters look like the new growth is deformed, do not automatically assume they need more water or more fertilizer. Curling leaves usually point to pest feeding, disease, or environmental stress. Here is how I would troubleshoot curled aster leaves in a beginner cut flower garden in Zone 7b.
What curled aster leaves can mean
When the newest leaves are curling or twisting, the problem is usually affecting the growing tip. The most common possibilities are:
Thrips
Broad mites
Cyclamen mites
Aphids
Aster yellows
Herbicide exposure
Fertilizer-related pest pressure
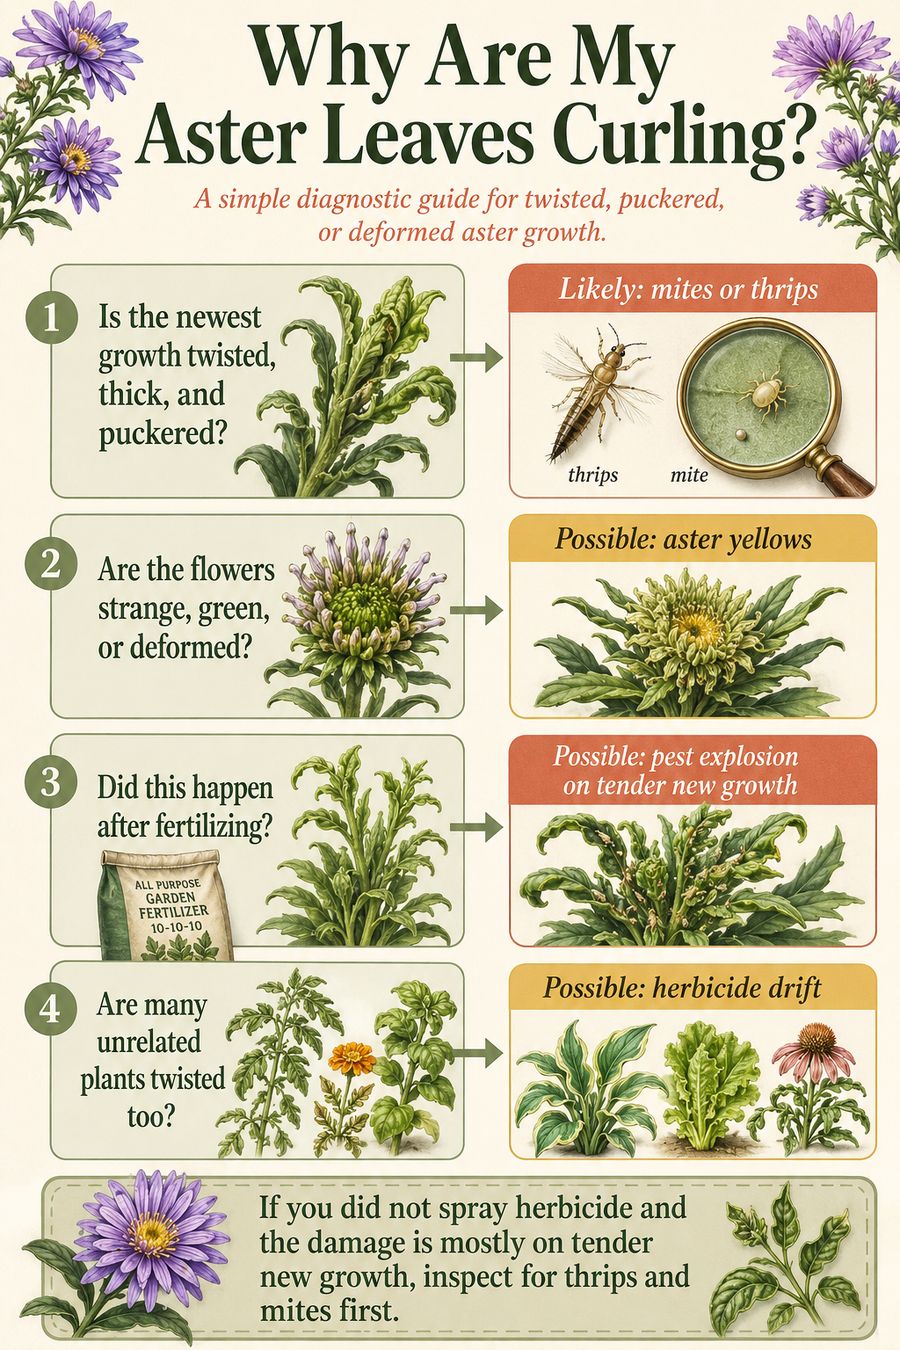
The exact cause depends on what the damage looks like and what has recently happened in the garden. Use the diagnostic flow above, then read the section that matches.
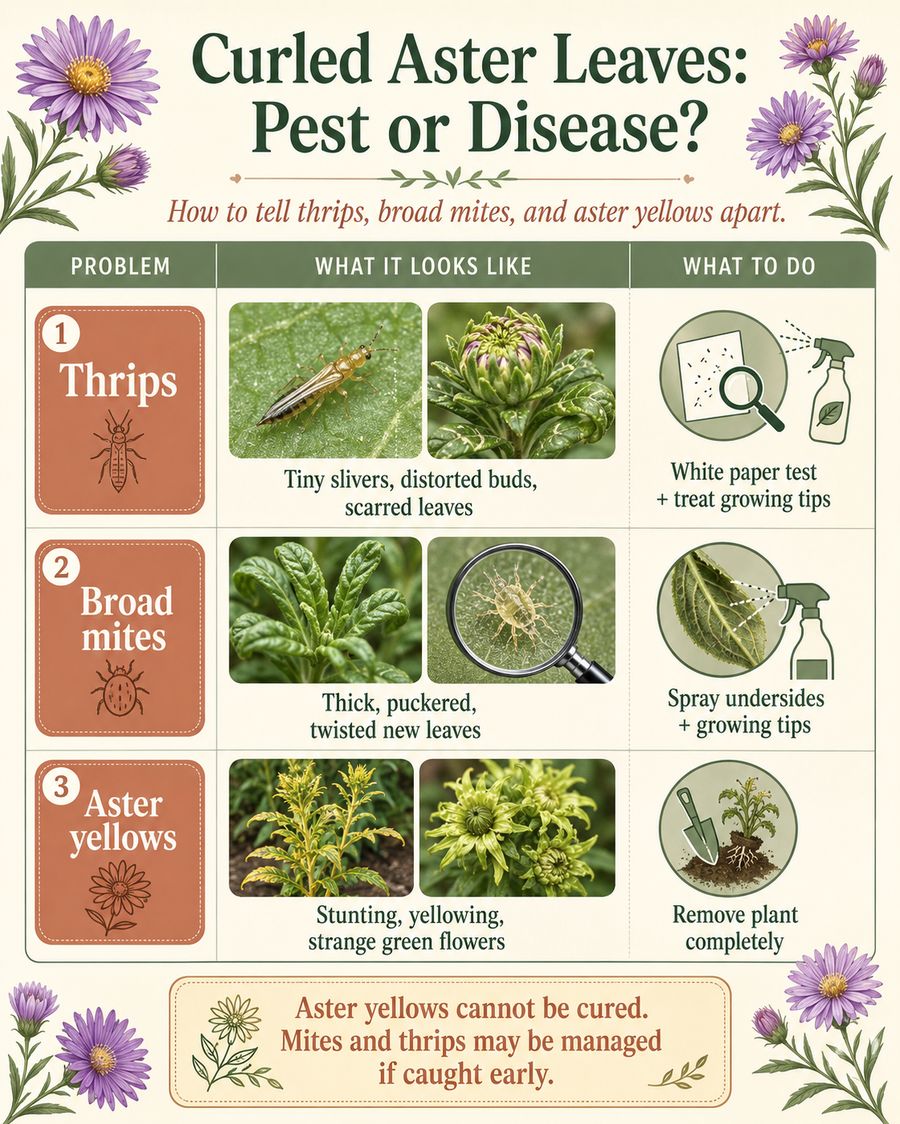
The three most-confused causes side by side. Match the symptom column to your plant before you treat anything.
1. Thrips
Thrips are tiny, slender insects that feed on tender new growth, flower buds, and leaves. They are hard to see because they hide inside curled leaves and buds. Thrips peak in Zone 7b from May through July, exactly when most cut flowers are flushing tender growth.
Signs of thrips
Distorted new leaves
Silvery or scarred patches on leaves
Buds that fail to open properly
Tiny black specks of waste on petals
Tiny tan, brown, or black sliver-shaped insects
How to check for thrips
Use the white paper test (see the next section). If tiny sliver-shaped insects fall onto the paper when you tap the stem or bud, thrips are likely involved.
What to do
Remove the worst distorted growth with bypass pruners. Then spray in the evening, focusing on growing tips and undersides of leaves. Neem-based sprays can help suppress thrips, but heavy infestations call for a spinosad product like Captain Jack’s Deadbug Brew. Spinosad is the most effective thrip-specific home garden option and the active ingredient most extension services recommend.
2. The white paper test
The white paper test is the single most useful diagnostic tool for confirming thrips and mites in a home garden. It costs nothing, takes 60 seconds, and tells you exactly what you are dealing with before you spend money on the wrong spray.
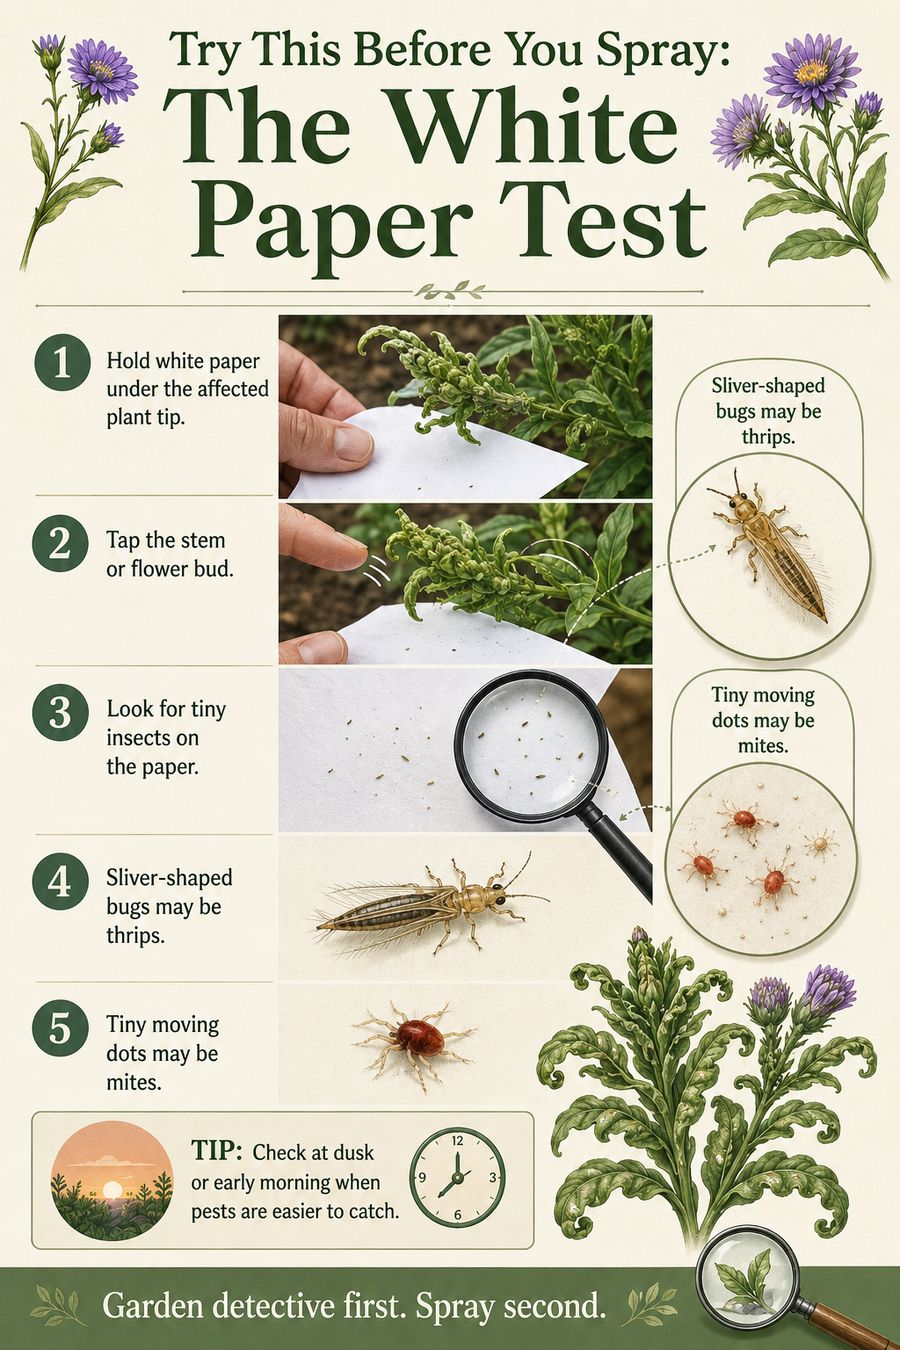
Steps 1 through 5 of the white paper test. Garden detective first. Spray second.
If you suspect mites specifically, pair the paper test with a 30x LED jeweler’s loupe. Broad mites are too small to see clearly without magnification. The loupe is $10 and pays for itself the first time it tells you broad mites instead of thrips (different sprays).
3. Broad mites or cyclamen mites
Broad mites and cyclamen mites are microscopic pests that feed on tender plant tissue. They are so small most gardeners never see them with the naked eye.
Signs of mite damage
New leaves look thickened or puckered
Growth tips look twisted
Leaves curl inward
Buds may be distorted
The plant looks stunted at the top
This can look very similar to disease or herbicide damage, which is why it can be frustrating to diagnose.
What to do
Bonide All-Seasons horticultural oil or a neem-based miticide can suppress mites. Spray thoroughly, especially into growing tips and undersides of leaves with a 2-gallon pump sprayer so you can get coverage on every surface. Plan on 2 to 3 applications 5 to 7 days apart; one spray rarely solves the entire problem.
For aphid-only pressure (large clusters of soft-bodied insects on stems), Garden Safe insecticidal soap is the simpler answer. Soap is contact-only, so coverage matters more than chemistry.
4. Aster yellows
Aster yellows is a disease spread by the aster leafhopper. It affects many plants in the aster family, including asters, zinnias, coneflowers, cosmos, daisies, marigolds, and chrysanthemums. In Zone 7b, aster yellows is endemic and shows up most often from June through September.
Signs of aster yellows
Stunted growth
Yellowing
Distorted leaves
Strange, deformed flowers
Excessive branching (witches’ broom)
Green or abnormal flower parts (called virescence)
Unlike pest damage, aster yellows is systemic. The whole plant is infected and there is no cure. According to the Clemson HGIC aster fact sheet, removal is the only response.
What to do
If a plant clearly has aster yellows, remove it completely and bag it for trash. Do not compost it; the phytoplasma can persist in plant tissue. However, if your plant only has dark green, puckered, curled new growth and no strange flowers or yellowing, mites or thrips are more likely than aster yellows.
5. Herbicide drift
Herbicide drift can also cause curled, twisted, or distorted growth, especially from lawn weed killers like 2,4-D or brush killers sprayed nearby.
Signs of herbicide injury
Multiple unrelated plant species are affected
Damage appears suddenly
New growth is twisted or strappy
Plants near the edge of the bed are worse
A neighbor, lawn company, or roadside crew recently sprayed
If no herbicide has been used nearby, this becomes less likely, but it is worth ruling out before you start treating for pests.
6. Recent fertilizer can make pests worse
In my own garden, the curling showed up shortly after fertilizing. That is an important clue. Fertilizer triggers a flush of soft, tender growth. Thrips, aphids, and mites love that kind of growth. The fertilizer may not be the direct cause, but it makes the plants more appealing to pests.
What to do
Pause fertilizing for 3 to 4 weeks while you diagnose and treat the issue. Too much nitrogen leads to leafy, soft growth instead of strong, resilient plants. For more on the fertilizer-pest connection, read the beginner pest and disease guide.
Why are my aster leaves curling? My troubleshooting plan
If your asters are curling and you are not sure why, here is the simple plan I would follow:
Remove the worst curled or dead tips.
Inspect the growing tips and undersides of leaves with a jeweler’s loupe.
Use the white paper test to check for thrips.
Stop fertilizing for 3 to 4 weeks.
Spray in the evening with a product labeled for mites and soft-bodied insects.
Repeat in 5 to 7 days if needed.
Watch the new growth over the next 7 to 14 days.
The old curled leaves will not uncurl. The goal is for new leaves to emerge normal.
Why are my aster leaves curling so badly I should remove the plant?
Remove the entire plant if any of these are true:
It is severely stunted
The flowers are deformed
The plant has strange green flower parts (virescence = aster yellows)
The problem continues after treatment
Only one or two plants are affected and you want to protect the rest of the bed
Sometimes pulling one sick plant saves the rest of the garden.
Key takeaways
Curled new growth points to pests (thrips, mites, aphids) more often than disease.
White paper test + jeweler’s loupe = the cheapest diagnostic toolkit in gardening.
Spinosad (Captain Jack’s Deadbug Brew) for thrips. Horticultural oil for mites.
Aster yellows = strange green flowers + stunting. Remove the plant. No cure.
Herbicide drift damages many unrelated plants at once. Mites and thrips target tender new growth only.
Pause fertilizer for 3 to 4 weeks while treating any curl problem.
Watch the next flush of growth. New leaves tell the truth.
Frequently asked questions
What is the fastest way to diagnose curled aster leaves?
The white paper test. Hold a sheet of white paper under the affected plant tip and tap the stem sharply. Tiny sliver-shaped insects falling onto the paper indicate thrips. Tiny moving dots indicate mites. No insects on the paper plus strange green flowers indicates aster yellows.
Can asters recover from leaf curl?
If the cause is thrips, mites, aphids, or fertilizer flush, yes. The old curled leaves will not uncurl, but the next flush of new growth should emerge normal once the cause is addressed. If the cause is aster yellows, no. Aster yellows is systemic and incurable; the plant must be removed.
What is the best spray for thrips on asters?
Spinosad-based products like Captain Jack’s Deadbug Brew are the most effective home garden thrips treatment. Spray in the evening, focusing on growing tips and undersides of leaves. Two to three applications 5 to 7 days apart usually clear an active infestation.
How do I know if it is aster yellows or just pest damage?
Aster yellows produces strange green flower parts (virescence), excessive branching (witches’ broom), and overall plant stunting in addition to leaf curl. Pest damage usually affects only new growth without flower distortion or whole-plant stunting. When in doubt, look at the flowers.
Should I pull asters with curl damage?
Only if you confirm aster yellows or if the plant continues to decline after treatment. For pest-caused curl that responds to treatment, leave the plant in place and wait for new growth.
How long until new aster leaves grow back normal?
7 to 14 days for visible new growth, longer for that new growth to mature into full leaves. Continue spraying weekly for 2 to 3 weeks after treatment to prevent reinfection. If the next flush still curls, escalate to a stronger product or remove the plant.
About Anna Katherine
I am Anna Katherine Page. I share garden, home, beauty, and resale tips from my home in Seneca, South Carolina (USDA Zone 7b). Follow along on TikTok and YouTube.
This post contains affiliate links. If you buy through them I may earn a small commission, at no extra cost to you. I only recommend products I actually use.
Quick answer: The most common cut flower garden pests in Zone 7b are chewing insects (flea beetles, Japanese beetles, caterpillars, slugs), fungal leaf spot on zinnias, and sap-sucking pests (thrips, broad mites, aphids) that cause curled new growth. Start with observation, remove damaged foliage, water at soil level, mulch to prevent soil splash, and only treat when you have confirmed the cause.
If you are new to growing cut flowers, there is a moment every gardener has: you walk outside excited to check on your flowers and suddenly notice holes in the leaves, brown spots, curled tips, or shriveling growth. It can feel like the whole garden is failing.
The good news? Most early summer cut flower garden problems are manageable, especially if you catch them early. In my own backyard cut flower garden in Upstate South Carolina (USDA Zone 7b), I started noticing a mix of leaf chewing, brown spotting, and curled new growth on zinnias, amaranth, and asters around late spring. Here is how to start identifying what is happening and what to do next.
Cut flower garden pests: Zone 7b timeline
Zone 7b in Upstate South Carolina has a long, humid growing season that creates ideal conditions for the full pest rotation. Here is what to expect month by month:
April to May: Aphids appear on tender new growth. Flea beetles arrive as soils warm.
May to July: Peak thrips and broad mite pressure. Japanese beetles emerge mid-June and feed for 4 to 6 weeks.
June to August: Fungal leaf spot peaks on zinnias as humidity rises. Slug pressure rebounds after rain.
August to October: Powdery mildew on zinnias and asters. Aster leafhoppers spread aster yellows.
Knowing the timeline lets you scout for the right problem at the right time instead of guessing.
1. Holes in leaves: usually insect feeding
If you see small to medium holes in leaves on plants that otherwise look healthy, it is usually insect chewing damage. The common culprits in Zone 7b are:
Flea beetles (small round shotgun holes)
Caterpillars (irregular larger holes, often near leaf edges)
Japanese beetles (lacy skeletonized damage on zinnias and roses)
Grasshoppers (jagged larger holes)
Earwigs (overnight damage, especially in mulch)
Slugs and snails (slimy trails, ragged holes near the soil)
In my garden, the amaranth had leaf holes but the plant itself looked strong, green, and was actively blooming. That kind of damage is usually more cosmetic than catastrophic.
What to do
Start by inspecting plants in the evening or early morning. Some pests feed at night and hide during the day.
Handpick beetles and caterpillars directly off the plant in early morning when they are sluggish. Drop them in soapy water.
For caterpillar pressure,Bonide Thuricide (Bt) is the clean, target-specific solution. Bacillus thuringiensis only affects caterpillars and is safe for bees, birds, and beneficial insects.
For slugs, sprinkle Sluggo iron phosphate bait around the base of plants. It is pet-safe and breaks down into iron and phosphate (a soil amendment).
For Japanese beetles, install a Japanese beetle trap at least 30 feet from your cut flower beds (traps attract more than they catch when placed too close).
Hang yellow sticky traps near beds to monitor population pressure of small flying pests.
Avoid over-fertilizing, which encourages soft, pest-attracting growth.
For light chewing damage, do not panic or immediately spray everything. A few holes does not mean the plant is ruined.
2. Brown or black spots on zinnia leaves: likely fungal leaf spot
Zinnias are one of the most rewarding cut flowers to grow, but in the hot, humid Upstate they are also extremely prone to leaf spot. By early July in Zone 7b, expect to see brown, black, or purplish spots on lower leaves, especially after rain or overhead watering.
Common Zone 7b zinnia leaf issues include:
Alternaria leaf spot (dark brown spots with concentric rings)
Cercospora leaf spot (small dark spots with purple halos)
Bacterial leaf spot (water-soaked spots that turn dark)
Powdery mildew (white powdery coating, usually late summer)
Pattern matters. The three most common visual problems and how to tell them apart.
What to do
The best first step is sanitation. Remove leaves that are heavily spotted, yellowing, touching the soil, or more than 25 percent damaged. Do not compost diseased foliage; home compost piles rarely hit the temperatures needed to kill fungal spores. Bag and trash.
Then add mulch around the plants. Mulch is your biggest disease-prevention tool. It blocks fungal spores from splashing up from the soil onto lower leaves during rain. Good options for Zone 7b include:
Also, avoid overhead watering. Water at the base of plants using a soaker hose, drip irrigation, or a gentle stream at soil level. According to the Clemson HGIC zinnia disease fact sheet, drip-style watering reduces leaf-wetness duration, which is the primary driver of fungal pressure in our humidity.
3. Curling, twisted, or shriveled new leaves: sap-sucking pests
Curled new growth is different from basic insect holes. If the newest leaves are twisted, puckered, thickened, or dying back, the issue is happening at the growing tip of the plant. Possible causes include:
Thrips
Broad mites
Aphids
Cyclamen mites
Herbicide drift
Aster yellows disease
In my case, I had not sprayed herbicide and the plants were seed-started that year. The damage appeared shortly after fertilizing, which made pests like thrips and mites more likely than a systemic disease.
What to do
Inspect the curled growth closely. A simple test: hold a sheet of white paper under the affected plant tip, tap the stem or flower bud sharply, and look for tiny insects falling onto the paper. Thrips look like tiny tan, brown, or black slivers. Mites look like tiny moving dots and are hard to see without magnification.
Fertilizer is not bad, but too much nitrogen creates soft, lush growth that pests love. If you notice distorted growth about a week after fertilizing, pests may have moved in to feed on that tender new growth. The fertilizer did not cause the problem directly — it made the plants more attractive to insects and mites.
What to do
Pause fertilizing for 3 to 4 weeks while you treat the issue. Let the plants harden off a bit and focus on consistent watering, better airflow, removing damaged foliage, and monitoring new growth.
The best way to manage cut flower garden pests and disease is to make the garden less inviting in the first place.
Print this and tape it inside a garden shed. Eight checks every week and most problems never escalate.
Water at the soil level. Wet leaves invite fungal disease. Use drip irrigation or a soaker hose.
Mulch your beds. Mulch reduces soil splash, retains moisture, and keeps lower leaves cleaner.
Space plants properly. It is tempting to cram in as many flowers as possible, but crowded plants trap humidity. Zinnias, asters, cosmos, and dahlias all benefit from better airflow.
Remove damaged leaves quickly. Walk the garden every few days and clip off problem foliage before it spreads.
Avoid over-fertilizing. More fertilizer does not mean more flowers. Too much nitrogen leads to lush leaves and more pest pressure.
Watch the new growth. Old damaged leaves will not repair themselves. The real test is whether the next leaves emerge healthy.
Key takeaways
Holes usually point to chewing insects (handpick, Bt for caterpillars, Sluggo for slugs).
Brown spots on zinnias usually point to fungal leaf spot (sanitation + mulch + soaker hose).
Twisted new growth usually points to thrips, mites, herbicide drift, or aster yellows.
Pest problems after fertilizing usually mean pests are feeding on soft new growth.
Zone 7b pest pressure peaks May through August. Scout weekly during these months.
Treat only after you have identified the cause. Mulch, airflow, and soil-level watering prevent more problems than spraying ever cures.
Frequently asked questions
What are the most common cut flower garden pests in Zone 7b?
The most common Zone 7b cut flower garden pests are flea beetles, Japanese beetles, caterpillars, slugs, thrips, broad mites, and aphids. Fungal leaf spot on zinnias and aster yellows on asters are the dominant diseases. Pest pressure peaks May through August.
How do I know if my zinnia leaves have fungal leaf spot?
Fungal leaf spot on zinnias shows up as brown, black, or purplish spots on the lower leaves, often with yellow halos or concentric rings. It usually starts in mid summer in humid climates like Upstate South Carolina. Remove affected leaves, add mulch to block soil splash, and switch to soaker-hose watering.
What is the safest way to treat caterpillars on cut flowers?
Bacillus thuringiensis (Bt) products like Bonide Thuricide are the cleanest caterpillar solution. Bt only affects caterpillars and is safe for bees, beneficial insects, birds, pets, and people. Spray every 7 to 10 days while caterpillars are actively feeding.
Are Japanese beetle traps a good idea near my cut flowers?
Japanese beetle traps work, but only if placed at least 30 feet away from the flower bed you want to protect. The pheromone lure attracts more beetles than the trap catches, so a trap placed inside the bed makes the problem worse. Place traps at the property edge, downwind of beds.
How often should I scout my cut flower garden?
Every 3 to 5 days during peak Zone 7b pest season (May to August). A quick weekly walk with the checklist above catches most problems before they spread. Bring bypass pruners and a small bucket so you can remove damaged foliage and handpick visible pests on the same walk.
Will fertilizer fix my pest problem?
No, and it usually makes pest problems worse. Excess nitrogen creates soft, tender new growth that thrips, aphids, and mites prefer. Pause fertilizing for 3 to 4 weeks while you treat the issue and let the plant harden off.
About Anna Katherine
I am Anna Katherine Page. I share garden, home, beauty, and resale tips from my home in Seneca, South Carolina (USDA Zone 7b). I grow a backyard cut flower garden every year and document the wins and the pest battles on TikTok and YouTube.
This post contains affiliate links. If you buy through them I may earn a small commission, at no extra cost to you. I only recommend products I actually use.
Quick answer: Here is how to remove stains from vintage furniture: mix equal parts warm water, white vinegar, all-purpose cleaner, and a small amount of dish soap in a spray bottle. Spray the stained area, let it soak for 10 to 15 minutes, then gently agitate with a plastic bristle brush. Wipe with a microfiber towel. For deep cracks and crevices, use a toothbrush dedicated to cleaning (not the one in your bathroom).
Most thrifted and vintage furniture has stains. Water rings on tables, ink on dresser tops, food on chair seats, mildew at the base of legs from a damp garage. These are not deal-breakers. They are the reason you can buy a $400 piece for $40. The trick is knowing how to read each stain and which solution to use without damaging the original finish.
This is the exact cleaning solution and process I use on every vintage piece I bring home. It works on most wood finishes, painted furniture, and upholstery. The handful of cases where you should not use this method are at the end of the post.
The all-purpose cleaning solution I use
One mixture handles 90 percent of vintage furniture stains. Mix these four ingredients in a clean spray bottle and shake to combine:
Dawn dish soap — a small squeeze (about 1 teaspoon)
This combination lifts most surface stains, neutralizes odors, and is gentle enough not to strip vintage wood finishes when applied lightly and wiped quickly.
The tools you actually need
Three tools handle almost every stain scenario. Skip the specialty cleaners and brushes until you find a stain that needs them.
A multi-pack of cleaning toothbrushes — for crevices, carving, hardware, and corners. Do not reuse a toothbrush from your bathroom. The cleaners we use are not safe to put back in your mouth.
Microfiber cleaning cloths — for wiping away the lifted stain. Cotton rags work but microfiber holds more.
How to remove stains from vintage furniture: step-by-step
Step 1 — Identify the surface
Before you spray anything, identify what you are working with. Raw wood, sealed wood (varnish or polyurethane), painted wood, veneer, laminate, leather, and fabric all respond differently. The all-purpose mixture is safe on sealed wood, painted wood, laminate, and most upholstery. For raw wood or oil-finished wood, dilute it further and test in a hidden spot first.
Step 2 — Spray the stained area thoroughly
Hold the spray bottle 6 to 8 inches from the surface and apply enough solution to coat the stain. You want it wet but not pooling. On vertical surfaces like chair legs, apply less and re-spray as needed.
Step 3 — Let the solution soak for 10 to 15 minutes
This is the most-skipped step and the one that makes the biggest difference. The dwell time is what gives the cleaning agents time to penetrate and lift the stain. Set a timer. Walk away. Come back.
Step 4 — Agitate gently with a plastic brush
When I say agitate, I do not mean scrub aggressively. I mean small circular motions with light pressure. The goal is to lift the stain to the surface, not grind it deeper. On vintage finishes, aggressive scrubbing strips the finish faster than the stain comes out.
Step 5 — Use a toothbrush for cracks and crevices
For carved details, joinery, around hardware, and along the seams of upholstered furniture, a toothbrush is the right tool. The smaller bristles reach where a regular brush cannot, and the toothbrush angle gives you finer control.
Step 6 — Wipe with a microfiber towel
Lift the dirty solution off the surface with a clean microfiber cloth. Use a dabbing motion first to absorb, then a wiping motion to clear. Replace the cloth as it gets dirty. Leaving the dissolved stain on the surface lets it set back in as it dries.
Step 7 — Repeat if needed
Most stains lift in one pass. Old ink, deep water rings, and 20-year-old grease may need two or three rounds. Repeat the spray, soak, agitate, wipe cycle. If the third pass produces no further lifting, the stain has set into the material and likely needs spot refinishing instead.
Stain-by-stain quick reference
Water rings on wood
Spray the all-purpose mixture lightly. Let soak 10 minutes. Agitate with a toothbrush. Wipe. If the ring persists, try a paste of equal parts baking soda and white toothpaste applied with a microfiber cloth in circular motions for 60 seconds.
Ink stains on wood or laminate
Spray, soak 15 minutes, agitate with a toothbrush. For stubborn ink, dab a small amount of rubbing alcohol on a cotton swab and roll it over the stain (do not scrub). Wipe immediately.
Food and grease stains
The all-purpose mixture handles these well. The dish soap and Simple Green cut grease while the vinegar neutralizes odor. Two passes usually clears them.
Mildew or musty smell on wood
Spray, soak 15 minutes, agitate, wipe. Then leave the piece in direct sunlight for 2 to 4 hours. UV light kills surface mildew the cleaner cannot reach. Repeat once if the smell returns.
Sticker and adhesive residue
Spray the residue, let soak 15 minutes, then peel with a plastic scraper or fingernail (not metal, which gouges finish). For stubborn residue, follow with a small amount of olive oil on a microfiber cloth, then re-clean with the all-purpose mixture to remove the oil.
Pet urine on upholstered seats
Skip the all-purpose mixture for this one. Use an enzyme-based pet odor eliminator instead. Enzymes break down the proteins in urine that vinegar cannot reach.
What to do after the stain is out
Once the stain is lifted and the surface is dry, finish the restoration with one of two products depending on the wood’s condition.
For surface scratches and dull finish
Apply Howard Restor-A-Finish in the matching wood tone with a soft cloth. It restores the existing finish without stripping or sanding. This is the closest thing to a magic restoration product I have ever used.
For dry, thirsty wood
Follow with a wood feed wax like Howard Feed-N-Wax. Apply with a soft cloth, let soak 20 minutes, buff with a clean cloth. Brings the wood back to a deep, healthy luster.
When to skip this method
True antique pieces. Anything pre-1900 or museum-quality should be evaluated by a professional restorer before cleaning.
Original milk paint or shellac finishes. Water-based cleaners damage these. Use a soft dry brush only.
Veneer that is lifting or bubbling. Liquid cleaners worsen lift. Re-glue first, clean second.
Painted pieces with chalking or crazing. Test in a hidden spot. Old chalk paint can soften.
Key takeaways
One mixture handles most vintage furniture stains: warm water + vinegar + Simple Green + dish soap.
Dwell time is the secret. Let the solution sit 10 to 15 minutes before agitating.
A toothbrush is the best tool for crevices, hardware, and joinery.
Wipe with microfiber, not paper towels, to fully remove dissolved stain.
Refinish dull wood with Howard Restor-A-Finish or Feed-N-Wax after cleaning.
Skip this method on true antiques, milk paint, lifting veneer, or chalking paint.
Frequently asked questions
What is the best way to remove stains from vintage furniture?
A mix of warm water, white vinegar, all-purpose cleaner, and a small amount of dish soap handles most stains. Spray, let soak 10 to 15 minutes, agitate gently with a plastic brush, then wipe with a microfiber cloth. Repeat for stubborn stains.
How do I remove water rings from vintage wood?
Light water rings often lift with the all-purpose cleaning mixture after a 10-minute soak and gentle agitation. For deep rings, a paste of baking soda and white toothpaste applied in small circles for 60 seconds is the next step. Wipe and condition with Howard Feed-N-Wax to restore the finish.
Can you use vinegar on vintage wood furniture?
Yes, when diluted. Pure vinegar can damage some finishes. A 1:1 mix of vinegar and water with a small amount of dish soap is safe on sealed wood, painted wood, and laminate. Test in a hidden spot first on oil or wax finishes.
What is the best brush for cleaning vintage furniture?
A medium-stiffness plastic bristle brush for flat surfaces, plus a multi-pack of cleaning toothbrushes for crevices, carving, and hardware. Avoid wire brushes, which scratch most finishes.
How long should you let cleaner sit on vintage furniture stains?
10 to 15 minutes is the sweet spot. Long enough to penetrate and lift the stain, short enough that the solution does not dry on the surface. Set a timer and walk away.
Should you sand a stained vintage piece?
Not first. Always try cleaning before sanding. Sanding removes the original finish and patina that gives vintage pieces their character. Most stains lift with the right cleaning method without losing the finish.
How do you restore wood finish after removing stains?
Apply Howard Restor-A-Finish in a matching wood tone for surface scratches and dull finish, or Howard Feed-N-Wax for dry, thirsty wood. Both restore without stripping or sanding.
Final notes on how to remove stains from vintage furniture
Most people overcomplicate how to remove stains from vintage furniture. One safe cleaning solution, three basic tools, and the right dwell time handles 90 percent of stains without damaging finish. If you remember nothing else about how to remove stains from vintage furniture, remember this: dwell time and gentle agitation beat aggressive scrubbing every single time.
About Anna Katherine
I am Anna Katherine Page. I share furniture restoration, resale, and home care tips from Seneca, South Carolina. I rehab thrifted and vintage furniture as a side hustle and have brought hundreds of pieces back from stained, scratched, and dusty to ready-to-list. Follow along on TikTok and YouTube for more restoration content.
Last updated October 25, 2026 by Anna Katherine Page
Quick answer: Here is how to sell on The RealReal: source authentic luxury designer items at thrift stores, secondhand shops, or yard sales by checking serial numbers and country of origin, clean them lightly at home, then ship them to The RealReal with a free prepaid label. They handle photography, listing, pricing, and the sale. The RealReal’s commission is a sliding scale based on each item’s sale price and category, so lower-priced pieces keep a smaller share. New seller bonus: first-time consignors currently get $150 in site credit when they sign up through this RealReal referral link and consign an item listed at $200 or more.
The hardest part of reselling is not finding items. It is the photography, measuring, listing, shipping, and customer service that turns one good find into 6 hours of work. The RealReal is the platform that removes all of it. You source, you ship, they sell. This is the workflow I use to source luxury designer items at my local thrift store and turn them into checks from The RealReal without ever taking a product photo.
This is the long version of that workflow: how I identify authentic designer pieces in the wild, the brands worth grabbing, the brands to leave on the shelf, the exact cleaning supplies I use, and the step-by-step process to ship items to The RealReal.
Why sell on The RealReal instead of reselling yourself
If you have ever sold luxury items on eBay, Poshmark, or Mercari, you already know the problem. The work that goes into a single listing (photos, measurements, description, packaging, shipping, returns, customer service) can take 45 minutes per item. Multiply that by 30 items and you have a part-time job you do not want.
The RealReal takes all of it. You ship the items in. Their team photographs, lists, prices, and ships every piece. They also authenticate, which is the part that matters most for high-value designer items. You collect commission on every sale.
The tradeoff is commission. You earn less per item than you would selling direct. But your time investment is so much lower that the overall return on hours worked is dramatically higher for most resellers.
How to spot authentic luxury designer items at the thrift store
This is the skill that separates a profitable luxury reseller from someone who keeps getting fooled by replicas. There are four things I check on every potential find.
1. Serial numbers
Most luxury designer brands print or stamp a serial number on the item. On the pair of Gucci kitten heels I found, the serial number was inlaid on the inside of the heel: 112500, followed by the size. On handbags, look inside on the interior pocket lining or stitched into a leather tab. No serial number on a brand that is supposed to have one is a red flag.
2. Country of origin
99 percent of the time, an authentic luxury item is marked with the country it was manufactured in. You are looking for Italy, Spain, France, or other established luxury manufacturing regions. Not China. If the country of origin is missing or vague, walk away.
3. Leather soles (on shoes)
Flip the shoe over. Almost 100 percent of authentic luxury designer shoes have a leather sole. Gucci, Salvatore Ferragamo, Stuart Weitzman, and others use leather construction throughout. A rubber or synthetic sole on a brand that is supposed to use leather is the easiest way to spot a fake.
4. Hardware quality
Hardware on a real designer item feels weighted, polished, and substantial. Hardware on a replica feels light, plasticky, or unevenly finished. Look at zippers, buckles, logo plates, and chain links specifically.
Where to source: stop only shopping rich neighborhoods
The biggest misconception about luxury thrifting is that you have to shop in wealthy areas. Donations get redistributed between thrift stores constantly, often across state lines. I have personally found a Fendi bag at the most sketchy Goodwill in town, and a friend of mine gets donations at her South Carolina shop from California and New York.
The rule is consistency, not geography. You will not find something every trip. But if you keep your eyes scanning brand labels every time you walk into a thrift store, the finds will come. One donation cycle from someone clearing out a closet can produce 4 to 6 designer pieces in a single trip, which is exactly what happened when I sourced the Gucci, Ferragamo, and Stuart Weitzman pieces I shipped to The RealReal.
Brands The RealReal accepts vs declines
Not every designer name is on The RealReal’s accepted list. Before you commit to buying a piece for resale, do a quick check.
Brands they accept (partial list)
Gucci, Salvatore Ferragamo, Stuart Weitzman, Prada, Dior, Louis Vuitton, Chanel, Hermes, Fendi, Bottega Veneta, Saint Laurent, Burberry, Balenciaga, Givenchy, Tom Ford, Manolo Blahnik, Jimmy Choo, Christian Louboutin, Valentino, Celine, Loewe, and most other established luxury houses.
Brands they decline (partial list)
Cynthia Rowley, Liz Claiborne, Banana Republic, J.Crew, Tory Burch (some items only), Coach (most items), Michael Kors, Kate Spade, and most mid-tier contemporary brands.
When in doubt, search the brand on The RealReal’s website before you buy. If they currently list items from that brand, you are safe.
What to use to prep items before shipping
The RealReal does not require you to clean items, but lightly polished pieces photograph better and tend to sell faster. These are the tools I use. Most are inexpensive and last for dozens of sessions.
This is the order I work in for shoes. The same general process applies to handbags, with a softer touch on stitching and lining.
Step 1: Brush out dust and crevices
Spray a toothbrush lightly with a mix of warm water, cleaning vinegar, and a small amount of all-purpose cleaner. Brush along seams, hardware, and any bejeweled or detailed areas. This lifts dust without saturating the material.
Step 2: Spot-treat scuffs and marks
For surface scuffs on leather, use a magic eraser sponge sprayed lightly with the same vinegar mix. Press, do not scrub. Most scuffs lift with light pressure. If a scuff is a true indent or scratch, it will not come out and should be disclosed in your packing list.
Step 3: Clean the soles
Wipe leather soles with a microfiber cloth and a small amount of vinegar mix. This removes residue and sticker glue. Adhesive residue is one of the most common problems on thrifted designer shoes (price tags from estate sales).
Step 4: Condition all leather surfaces
Apply leather conditioner with a clean microfiber cloth. Work in small circles. Cover the uppers, the inside, and the soles. Leather darkens slightly with conditioner, which is normal and resets within an hour as the product absorbs.
Step 5: Brush suede gently
For suede pieces, skip water entirely. Use a clean, dry bristled brush to lift the nap. For stains on suede, lightly mist with the vinegar and all-purpose cleaner solution, brush, then let air dry.
Step 6: Let dry right side up
Stand shoes upright to dry overnight. Conditioner takes 6 to 12 hours to fully absorb. Do not pack damp pieces for shipment.
How to ship to The RealReal: step-by-step
Step 1: Create an account
Sign up for a consignor account through this referral link so the new seller bonus applies: as of October 2026, first-time consignors get $150 in site credit once they consign an item listed at $200 or more. Sign up before shipping anything, since the credit only applies to accounts created through the link.
Step 2: Add items to a packing list
Each item needs three fields: category (shoes, bags, clothing), brand, and item type. Add items one at a time. If a brand you have is not in the dropdown, they likely do not accept it.
Step 3: Print the packing list and prepaid label
The RealReal generates both for you. Shipping is free. Reuse any Amazon or shipping box you have on hand.
Step 4: Pack with paper, not bubble wrap
Brown kraft paper wrapped loosely around each item is plenty. Bubble wrap is overkill for shoes and small bags.
Step 5: Schedule pickup with a UPS specialist
Within an hour of finishing your packing list, a RealReal luxury specialist will call or text you to coordinate UPS pickup directly from your house. You do not have to drive anywhere.
Step 6: Wait for the listing and the sale
Items typically appear on The RealReal within 7 to 14 days of arrival. When something sells, commission is paid out monthly.
The RealReal commission structure
The RealReal’s commission is a sliding scale based on each item’s sale price and category, so lower-priced pieces keep a smaller share. The full table is in The RealReal commission rates by sale price.
Fine jewelry, watches, and handbags often pay higher commission rates than shoes or apparel. Always check the current rate card on The RealReal’s consignor page before assuming.
Tips for new RealReal sellers
Start small. Ship 3 to 5 items in your first batch to learn the workflow.
Keep receipts from the thrift store. Useful for tracking margin.
Photograph each item before shipping. Helps if there is any dispute later.
Disclose all flaws in your packing list. They authenticate and inspect every piece. Surprises slow payment.
Lean on the luxury specialist. Each new consignor gets a coordinator who answers questions fast. Use them.
The RealReal handles photography, listing, pricing, and shipping. You source and ship.
Authenticate by serial number, country of origin, leather soles, and hardware quality.
Donations move between thrift stores nationally. You do not need a wealthy zip code.
Clean lightly with castile soap, vinegar, and leather conditioner. Skip aggressive cleaning.
Commission is a sliding scale based on each item’s sale price and category, so lower-priced pieces keep a smaller share.
First-time consignors get a dedicated luxury specialist. Use them.
Frequently asked questions
Is there a sign-up bonus for selling on The RealReal?
Yes. As of October 2026, first-time consignors get $150 in site credit when they sign up through a referral link like this one and consign an item listed at $200 or more. Check the sign-up page for the current amount, since The RealReal changes this offer from time to time.
How do I know if a designer item at a thrift store is real?
Check four things: serial number, country of origin, sole material (leather for shoes), and hardware quality. Real luxury items are marked with the country of manufacture (typically Italy, Spain, or France), have serial numbers stamped or printed inside, and feature weighted, polished hardware.
What brands does The RealReal accept?
Most established luxury houses: Gucci, Prada, Chanel, Hermes, Louis Vuitton, Dior, Saint Laurent, Bottega Veneta, Ferragamo, Stuart Weitzman, Jimmy Choo, Manolo Blahnik, Christian Louboutin, and others. They decline most mid-tier brands like Michael Kors, Kate Spade, and Coach. Always check the current brand list before sourcing.
How much commission does The RealReal pay?
The RealReal’s commission is a sliding scale based on each item’s sale price and category, so lower-priced pieces keep a smaller share. Fine jewelry, watches, and handbags pay higher rates than shoes or apparel. See The RealReal commission rates by sale price.
Do I have to clean items before sending them to The RealReal?
No, but lightly cleaned items photograph better and sell faster. Brush off dust, condition leather, and spot-treat any obvious marks. Skip aggressive cleaning that could damage materials.
How long does it take for items to sell on The RealReal?
Listings typically go live within 7 to 14 days of arrival. Sale time varies by category and current demand, ranging from a few days for in-demand handbags to several months for less popular categories.
Can I sell on The RealReal if I do not live in a major city?
Yes. The RealReal ships from your home anywhere in the United States and provides a free prepaid label. Your location does not affect commission or sales speed.
What is the best way to source luxury designer items at thrift stores?
Consistency over geography. Donations get redistributed between thrift stores constantly. Visit your local stores regularly, scan brand labels in shoe and handbag sections every trip, and check serial numbers and country of origin before buying.
Final notes on how to sell on The RealReal
Once you know how to sell on The RealReal, the workflow takes about 30 minutes per shipment of 5 to 10 pieces. The hardest part is sourcing authentic luxury items at thrift stores, and the easiest part is the actual selling, because The RealReal handles photography, listings, and shipping. If you have been wondering how to sell on The RealReal as a side hustle, the answer is to start small with 3 to 5 pieces in your first batch.
About Anna Katherine
I am Anna Katherine Page. I have been sourcing and reselling vintage and luxury designer items for over five years while also working full-time as a procurement manager in construction and manufacturing. The procurement background trained my eye for authenticity, which I apply to luxury thrift sourcing. Follow along on YouTube for more reselling content.
This post contains affiliate links. If you buy through them I may earn a small commission, at no extra cost to you. I only recommend products I actually use.
Quick answer: Here is how I ran a Facebook Marketplace furniture flip: a $15 yard sale find resold for $150 in 45 minutes. I spotted a vintage Italian-style mid-century modern leather chair, paid cash, did a light leather clean, posted 4 photos with a one-line description, and had it sold and picked up within an hour. 10x return on a $15 sourcing cost.
Last weekend, my boyfriend and I were doing our usual stroll downtown for breakfast. On the way to my parents’ house, we passed a hand-painted yard sale sign. He had been politely suggesting I stop buying furniture to resell (fair, I am working on it), but this was a yard sale we had not seen in eight months and it was right on our route.
The first thing I saw walking in was a quilted cover draped over a chair with a polished aluminum base. I knew before I saw the leather underneath. I whispered the question I always whisper at yard sales: how much for the chair? Fifteen dollars. Sold. Forty-five minutes after I listed it on Facebook Marketplace, it was paid for, picked up, and gone. Here is exactly how I did this Facebook Marketplace furniture flip from start to finish.
How to run a Facebook Marketplace furniture flip in under an hour
This is the workflow I use every time. The whole thing, from photo to sale, can happen in under an hour if the item is priced correctly and listed cleanly.
Step 1 — Source from yard sales, not just thrift stores
Yard sales are underrated for mid-century modern and vintage Italian furniture. Estate-driven yard sales (people clearing out a parent’s house or downsizing) regularly turn up designer pieces priced as junk. Walk the whole sale before you commit to anything, but trust your gut on a recognizable silhouette.
Step 2 — Know the maker categories worth grabbing
For chairs specifically, the categories that flip fast on Facebook Marketplace are:
Italian leather (Natuzzi, De Sede style, Le Corbusier reproductions)
Danish modern teak (Hans Wegner, Arne Jacobsen styles)
Eames-style lounge and shell chairs
Mid-century floor or chaise lounges with metal bases
Bentwood and cane (Thonet, Cesca)
Step 3 — Always look for the base or matching pieces
This is the lesson I learned the hard way on this flip. The chair I bought was originally a chaise that paired with a separate ottoman base. Without it, the resale value capped at $150. With the base, comps showed $800 plus. Always ask the seller if there are any matching pieces in the garage or attic. A 30-second question can multiply your sale price.
Step 4 — Clean lightly with leather conditioner
For most thrifted leather pieces, you do not need to deep clean. A light pass with Weiman leather cleaner and conditioner on a microfiber cloth restores the sheen without changing the color. Cleaning beyond this point eats into your profit margin and is usually unnecessary for buyers shopping vintage on Facebook Marketplace.
Step 5 — Take 4 clean photos
You do not need a studio. You need decent light and 4 honest angles: front, side, back, close-up of any maker tags or unique details. I shoot on a hand-me-down DSLR from my grandfather, but a recent iPhone shot near a window works equally well. Keep the background clean: a blank wall, hardwood floor, no laundry baskets.
Step 6 — Write a one-line description with width and length
Most Facebook Marketplace buyers do not read long descriptions. They want: what it is, width and depth (height matters less for floor chairs), pickup location, and payment method. That is it. Cash or Venmo, located [town] near [landmark], width X by length Y. Done.
Step 7 — Price for speed, not maximum
If you want it gone in an hour, price it about 30 percent below comparable sold listings. I had this chair priced at $150 against comps of $200 to $300 because I wanted it out of my house. Within five minutes I had an offer. Within 30 minutes I had six messages. Within 45 minutes the buyer was here paying cash.
The numbers on this Facebook Marketplace furniture flip
Cost: $15 cash
Cleaning supplies used: 5 minutes of leather conditioner
Photo and listing time: 20 minutes
Transport time: 10 minutes (carried into and out of the house, used furniture moving straps)
Sale price: $150
Time from list to cash: 45 minutes
Profit: $135
Return on investment: 10x
What I would do differently on my next Facebook Marketplace furniture flip
Two things I will change on the next flip like this:
Snap a discreet phone pic at the yard sale to do a comp check. I avoid this because it feels rude in front of the seller, but a quick Google reverse image search would have told me about the missing base.
Ask about matching pieces before paying. “Is there a base or ottoman that goes with this?” is a 5-second question that can multiply the value of the flip.
Key takeaways
Yard sales beat thrift stores for high-value mid-century furniture.
Light leather conditioning is enough for a fast Facebook Marketplace flip.
4 clean photos and a one-line description outperform long listings.
Price 30 percent below comps if you want the sale in under an hour.
Always ask the seller about matching bases or ottomans before paying.
Frequently asked questions
How do you find profitable vintage furniture at yard sales?
Walk the whole sale first to spot recognizable silhouettes. Mid-century modern, Italian leather, Danish teak, and Eames-style chairs flip fastest. Yard sales clearing out an older homeowner’s estate are highest probability for designer pieces priced as junk.
How fast can you sell furniture on Facebook Marketplace?
If priced 30 percent below comparable sold listings with 4 clean photos, popular vintage furniture can sell within 30 to 60 minutes of posting. The fastest sales I have had were under 45 minutes from list to cash in hand.
What is the best way to clean thrifted leather furniture?
For a fast flip, a single pass of leather cleaner and conditioner on a microfiber cloth is enough. Brands like Weiman or Lexol work well. Avoid harsh chemicals or water-based cleaners on vintage leather.
How much should you pay for thrifted furniture to flip?
The general rule for fast flips is buy at 10 to 20 percent of expected resale value. A $15 sourcing cost on a $150 sale price is a 10x return, which is what made this flip worth doing.
Should you take photos of items at yard sales before buying?
Personally, I avoid it in front of the seller. It can come across as disrespectful. If you can snap one discreetly to run a comp check before committing, do it. It saved me from missing the value of a piece that was missing its matching base.
What size DSLR or phone camera do you need for furniture flips?
You do not need expensive gear. A recent iPhone or Android camera shot near a window outperforms an older DSLR in most light conditions. 4 clean photos at decent resolution is the entire requirement.
Final notes on running a Facebook Marketplace furniture flip
The fastest Facebook Marketplace furniture flip I have ever done was 45 minutes from listing to cash. The slowest took 6 weeks. The difference is almost always pricing relative to comps, not the quality of the photos. If you want a Facebook Marketplace furniture flip to move quickly, price below the recently sold listings, write a one-line description, and respond to messages within 5 minutes.
About Anna Katherine
I am Anna Katherine Page. I share resale, furniture restoration, and home care tips from Seneca, South Carolina. I run a side hustle reselling vintage furniture and luxury thrift finds. Follow along on TikTok and YouTube for more flip stories.
Last updated October 8, 2026 by Anna Katherine Page
Quick answer: Here is how to dermaplane at home with the Michael Todd Sonicsmooth Pro+: cleanse, apply a few drops of face oil so the blade glides, pin hair back, then use short downward strokes at a 45 degree angle. Wipe the blade between sections. The whole routine takes 5 to 7 minutes and gives you smoother skin and visibly better makeup application the same day. Repeat once every 3 to 4 weeks.
If your makeup never looks quite as smooth as it does in product photos, the issue is probably not the makeup. It is the peach fuzz, dead skin, and tiny hairs that catch foundation and break up coverage. Dermaplaning solves this in under 10 minutes, and you do not need to book an esthetician to do it.
The routine below is built around the Michael Todd Beauty Sonicsmooth Pro+, a sonic dermaplaning tool made for at-home use. Expect a surprising amount of dead skin and peach fuzz to come off the first time, and smoother makeup the same day.
What is dermaplaning and how to dermaplane at home?
Dermaplaning is a physical exfoliation technique that uses a fine blade held at a shallow angle to lift away dead skin cells and vellus hair (peach fuzz) from the face. The benefits are immediate: smoother texture, better product absorption, and a noticeably smoother makeup application.
Done professionally at an esthetician’s office, it runs $75 to $150 a session. At-home tools like the Sonicsmooth Pro+ use a sonic-vibration blade that does the same job safely at home, as a one-time purchase.
This is the order to follow. Skipping the oil step is the most common at-home mistake and the reason most people nick themselves the first time.
Step 1: Cleanse and dry your face
Start with a clean, dry face. Any makeup, sunscreen, or sweat on the skin will gum up the blade and reduce how well it lifts hair and dead skin.
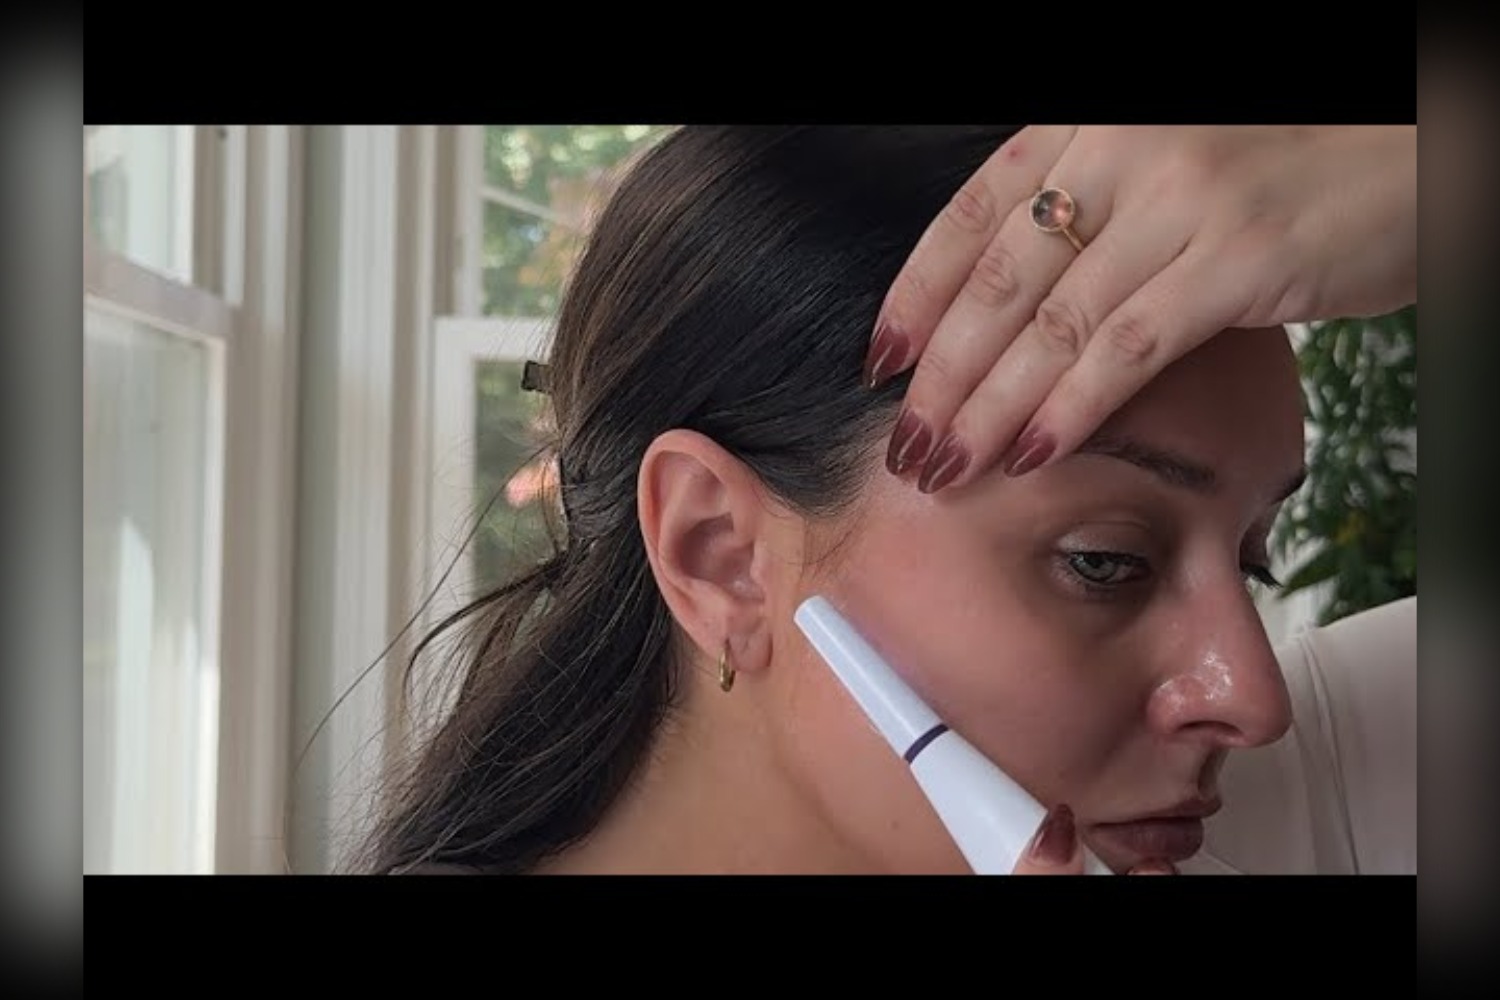
Step 2: Apply a few drops of face oil
Warm 3 to 4 drops of a light facial oil like rosehip or jojoba between your fingertips and press it into your face. The oil helps the blade glide instead of drag, which is what prevents nicks. Cover everywhere you plan to dermaplane: forehead, cheeks, jawline, under the nose, chin, and just below the jaw.
Step 3: Pin your hair back
Pull hair completely off your face with sectioning clips or a headband. Loose strands catch in the blade and can get cut.
Step 4: Load the cartridge and turn on the tool
The Sonicsmooth Pro+ kit comes with 16 single-use blades. Slide a fresh one into the head until it clicks. Press the power button. The sonic vibration makes the blade glide more smoothly and lifts dead skin and peach fuzz more effectively than a flat razor.
Step 5: Work in short strokes at a 45 degree angle
Hold the tool at a 45 degree angle to the skin. Use short, downward strokes (about an inch long). Gently pull the skin taut with your free hand. Work one section at a time:
Sideburns and outer cheeks
Inner cheeks
Jawline and under the chin (the spot most people miss)
Forehead, including between the brows
Upper lip
The bridge and sides of the nose
Carefully under the eyes
Step 6: Wipe the blade between sections
Have a paper towel ready. Every few strokes, wipe the blade clean. The visible buildup is the proof the tool is working. It is also the reason wiping matters: a clogged blade does not lift well.
Step 7: Apply serum and moisturizer
Right after dermaplaning, your skin absorbs product better than usual. This is the window for a hydrating serum and moisturizer. Avoid retinol or strong acids for at least 24 hours. The full routine is in What to Use After Dermaplaning.
What to know about the Sonicsmooth Pro+
The Sonicsmooth Pro+ is not an intimidating tool. The sonic vibration does most of the work, so there is no need to press hard, and pressing is what causes nicks. That is the main difference from the flat dermaplane razors sold in multi-packs.
The kit comes with 16 blades, and you will need more eventually. Michael Todd designs each blade for one-time use, so start every session with a fresh one. The replacement blades come in an eight-pack.
Bottom line: it is a strong pick for at-home dermaplaning, especially for beginners.
Once every 3 to 4 weeks. Doing it more often does not give better results and can irritate the skin barrier. The reason: vellus hair grows back at roughly the same rate as the skin renewal cycle, so once a month is the sweet spot. Adjust for your skin type: oily every three to four weeks, dry every four to six, sensitive every six to eight, and never more than once a week. Keep blade refills on hand.
Also looking at hair removal? Dermaplaning clears peach fuzz for a week or two. For hair that keeps coming back on legs, underarms or the bikini line, at-home IPL is the next step up, and the one to look at is the Nood Flasher Pro, the only at-home IPL device with an energy figure in a public FDA file.
A 45 degree angle, using short strokes. Any steeper and the blade scrapes instead of glides; any flatter and it will not catch the vellus hair. If you are pressing, the angle is wrong.
Does the hair grow back thicker after dermaplaning?
No. This is a common myth. Vellus hair (peach fuzz) grows back at the same fineness and density it had before. Cutting hair does not change the follicle. More myths and side effects are in Dermaplaning Mistakes and Side Effects.
Is dermaplaning at home safe?
Yes, with the right tool and technique. Sonic-vibration dermaplaning tools like the Sonicsmooth Pro+ are designed for at-home use and are significantly safer than flat blade razors. Always apply face oil first and use short strokes at a 45 degree angle.
How long does an at-home dermaplane take?
5 to 7 minutes once you have the routine down. The first time may take 10 to 15 minutes while you learn how the tool feels and where to hold the skin taut.
Does dermaplaning help with makeup application?
Yes, dramatically. With peach fuzz and dead skin removed, foundation and concealer sit on the skin instead of catching on hair. Coverage looks smoother and lasts longer through the day.
How much does the Michael Todd Sonicsmooth Pro+ cost?
No. Always dermaplane on clean, dry skin with a light layer of face oil. Wet skin drags against the blade and increases the risk of nicks.
Final notes on how to dermaplane at home
Once you know how to dermaplane at home, the routine becomes a 5-to-7-minute habit you do once every 3 to 4 weeks. The biggest payoff is how much smoother foundation looks after, but the secondary benefits (better serum absorption, brighter skin, less product clinging to peach fuzz) compound over time. The Michael Todd Sonicsmooth Pro+ is the at-home tool that makes how to dermaplane at home actually safe and effective for non-estheticians.
About Anna Katherine
I am Anna Katherine Page. I share beauty, home care, and resale tips from Seneca, South Carolina. Follow along on YouTube for more honest beauty reviews.
This post contains affiliate links. If you buy through them I may earn a small commission, at no extra cost to you. I only recommend products I actually use.
Quick answer: If your home smells like mold, the cause is almost always trapped humidity in the air, especially in older houses. The fastest fix is a portable dehumidifier sized for the room. I run a Midea 50-pint dehumidifier in my 75-year-old house and the musty smell was gone the same day it was plugged in.
My house was built in 1949. I love it. The original hardwoods, the plaster walls, the windows that have been there longer than I have been alive. I do not love what older homes do when summer humidity rolls in.
That damp, musty, slightly-mildew smell that hits you the second you walk in the door is not actually about cleanliness. It is about the air itself holding too much moisture. And once you fix that, the smell disappears.
Why your home smells like mold (and it is not always actual mold)
That smell is microbial growth that thrives in damp air. It can come from spores on baseboards, behind walls, inside upholstery, or in the crawl space underneath the house. In a well-sealed older home, humidity gets trapped indoors with nowhere to go. The relative humidity climbs above 60 percent, and the smell follows.
The fix is not just deodorizing. Sprays mask the smell for a few hours. To make it go away, you have to pull the moisture out of the air. That is what a dehumidifier does.
How to get rid of the mold smell in your home
Step 1 — Check your indoor humidity
Before buying anything, check what your humidity actually is. A small indoor hygrometer tells you the relative humidity in any room. Anything above 55 percent is the danger zone for mold growth and musty smell. The target is 40 to 50 percent.
Step 2 — Run a dehumidifier sized for the room
A dehumidifier pulls water out of the air and collects it in a tank or drains it through a hose. I use a Midea 50-pint dehumidifier in my living room. The 50-pint size handles up to a 4,500 square foot space, which is overkill for one room but means it runs less often and is quieter. For one room or a basement, a 20 to 35-pint model is plenty.
The Midea has features I would not give up now that I have used them:
Wheels on the base. Easy to move room to room without lifting.
Washable filter. No replacement filters to buy. Rinse it in the sink with dish soap.
Easy-pull water tank. One hand removal even when full.
Auto humidistat. Set the target humidity and the unit cycles itself.
Step 3 — Decide between tank or hose drainage
You have two options for the water it pulls out. Empty the tank twice a day, or run a drain hose kit from the unit to a sink or floor drain so it self-empties. I picked the tank because the unit lives in my living room, nowhere near a drain. I save the water and use it for my plants.
Step 4 — Address the air leaks
A dehumidifier solves the symptom. To stop the problem from coming back, look at where the moisture is getting in. In older homes the usual suspects are the crawl space, an un-vented bathroom fan, an HVAC return that pulls humid attic air, and old windows that condensate. Fix what you can.
My honest Midea dehumidifier review
Within an hour of plugging the Midea in, the air in my living room felt different. By the end of the first day, the musty smell I had lived with for two summers was gone. I empty the tank twice a day in peak summer, less in spring and fall, and almost never in winter. The water it pulls out is shocking. It is genuinely gallons per day from one room.
I give it 10 out of 10 for an older home. The price is reasonable for what it replaces (a whole-house dehumidification system runs thousands), and I have not had to buy a single replacement part.
How often should you run a dehumidifier?
Run it whenever indoor humidity is above 55 percent. In humid climates, that is most of the year. Set the target to 45 percent on the unit and let it cycle itself. The auto-humidistat shuts it off when the target is hit and restarts when humidity climbs back.
Signs your home has a humidity problem
Musty smell that returns no matter how often you clean. The smell is in the air, not on the surfaces.
Condensation on windows. A clear sign the air is holding more moisture than it can carry.
Wood floors feel slightly tacky. Surface moisture pulled from humid air.
Allergy symptoms indoors. Mold spores thrive in humid air and trigger reactions.
Visible mildew at baseboards or grout. Far past the early warning stage.
Key takeaways
Mold smell is a moisture problem first, a cleaning problem second.
A portable dehumidifier sized for the room is the fastest fix.
The Midea 50-pint has wheels, a washable filter, and an auto humidistat.
Address air leaks and ventilation to keep humidity down long term.
Frequently asked questions
Why does my home smell like mold but I cannot see any?
Most musty smell in a home comes from microbial growth in damp air, baseboards, behind walls, or in the crawl space, not from visible mold colonies. The smell can be present long before mold is visible. Reduce humidity below 50 percent and the smell typically clears within 24 to 48 hours.
What is the best dehumidifier for an old house?
For most older homes, a 50-pint portable dehumidifier handles a full main floor without running constantly. The Midea 50-pint is a strong pick because of the wheels, washable filter, and auto humidistat. For just one room or a basement, a 20 to 35-pint model is enough.
How long until a dehumidifier removes mold smell?
Most people notice a difference within hours of plugging it in. The musty smell is usually gone within 24 to 48 hours of running the unit, assuming the source is humidity and not a hidden water leak.
Where should a dehumidifier be placed?
In the room with the worst smell or highest humidity, usually a basement, bathroom-adjacent room, or living area in an older home. Keep it at least 6 inches from walls so air can circulate around the intake.
Can a dehumidifier replace a HVAC system?
No. It dehumidifies the air but does not heat or cool it. It works alongside your HVAC by reducing how hard the AC has to work, since dry air feels cooler than humid air at the same temperature.
Is the water from a dehumidifier safe to drink?
No. It is not filtered or treated and can contain bacteria from the coils. It is fine for watering non-edible plants, which is how I use mine.
Final notes if your home smells like mold
If your home smells like mold and you have ruled out a visible water leak, the cause is almost always trapped indoor humidity. A portable dehumidifier sized for the room is the single fastest fix. Pair it with a hygrometer so you can confirm the humidity level drops below 50 percent. If your home smells like mold even after the humidity drops, look at the crawl space and HVAC return next.
About Anna Katherine
I am Anna Katherine Page. I share home care, furniture restoration, and resale tips from my 1949 home in Seneca, South Carolina. Follow along on TikTok and YouTube for more.
This post contains affiliate links. If you buy through them I may earn a small commission, at no extra cost to you. I only recommend products I actually use.
Quick answer: Here is how to deep clean couch with pets: vacuum the upholstery with a shop vac, pre-treat with pet odor spray, fill the tank of a portable upholstery cleaner with warm water plus a cleaning solution, pre-spray the cushions, then extract section by section. Repeat the suction-only pass to pull out leftover moisture so mold cannot grow. Plan on 30 to 45 minutes for a full sectional.
I have four dogs. My boyfriend has dogs. The sectional in our living room is the unofficial dog bed of the house. If you live with pets, your couch absorbs hair, dander, dirt, drool, and every smell a dog brings in from the yard. A regular vacuum will not get it out. The fabric needs water and suction.
This is exactly how to deep clean couch with pets once a month to keep our sectional looking and smelling clean, and the tools I use to do it. The water that comes out of the couch will make you swear you are seeing things. It is gross. It is also exactly why you want to do this.
How to deep clean couch with pets: why a vacuum is not enough
A vacuum lifts surface debris. It does not pull out the dander, body oils, and ground-in dirt that build up inside the fabric and cushion foam. Those are the things that hold smell. An upholstery cleaner sprays warm water plus a cleaning solution into the fabric, then immediately extracts it under suction, lifting out everything the vacuum left behind.
For a pet-heavy household, that extraction step is what separates a couch that looks clean from a couch that actually is clean.
How to deep clean couch with pets: step-by-step
This is the order I work in. Skipping the vacuum step or the second suction-only pass is what causes the musty smell most people complain about after they clean their couch.
Step 1 — Vacuum the entire surface with a DeWalt shop vac
Before any water touches the couch, get every loose hair off it. A DeWalt wet/dry vacuum with an upholstery brush attachment picks up far more pet hair than a standard vacuum. Run it over every cushion, into the seams, under the cushions, and around the base. Lift cushions off and vacuum the deck underneath.
Step 2 — Pre-treat odors and visible stains
Spray the whole couch with Febreze Pet Odor Eliminator. On any visible stains, hit them directly with a small amount of dish soap mixed with warm water. Let the pre-treatment sit for 5 minutes while you mix the tank solution.
Step 3 — Mix the tank solution
Fill the clean water tank with warm water. Add the manufacturer-recommended amount of upholstery cleaning formula. I also add a small squeeze of OxiClean dish soap and a splash of white vinegar. The vinegar helps cut odor and the dish soap lifts oils that the standard formula misses.
Step 4 — Pre-spray the cushions
Before vacuuming, hold the trigger and lightly mist the cushions with the tank solution. This prep step opens the fabric up and gives the deep clean a head start.
Step 5 — Deep clean with the Bissell Little Green ProHeat
The Bissell Little Green ProHeat sprays warm water plus solution and extracts at the same time. Press the trigger, pull the head slowly across the fabric in 12 inch passes. Go in one direction, then cross-hatch in the other. Work one cushion at a time so the fabric is not soaking wet for long.
After the cleaning pass, go back over every section with the trigger released. The head will only suction now. Pull the head slowly to lift out any remaining water. This is the step almost everyone skips, and it is the reason couches grow mold or smell musty for days after cleaning. Keep extracting until almost no water comes up into the dirty tank.
My Bissell Little Green review for how to deep clean couch with pets
I have owned three generations of the Bissell Little Green. The current ProHeat version is the best of them. It is lighter than the previous model even with a full tank. The heated water makes a noticeable difference on grease and pet oils. The included stair attachment is useful for car interiors, throw pillows, and odd-shaped furniture pieces. After more than a year of monthly use on a four-dog sectional, mine still runs like new.
I give it 10 out of 10 for pet households. The price point is also reasonable compared to a full-size carpet cleaner, and it stores easily.
How often should you deep clean couch with pets?
For one or two pets, every 8 to 12 weeks. For three or more, once a month. If anyone in the house has allergies, lean toward the shorter end. In between deep cleans, vacuum once a week and pre-treat any accidents right away with a pet enzyme spray.
Tips for keeping a couch clean between deep cleans
Wash throw blankets weekly. A washable cover on the seating area catches most of the dirt and hair before it gets into the fabric.
Vacuum on day-five. Set a recurring weekly reminder so it actually happens.
Treat accidents immediately. The longer a stain sits, the deeper it sets into the cushion foam.
Bathe the dogs. A clean dog leaves a clean couch.
Key takeaways
Vacuum with a shop vac first. Water on dry hair turns into matted clumps.
Pre-treat with pet odor spray and let it sit 5 minutes before extraction.
Use warm water in the tank. Heat lifts oils that cold water leaves behind.
Always do a second suction-only pass to extract leftover moisture.
Plan on 30 to 45 minutes for a sectional. Schedule monthly if you have multiple pets.
Frequently asked questions
What is the best couch cleaner for pet households?
For most pet households, the Bissell Little Green ProHeat is the best couch cleaner. It is portable, has a heated water tank, and is sized for upholstery rather than full carpets. Larger upright extractors are overkill for a single sectional.
Can you deep clean a couch without a Bissell?
You can spot clean with a brush, dish soap, and warm water, but you cannot fully deep clean a fabric couch without an extractor. The extraction step is what removes the dirty water from the cushion foam. Renting a portable upholstery cleaner from a hardware store works too if you do not want to buy one.
How do you get pet smell out of a couch?
Vacuum thoroughly, spray Febreze Pet Odor Eliminator, then deep clean with warm water plus a cleaning formula and a splash of white vinegar. The vinegar neutralizes odor at the source. Always do a second suction-only pass to remove leftover moisture, which is the cause of musty smells after cleaning.
Will deep cleaning ruin upholstery?
No, if the fabric is rated for water cleaning. Check the tag under the cushion. A “W” code means water-safe. An “S” code means solvent-only, which needs a dry-cleaning method instead. “W/S” means either works. “X” means vacuum only.
How long does a couch take to dry after deep cleaning?
2 to 6 hours if you extracted thoroughly. Open windows, run a ceiling fan, and avoid sitting on the couch until the fabric is fully dry to prevent re-soiling.
Is the Bissell Little Green ProHeat worth it for pet owners?
Yes. For households with multiple pets, the monthly deep clean it enables is the difference between a sectional that lasts 10 years and one you replace in 3. It pays for itself the first time you skip a furniture replacement.
Final notes on how to deep clean couch with pets
Learning how to deep clean couch with pets is one of the highest-ROI cleaning habits for a multi-pet household. Done monthly, this 30-to-45-minute routine extends the life of upholstery by years, keeps allergens down, and removes the source of pet smell instead of masking it. The Bissell Little Green ProHeat plus a shop vac and a pet odor pre-treatment is the entire toolkit you need to know how to deep clean couch with pets the right way.
About Anna Katherine
I am Anna Katherine Page. I share home care, furniture restoration, and resale tips from my home in Seneca, South Carolina, where I live with four dogs and run a side hustle reselling vintage furniture and luxury thrift finds. Follow along on TikTok and YouTube for more.