Last updated: June 5, 2026 · By Anna Katherine Page
This post contains affiliate links. If you buy through them I may earn a small commission, at no extra cost to you. I only recommend products I actually use in my own home.
Quick answer: Here is the truth about an air purifier filter: within a few months of normal use, it visibly fills with dust, pet dander, pollen, and microscopic particles. That gunk is what you would otherwise be breathing all day. Once you see a working filter, the case for owning an air purifier stops being theoretical.
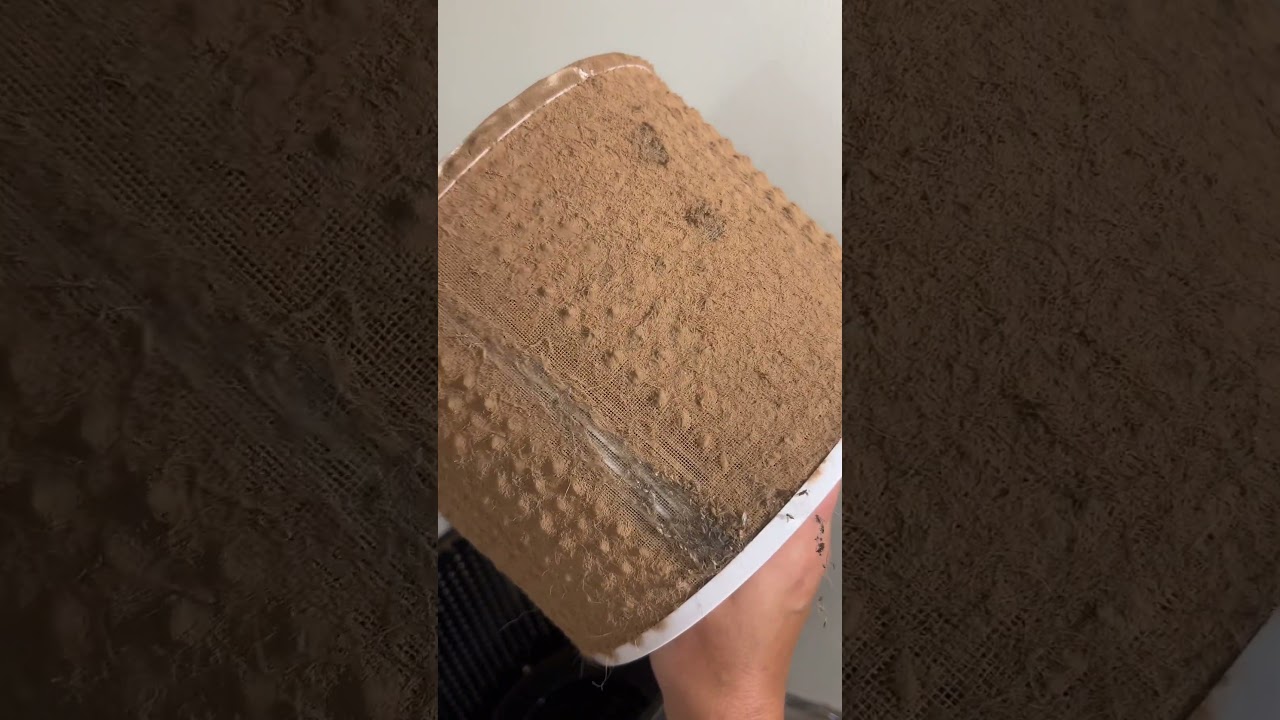
The most convincing argument for an air purifier filter is the filter itself, after a few months of running. Mine came out looking unrecognizable from the white-ish disc that went in. This post is the visual that finally made me a believer, plus what is actually getting trapped, how often to swap the filter, and what to look for if you do not own one yet.
The filter in the video is the same one that started crisp and white. After a few months of running in normal everyday living, with dust, hair, cooking, candles, pets, and seasonal pollen, it looks unmistakably brown and matted. That is not a flaw with the filter. That is the filter doing exactly what an air purifier is designed to do: pull airborne particles out of the air before they end up in your lungs.
What an air purifier filter actually captures
A quality HEPA-grade air purifier filter is engineered to trap a wide range of airborne particles, including:
Dust and dust mite debris
Pet dander and hair
Pollen
Mold spores
Smoke particles from cooking, candles, and wildfires
Many bacteria and virus-sized particles
That is why HEPA filters are the standard reference point. They are required to capture at least 99.97 percent of particles 0.3 microns in size, which is the toughest particle size to filter. Anything larger and anything smaller is actually easier to trap.
Most HEPA-style air purifier filters need to be replaced every 6 to 12 months under normal home use, sometimes sooner if you have heavy pet shedding, allergies, or run the unit continuously. Pre-filters that catch the largest particles can usually be rinsed and dried monthly to extend the life of the main filter. The fastest way to know it is time: look at it. If the filter looks anything like the one in the video, it is overdue.
What to look for in an air purifier
True HEPA rating. Not HEPA-type or HEPA-like. True HEPA captures 99.97 percent of 0.3 micron particles.
CADR rating that matches your room size. Clean Air Delivery Rate tells you how much air the unit can clean per hour in a given square footage.
Replacement filter availability. An air purifier you cannot get filters for is a one-season tool.
Quiet operation modes. Especially if it will run in a bedroom.
An activated carbon stage if odors and VOCs are a concern, on top of the HEPA layer.
Where to put one in your home
Bedrooms are the highest-impact placement because you spend roughly a third of your life there with the door closed. Living rooms or family rooms with high foot traffic and pet activity are next. If you only own one unit, put it where you sleep. If you own two, the bedroom and the room where the family lives during the day.
Key takeaways
The visible state of an air purifier filter after a few months is the most convincing argument for owning one.
HEPA-grade filters capture dust, dander, pollen, mold, smoke, and many tiny pathogens.
Replace HEPA filters every 6 to 12 months under normal use.
Place units where you spend the most time: bedrooms and high-traffic family rooms.
Frequently asked questions
How long does an air purifier filter last?
Most HEPA-grade air purifier filters last 6 to 12 months in normal home use, sometimes shorter with heavy pet shedding or continuous operation.
Are air purifiers worth it?
If you have allergies, pets, asthma, cooking smoke, candles, or live in a wildfire-affected area, yes. Most people who run one for a few months and look at the filter become converts.
What does an air purifier filter actually capture?
Dust, pet dander, pollen, mold spores, smoke particles, and many bacteria and virus-sized particles. True HEPA captures at least 99.97 percent of particles 0.3 microns in size.
Where is the best place to put an air purifier?
The bedroom is the highest-impact spot because you spend so much time there with the door closed. Living rooms with pet activity and foot traffic are next.
Should I get a HEPA or HEPA-type air purifier filter?
Choose true HEPA. HEPA-type, HEPA-like, and similar marketing terms do not meet the same particulate-capture standard.
How big of an air purifier do I need?
Match the unit to your room size using its CADR rating. Most manufacturers list room size on the box.
About Anna Katherine
I document the real version of caring for a home and a small business on a budget. Honest picks, no sponsored hype. Follow on TikTok and YouTube.
Last updated: June 5, 2026 · By Anna Katherine Page
This post contains affiliate links. If you buy through them I may earn a small commission, at no extra cost to you. I only recommend products I actually use in my own garden.
Quick answer: Here is how to propagate hydrangeas from cuttings: take a healthy stem cutting, dip the cut end in rooting hormone, and plant it in moist potting soil. Keep the cutting consistently damp in bright indirect light for the next few weeks while it grows roots. This is how I propagate hydrangeas every season to get endless free plants from the ones I already have.
If you want more hydrangeas in your yard without buying a single new plant, this is the way. Learning how to propagate hydrangeas from cuttings turns one shrub into many, costs almost nothing, and only takes a few minutes of hands-on work. I use the same three-step method every season and it works.
One mature hydrangea can give you a dozen new plants in a single afternoon. That is the math that makes propagation worth learning. Knowing how to propagate hydrangeas means you can fill a whole border for free, share rooted cuttings with friends and neighbors, or quietly multiply a favorite variety that is hard to find at the nursery. It is also the easiest way to keep a specific hydrangea going if the original plant ever gets damaged or dies.
When to take hydrangea cuttings
The best window is late spring through early summer, when the plant has put out new soft green growth but stems are not yet fully woody. These softwood cuttings root the fastest. Early morning is the best time of day because the stems are full of moisture before the heat sets in.
Take a stem cutting. Choose a healthy, non-flowering stem with new green growth. Cut a 4 to 6 inch section just below a leaf node. Strip the lower leaves so only the top two remain. If the top leaves are large, cut them in half to reduce water loss.
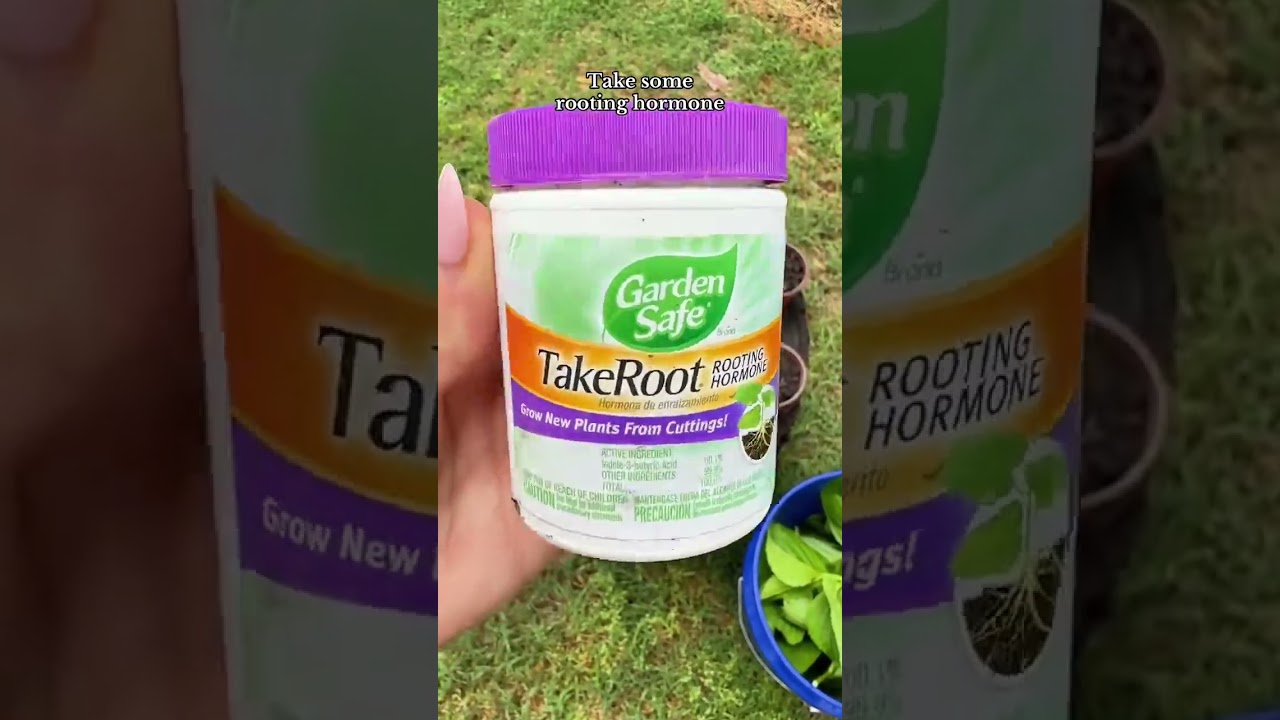
Dip the cut end in rooting hormone. Wet the bottom inch of the cutting and dip it into Garden Safe TakeRoot or another rooting hormone powder. Tap off the excess. The hormone is what tells the cutting to focus on producing roots instead of pushing out new leaves.
Plant in moist potting soil. Make a hole in damp potting soil, slide the dipped cutting in, gently press the soil around the stem to hold it upright, and water lightly to settle everything in.
After-care: keeping the cuttings alive
The next few weeks are about keeping the cutting consistently damp without rotting it. Place the pot somewhere with bright, indirect light. Direct afternoon sun will cook a fresh cutting before it has roots. Check the soil daily and water whenever the surface starts to dry. Some gardeners loosely cover the pot with a clear plastic bag or dome to keep humidity high, which can speed things along.
When to expect roots
Most hydrangea cuttings start producing roots within 2 to 4 weeks. You can do a very gentle tug test after about three weeks; if you feel a tiny bit of resistance, roots are forming. Wait until the cutting is well-rooted (usually 4 to 6 weeks total) before transplanting into a larger pot or directly into the garden.
Key takeaways
How to propagate hydrangeas comes down to three steps: cut, dip, plant.
Take softwood cuttings in late spring or early summer for the fastest results.
Rooting hormone like Garden Safe TakeRoot dramatically improves success rates.
Keep cuttings consistently damp in bright indirect light for 4 to 6 weeks.
Frequently asked questions
Can you propagate hydrangeas without rooting hormone?
You can, but success rates are noticeably lower. Rooting hormone signals the cutting to focus on producing roots, which is exactly what you want.
How long does it take to propagate hydrangeas from cuttings?
Most cuttings produce roots within 2 to 4 weeks, with a fully rooted plant ready for transplant around 4 to 6 weeks.
What is the best time of year to propagate hydrangeas?
Late spring through early summer is ideal, when stems are softwood (green and flexible, not yet woody).
Do hydrangea cuttings need direct sunlight?
No. Bright, indirect light is best. Direct afternoon sun will dry out a fresh cutting before it has roots.
Can I propagate hydrangeas in water instead of soil?
Yes, water propagation works. Transfer to soil once roots are about an inch long.
How many cuttings should I take to make sure some succeed?
Plan on 6 to 10 cuttings to virtually guarantee a few thriving plants. The math is easy when cuttings are free.
About Anna Katherine
I am a South Carolina gardener documenting a real cut-flower and pollinator garden, season by season. I share what works, what flops, and the small steps and hacks like this one that make the biggest difference. Follow the garden on TikTok and YouTube.
More garden tutorials and free-plant hacks on TikTok.
Last updated: June 5, 2026 · By Anna Katherine Page
This post contains affiliate links. If you buy through them I may earn a small commission, at no extra cost to you. I only recommend products I actually use.
Quick answer: The Logitech K270 wireless keyboard sets up in about 30 seconds. The tiny USB receiver lives inside the keyboard box (do not throw it away), the batteries are already installed, and you only need to plug in the receiver and flip the on switch. No Bluetooth, no pairing, no driver install. The battery lasts about two years and the deck is spill-proof.
If you just unboxed a Logitech K270 wireless keyboard, this is the entire setup. From cardboard to typing in under a minute, no Bluetooth pairing or app downloads, with a couple of quiet features that make it punch above its price.
Why the Logitech K270 wireless keyboard is worth it
For under a typical big-box price you get a full-size keyboard with a number pad, no cable cluttering your desk, no Bluetooth pairing headaches, and a battery that lasts about two years. The Logitech K270 wireless keyboard is the kind of unsexy daily-driver tech that you stop noticing within a week because it just works.
What is in the Logitech K270 wireless keyboard box
The Logitech K270 wireless keyboard itself
A tiny USB receiver (this is the most important part, do not lose it)
Two AAA batteries (already installed in the keyboard)
A small instruction card
The single most important moment when you open the box is finding the USB receiver. It is a small black tab and it tucks into a slot in the keyboard or the packaging. That little piece is what makes the keyboard wireless without Bluetooth.
How to set up the Logitech K270 wireless keyboard in 30 seconds
Find the USB receiver. Check the slot in the keyboard or inside the cardboard packaging. Set it aside where you can see it.
Confirm the batteries are in. They are usually pre-installed. Pop the battery cover on the back if you want to double check.
Plug the receiver into a USB port on your computer.
Flip the on switch. The on/off switch lives on the back or side of the keyboard. Slide it to on.
Start typing. Your computer will auto-detect the keyboard. No driver install, no pairing, no app.
That is the entire setup. From sealed box to typing in about 30 seconds.
Features I love
About a two-year battery life. You forget the keyboard is even wireless because you almost never change the batteries.
Spill-resistant deck. Worth knowing if you keep coffee or tea near the keyboard, which I do every morning.
Full size with a number pad. Great for spreadsheets, accounting, and anyone who actually uses the number row.
No Bluetooth needed. The little USB receiver means no pairing dropouts, which can be a real annoyance on cheaper wireless keyboards.
Quiet, low-profile keys. Pleasant to type on for long sessions.
Who this keyboard is for
The Logitech K270 wireless keyboard is a fit for a home office setup where you want full-size typing, no cables, no fuss, and a multi-year battery. It is also great as a guest or kids-room keyboard since the setup is so foolproof. If you want a mechanical keyboard or RGB lighting, this is not it, and that is fine.
Key takeaways
The Logitech K270 wireless keyboard sets up in about 30 seconds without Bluetooth or drivers.
The tiny USB receiver is the most important part of the box. Do not throw it away.
Battery life is about two years and the keyboard is spill-resistant.
Full-size with number pad makes it a great everyday home office keyboard.
Frequently asked questions
Does the Logitech K270 wireless keyboard use Bluetooth?
No. It uses a small USB receiver that plugs into your computer. There is no Bluetooth pairing required, which avoids the dropout issues that plague some Bluetooth keyboards.
How long does the Logitech K270 battery last?
About two years on the included AAA batteries with normal daily use.
Is the Logitech K270 wireless keyboard spill-proof?
It is spill-resistant. Small accidental spills like coffee or tea should not destroy it, but you should still wipe up promptly.
Do I need to install drivers for the Logitech K270?
No drivers needed for basic use. The keyboard works as soon as you plug in the USB receiver and turn it on.
What USB receiver does the Logitech K270 use?
It uses a Logitech Unifying receiver, which can pair with multiple Logitech peripherals on one receiver if you have other Logitech mice or keyboards.
Can the Logitech K270 wireless keyboard work with Mac?
It is primarily designed for Windows, but the basic typing keys work with Mac when the receiver is plugged in. A few Windows-specific keys may not have Mac equivalents.
About Anna Katherine
I share the real version of building a home office, a small business, and a budget setup on a budget. Honest picks, no sponsored hype. Follow on TikTok and YouTube.
Last updated: June 5, 2026 · By Anna Katherine Page
This post contains affiliate links. If you buy through them I may earn a small commission, at no extra cost to you. I only recommend products I actually use. Essential oils are concentrated; check the safety notes below and consult a healthcare professional if you have specific concerns.
Quick answer: Frankincense essential oil is one of the most versatile oils to keep on hand. My three daily uses are skincare for a natural glow, scenting the home (it is what visitors compliment most), and dabbing onto pulse points or a diffuser throughout the day. One small bottle covers all three.
If you only buy one essential oil this year, make it frankincense essential oil. It earned a permanent spot in my routine because it works just as well on my skin as it does in my diffuser, and a single bottle stretches for months. Here are the three ways I use it every day.
Frankincense essential oil is steam-distilled from the resin of the Boswellia tree. It has been used in spiritual practice, skincare, and perfumery for thousands of years, which is part of why it shows up in so many traditions. The scent is warm, woody, and slightly sweet, with none of the sharpness that some essential oils carry. That balance is what makes it so easy to use in everyday ways without feeling overpowering. (Find frankincense essential oil on Amazon)
1. Frankincense essential oil in my skincare routine
This is my favorite use. A drop or two of frankincense essential oil mixed into a carrier oil (jojoba, argan, or a basic moisturizer) and smoothed into my face has become a step I look forward to. It is famously associated with helping skin look balanced and bright, and the small ritual of adding it to my routine matters as much as the oil itself. The trick is dilution: essential oils are concentrated, so always blend with a carrier rather than applying directly.
2. Using frankincense essential oil to scent the home
This is the one that gets the most compliments. A few drops of frankincense essential oil in a diffuser, especially in the late afternoon, fills the house with a warm, grounded scent that does not feel like a candle and is not chemical. People walk in and ask what I am burning. The answer is just frankincense and water. It works year round; in winter it feels cozy, in summer it pairs beautifully with citrus.
3. Daily uses beyond skin and home
Once you have a bottle in the house, frankincense essential oil starts showing up everywhere. A drop on pulse points for a personal scent that lasts. A diffuser blend with lavender at bedtime. A drop in unscented lotion. Even in a homemade body oil after the shower. This is the part I describe as putting it everywhere; one ingredient slots into a dozen tiny moments throughout the day.
How to use frankincense essential oil safely
Always dilute. Mix frankincense essential oil with a carrier (jojoba, fractionated coconut, sweet almond) before applying to skin. A 1 to 2 percent dilution is typical for daily face use.
Patch test first. Apply a small diluted amount to your inner arm before using on the face.
Avoid the eye area and any open or broken skin.
Keep out of reach of children and pets. Some essential oils are not safe around animals, especially cats.
Check with a healthcare provider if you are pregnant, nursing, or managing a medical condition before adding any essential oil routine.
Key takeaways
Frankincense essential oil is one of the most versatile oils for daily home use.
Three favorite uses: skincare with a carrier, diffusing for home scent, and small daily touches like pulse points.
Always dilute on skin and patch test first.
The warm, woody scent is the most-complimented thing in my house.
Frequently asked questions
What is frankincense essential oil good for?
Frankincense essential oil is widely used in skincare blends, diffusing for home scent, and personal fragrance. Its warm, woody scent is well-balanced and pairs with many other oils.
How do you dilute frankincense essential oil for skincare?
Mix it with a carrier like jojoba, argan, or fractionated coconut oil. A 1 to 2 percent dilution (a few drops per tablespoon of carrier) is typical for daily face use.
Can you put frankincense essential oil directly on your skin?
No. Essential oils are highly concentrated and should always be diluted in a carrier oil or unscented lotion before applying to skin.
How long does a bottle of frankincense essential oil last?
With a few drops per use, a small 15ml bottle commonly lasts several months for daily users.
Can you use frankincense essential oil in a diffuser every day?
Yes, in a well-ventilated room. Many people diffuse for 30 to 60 minutes at a time and take breaks between sessions.
Is frankincense essential oil safe around pets?
Not all essential oils are pet safe, particularly for cats. If you have pets, research specific safety guidelines and consult your veterinarian before diffusing.
About Anna Katherine
I share the real version of building a home, a small business, and a wellness routine on a budget. Honest picks, no sponsored hype. Follow on TikTok and YouTube.
Last updated: June 5, 2026 · By Anna Katherine Page
This post contains affiliate links. If you buy through them I may earn a small commission, at no extra cost to you. I only recommend products I actually use. This is not medical advice; consult a dermatologist for any skin concerns.
Quick answer: An LED light therapy mask builds collagen at home, which is something Botox does not actually do. I use a wireless silicone mask with red, blue, purple, and yellow light for about 10 minutes before bed. It is peaceful, takes no real effort, and the results show up gradually in the skin.
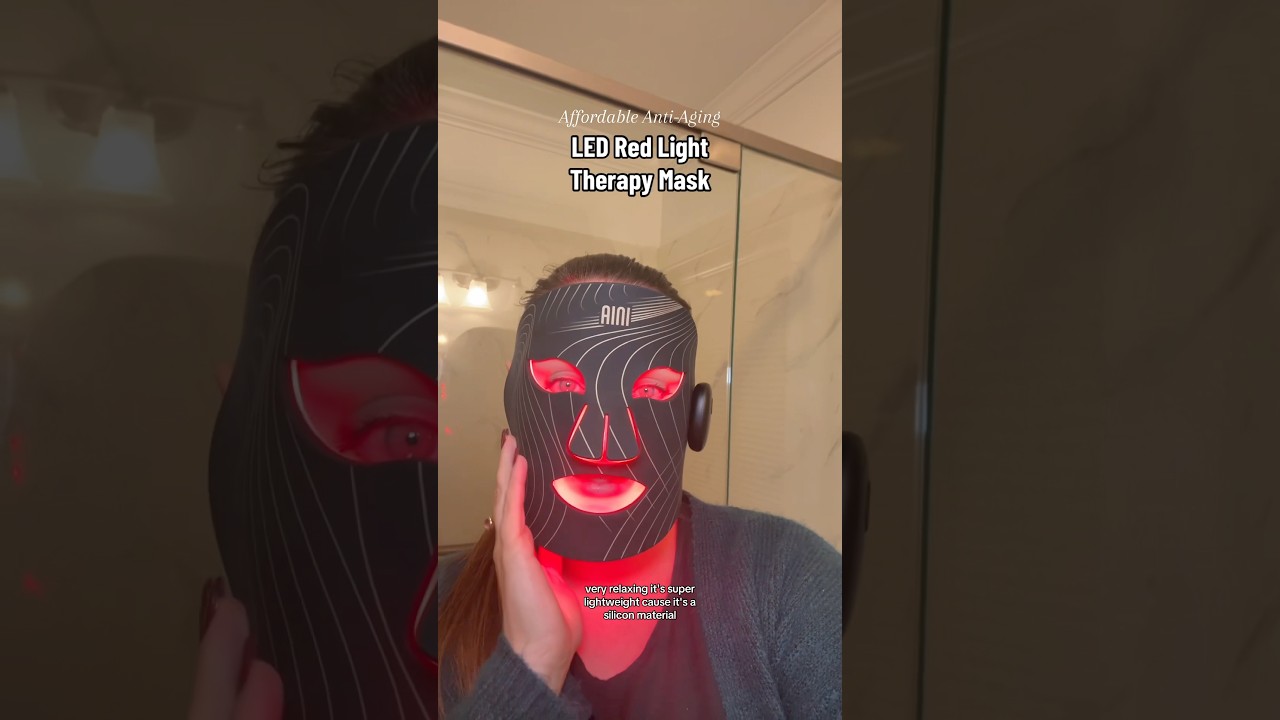
If you have been looking at every LED light therapy mask on the internet trying to figure out which one is worth the money, here is mine. I picked a wireless silicone option with more LEDs and more color modes than the top-of-the-list competitors, and I use it for ten minutes most nights. This LED light therapy mask review covers why I chose this style, what to look for if you are shopping, and how I actually use it at home.
Why an LED light therapy mask over other anti-aging tools
Here is the thing nobody talks about enough: Botox does not build collagen. It relaxes specific facial muscles to soften wrinkles, but it does nothing to actually strengthen the skin underneath. An LED light therapy mask works in the opposite direction. Red wavelengths of light penetrate the skin and stimulate the cells that produce collagen, the structural protein that keeps skin firm and bouncy. For at-home daily use, that is a real point of difference. You are investing ten minutes a day in something that supports the long game of skin health, not a quarterly appointment that smooths the surface.
What to look for in an LED light therapy mask
If you are shopping right now, these are the features that made me settle on mine instead of the popular ones every dermatologist seems to be paid to mention.
Wireless and rechargeable. No cord to dodge while you are trying to relax.
Silicone construction. It contours to your face comfortably and lets you wear it while lying down without a hard plastic shell pressing in.
Multiple light colors. Different wavelengths target different things. A mask with red, blue, purple, and yellow gives you flexibility from one tool.
More LEDs and better coverage. The number of individual LEDs across the mask matters. More lights means more even exposure, especially around the cheeks and forehead.
Built-in timer. Most quality masks auto-shut off around 10 minutes, which is the standard treatment window.
Adjustable strap. You want it secure enough to wear hands-free.
A good LED light therapy mask gives you several color modes, each one targeting something different. Here is the short version of what each color is generally used for in at-home skincare:
Red light. The collagen builder. The wavelength most associated with anti-aging and firming.
Blue light. Targets the bacteria associated with breakouts, often used by people with acne-prone skin.
Purple light. A blend of red and blue, useful when you want both anti-aging and clearing in one session.
Yellow light. Often used for tone and to soothe the look of redness.
Most nights I run mine on red because building collagen is the main goal for my skin right now. The color flexibility is part of why I wanted a multi-mode mask rather than a single-color version.
How I use my LED light therapy mask
Cleanse first. A clean face lets the light reach the skin without makeup or sunscreen blocking it.
Put the mask on and secure the strap. The silicone shapes to your face.
Choose your color. Mostly red for me.
Set it and lie down. Ten minutes. The mask shuts off automatically when the session is done.
Use the time to wind down. Most evenings I do this right before bed. It is quiet, your eyes are protected, and it doubles as a ritual that signals the day is closing.
Finish with your usual serum and moisturizer. Skincare goes on after, when the skin is warm and receptive.
What to expect from your results
The honest answer: gradual. LED light therapy is not a one-session miracle. Consistency over weeks and months is what produces visible difference. The first thing most people notice is a smoother look to the skin and a gradual brightening. Texture changes follow. None of this replaces a real skincare routine; what it does is amplify the work the rest of your routine is already doing, by giving the cells underneath more of the building blocks they need.
Key takeaways
An LED light therapy mask uses red light to build collagen, which Botox does not do.
Look for wireless, silicone, multi-color, with enough LEDs for even coverage.
Ten minutes a night, often before bed, is the standard session.
Results are gradual; consistency over months is the rule.
Frequently asked questions
Does an LED light therapy mask actually build collagen?
Red wavelengths of LED light are associated with stimulating the cells that produce collagen, the structural protein that keeps skin firm. Effects build over consistent use rather than from a single session.
How often should I use an LED light therapy mask?
Most home users run a session 3 to 5 times a week, with each session around 10 minutes. Some users do it daily. Consistency is the most important variable.
Is an LED light therapy mask safe to use at home?
At-home LED masks are designed to be safe for daily use, with built-in timers and eye coverage. If you have sensitive skin, are pregnant, or are on photosensitizing medications, check with a dermatologist before starting.
Should I use my LED light therapy mask on clean skin or with skincare on?
Clean, dry skin. Makeup, sunscreen, and most serums can block the light from reaching your skin. Apply your products after the session, when skin is warm.
What color of light should I use most?
For most adults focused on anti-aging, red is the default. Blue gets attention from people targeting breakouts. Many masks let you cycle through.
How long until I see results from an LED light therapy mask?
Visible results typically build over weeks to a few months of consistent use. The earliest changes tend to be smoothness and brightness, with texture changes following.
About Anna Katherine
I share the real version of building a home, a small business, and a skincare routine on a budget. Honest reviews, no sponsored hype. Follow on TikTok and YouTube.
Last updated: June 5, 2026 · By Anna Katherine Page
This post contains affiliate links. If you buy through them I may earn a small commission, at no extra cost to you. I only recommend products I actually use.
Quick answer: The smartest way to learn how to thrift furniture is to target thrift stores that do donation pickups. These stores send trucks to homes (often after estate sales) and bring back whole loads of real furniture: sofas, beds, dining sets, cabinets. Skip the thrift stores that only stock knick-knacks, and you will find dramatically better pieces.
If you want to learn how to thrift furniture and consistently find pieces you actually want to live with, where you shop matters more than how often. The best vintage furniture does not show up randomly at any thrift store. It tends to land at a specific kind of thrift store, and once you know which kind, your finds get dramatically better.
You can go thrifting every weekend for a year and not find a single piece worth bringing home, if you are walking into the wrong stores. Different thrift stores get their inventory in very different ways, and that single difference shapes what you will see on the floor. Knowing how the inventory arrives is the foundation of how to thrift furniture well.
How to thrift furniture: target stores with donation pickups
Here is the one move that changes everything. Find thrift stores that offer donation pickups. These are the stores that send trucks to homes to collect donated furniture, not the ones that only accept whatever fits in a car. Most cities have a handful of them. They are often run by larger nonprofits, and the pickup service is usually a free phone call away.
Once you know which stores in your area do pickups, those are your stops. The smaller thrift stores that only accept counter drop-offs are great for clothes and knick-knacks, but they are not where the good furniture lands.
Why donation-pickup stores get better furniture
When a thrift store sends a truck to a home, they are not going for a few small items. They are going to pick up whatever the homeowner is donating in volume, which often means an entire room or even a whole house worth of furniture at once. The most common reason for a pickup like that: an estate sale wrapped up and the leftovers were donated, or a family is downsizing and clearing out the parents’ house. Either way, what hits the floor is real furniture, often vintage, often in great shape, and priced like thrift inventory rather than antique-shop inventory.
The heavy pieces worth thrifting
Heavy, expensive-to-replace pieces are exactly where thrifting wins biggest. Buying these new is brutal on the wallet, and the vintage versions are often higher quality construction than what is sold new today. Specifically:
Sofas and sectionals
Armchairs and accent chairs
Beds, bed frames, and headboards
Cabinets and dressers
Dining sets and dining chairs
Side tables and coffee tables
For all of these, a donation-pickup thrift store is where you are most likely to find a piece worth bringing home.
Why how to thrift furniture matters for first-time homebuyers
As a millennial first-time homebuyer, I learned fast how brutal the cost of outfitting a whole house is. New furniture for every room adds up to thousands of dollars, often for pieces that will not last more than a few years. Thrifting vintage furniture flips that equation. You can fill a home with real wood, real upholstery, and pieces that have already lasted decades, for a fraction of the cost. Learning how to thrift furniture early is one of the best skills a first-time homebuyer can develop.
Tips for spotting quality vintage pieces
Check the joinery. Dovetail joints in drawers and well-fitted construction usually signal a piece built to last.
Look under the cushions and behind the panels. Solid wood frames and metal hardware are great signs. Particleboard with stapled corners is not.
Bring a measuring tape. Vintage pieces vary in scale, and a measure on the spot saves disappointment at home.
Refinishable beats perfect. Surface scratches, dated finishes, and tired upholstery are easy fixes. Broken frames or rotted wood are not.
Wear work gloves. Old upholstery hides staples, dust, and the occasional spider. Gloves let you check inside drawers, lift cushions, and feel along frames without flinching.
Keep moving straps in your car. The best thrifted pieces are heavy. A pair of lifting straps turns a two-person dresser job into something one person can handle.
Key takeaways
How to thrift furniture comes down to one thing: shop the stores that do donation pickups.
Those stores get whole-home donations, often from estate sales, which means real furniture lands there.
Thrifting is most valuable on heavy, expensive-to-replace pieces.
For first-time homebuyers, it is one of the highest-leverage skills you can build.
Frequently asked questions
How do you find thrift stores that do donation pickups?
Search online for the larger nonprofit thrift stores in your area, then check their websites or call them to ask about pickup services. Most stores that offer pickups advertise it clearly. Local moving-related forums are also a good place to ask.
What is the best day to thrift for furniture?
Weekday mornings are often quieter and let you see fresh stock before weekend shoppers pick it over. Some stores restock on specific days, so it is worth asking.
Are vintage thrift store finds always cheaper than new furniture?
Almost always for solid wood furniture, sofas, and cabinetry. Vintage pieces are priced by thrift inventory standards, not by retail. The savings are biggest on heavy pieces that cost the most new.
How do you spot a quality vintage piece at a thrift store?
Check the joinery and construction. Dovetail joints, solid wood frames, and metal hardware all signal quality. Particleboard and stapled joints suggest a cheaper piece.
Is thrifting furniture worth it for first-time homebuyers?
Yes. Outfitting a whole house with new furniture adds up to thousands of dollars. Thrifting fills the same rooms with sturdier vintage pieces for a fraction of the cost.
What kinds of furniture are worth thrifting?
The heavy, expensive-to-replace pieces are best: sofas, sectionals, chairs, beds, bed frames, headboards, cabinets, dressers, and dining sets.
About Anna Katherine
I am a South Carolina founder, thrifter, and first-time homebuyer documenting the real version of building a home and a small business with vintage finds. Follow along on TikTok and YouTube.
Last updated: June 5, 2026 · By Anna Katherine Page
This post contains affiliate links. If you buy through them I may earn a small commission, at no extra cost to you. I only recommend products I actually use.
Quick answer: A simple thrifted desk makeover with no paint at all. I picked up a vintage wood desk at a thrift store for $25, cleaned it with Murphy’s Oil Soap, conditioned it with Old English wood oil that has a touch of stain, and sealed it with SC Johnson paste wax. Three easy steps, and the original character of the piece stayed intact.
This thrifted desk makeover started with a $25 score at the thrift store and ended with a piece I love a hundred times more than anything I could have bought new. The whole project uses just three products, no paint, and protects what makes vintage wood furniture special: its grain, color, and the little quirks that come from a piece having a life before you.
Vintage wood desks at thrift stores are some of the best values you can find. Real solid wood, joinery that has already proven itself, and prices a fraction of what you would pay for a comparable new piece. A thrifted desk makeover takes that bargain and turns it into a piece you actually love, often without changing its character at all. You are not building from scratch, you are coaxing what is already good back to the surface.
What you will need for the thrifted desk makeover
Murphy’s Oil Soap. A gentle wood cleaner that lifts grime without stripping the finish. (Find it on Amazon)
Old English wood oil with stain. Conditions dried-out wood and adds a touch of color where it needs it. (Find it on Amazon)
SC Johnson paste wax. Seals and protects with a soft, low-sheen finish. (Find it on Amazon)
Soft cloths or microfiber rags for applying each product.
How to refinish a thrifted wood desk in 3 easy steps
Clean with Murphy’s Oil Soap. Mix according to the bottle directions, dampen a soft cloth, and work it across the whole desk to lift years of grime. Wipe down with a clean damp cloth and let the wood fully dry.
Condition with Old English wood oil. Apply a thin coat of the wood oil with stain, following the grain, and let it soak in. The oil rehydrates dried-out wood and the touch of stain evens out faded or worn spots without covering the grain.
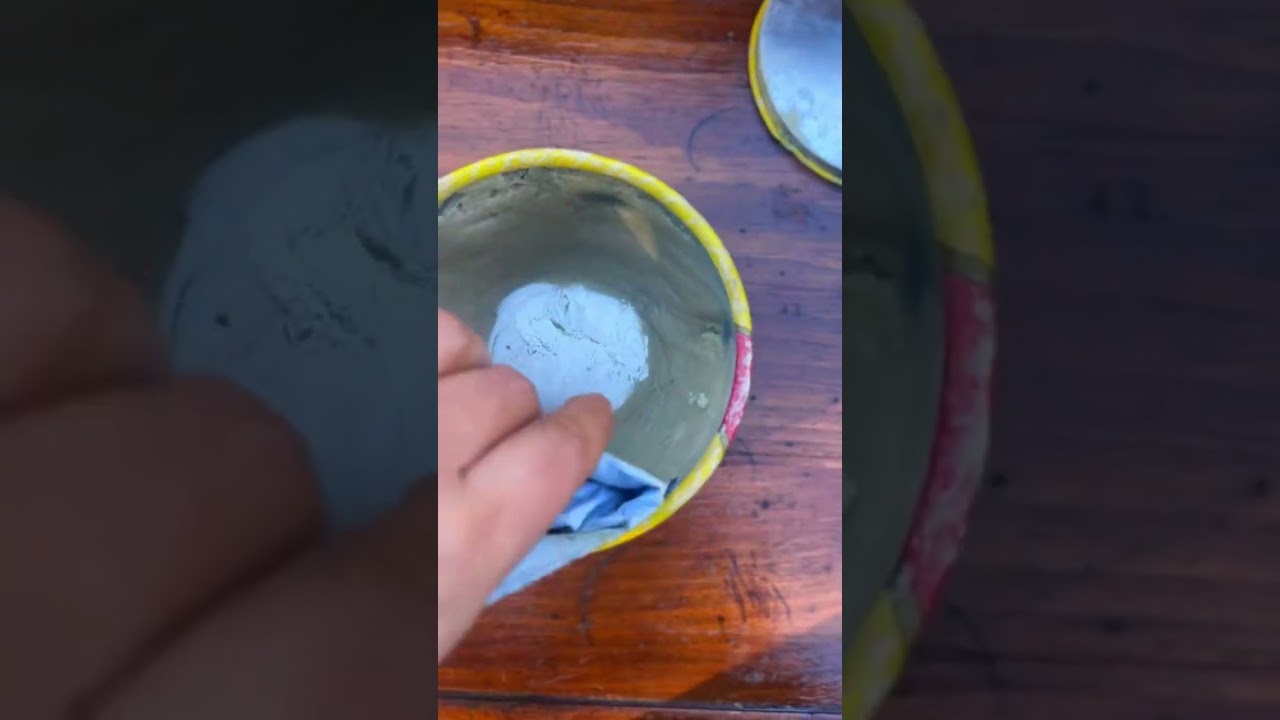
Seal with SC Johnson paste wax. Once the oil has set, rub on a thin layer of paste wax with a clean cloth, then buff to a soft sheen. This protects the surface and gives it a finish that feels like real wood instead of plastic.
That is the entire thrifted desk makeover: clean, condition, seal. No sanding, no painting, no power tools.
Keeping the original character details
One of the best things about this desk: it had a few original smiley faces carved into it from whoever owned it before. I left them in. A thrifted desk makeover is at its best when you protect the parts that make the piece unique, not erase them. Carvings, original hardware, color variations, the patina on the edges. Those are the details that make a vintage piece feel intentional in a room, not like another mass-produced board.
Why oil and wax instead of paint
Painting a wood desk is fast and dramatic, and there is a time for it (I have done plenty of painted furniture projects too). But on a beautiful piece of real wood, paint covers exactly what makes it valuable. Oil and wax do the opposite. They feed the wood, deepen its color, and protect it without hiding the grain. For a vintage thrifted desk with character, this approach almost always reads better.
Key takeaways
This thrifted desk makeover took three products and three steps.
Clean with Murphy’s Oil Soap, condition with Old English wood oil with stain, seal with paste wax.
No paint, no sanding, no covering up the wood grain.
Original details like carvings and hardware stay intact and add character.
Frequently asked questions
How long does a thrifted desk makeover like this take?
About an afternoon. Cleaning and oil application is the bulk of the time, with drying built in. The paste wax goes on quickly and buffs out in minutes.
Do I need to sand the desk first?
Not for this approach. If the existing finish is intact and the desk just needs cleaning and conditioning, sanding would strip the patina you are trying to keep. Only sand if you are dealing with damaged or peeling finish.
What does Murphy’s Oil Soap actually do?
It is a gentle wood-safe cleaner that lifts dirt, grease, and grime without stripping the existing finish. Perfect first step for any thrifted wood furniture project.
Can I use this method on other wood furniture?
Yes. Any vintage wood piece you want to preserve without painting works with the same three steps. Side tables, dressers, dining chairs, headboards.
How often do I need to rewax the desk?
Once a year is plenty for most pieces. A quick buff with a soft cloth refreshes the finish between waxings.
Is this thrifted desk makeover beginner friendly?
Yes. There are no power tools, no sanding, and the worst case if you over-apply oil or wax is just wiping it back. This is one of the easiest finishes to get right.
About Anna Katherine
I refresh thrifted furniture and home decor on a budget and share the real, hands-on process. Follow along for honest DIY projects and the small techniques that make them look professional, on TikTok and YouTube.
Watch the original makeover and more thrift flips on TikTok.
Last updated: June 5, 2026 · By Anna Katherine Page
This post contains affiliate links. If you buy through them I may earn a small commission, at no extra cost to you. I only recommend products I actually use.
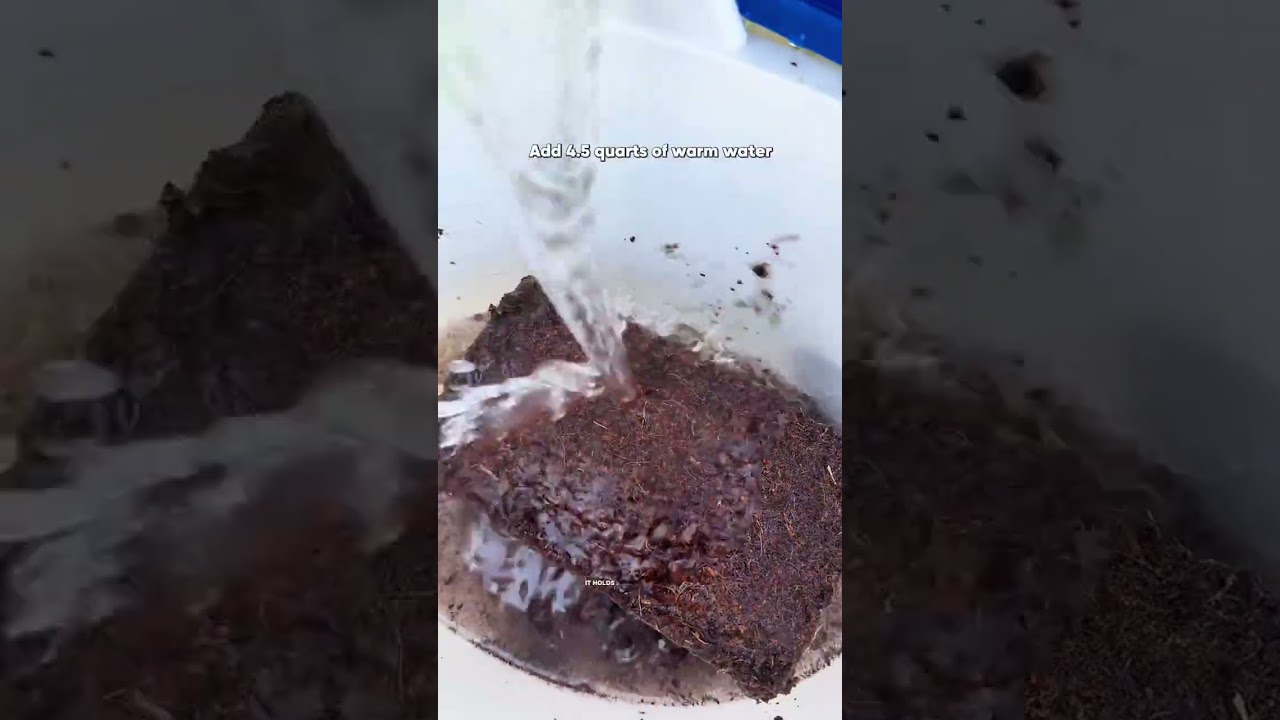
Quick answer: A compressed coconut coir brick expands into about 16 quarts of seed starting mix in 120 seconds with just warm water. No more hauling heavy bags of soil from the store or wrestling them out of the car, and this seed starting mix holds moisture noticeably better than most bagged options.
If you have ever lugged a 30-pound bag of soil out of a car for spring seed starting, this is the seed starting mix hack you have been waiting for. One compressed coir brick the size of a paperback book turns into 16 quarts of light, moisture-holding seed starting mix in 120 seconds. No back strain, no plastic bag of dust, and a better result for your seedlings.
The biggest barrier to starting seeds at home is the soil itself. Bagged seed starting mix shows up at the store as dense, heavy, plastic-wrapped bags. You haul one through the parking lot, wrestle it into the car, drive it home, and lug it out again. By the time you get to the actual planting, your back is already done. And the mix inside is often dried out, hard to wet evenly, and runs water right off the top of the pot.
This seed starting mix hack solves both problems at once: it weighs almost nothing, and it holds water like a sponge.
What you’ll need for this seed starting mix hack
A compressed coconut coir brick. Small, dense, paperback-sized. Look for one that expands to 16 quarts or more. (Shop compressed coir bricks on Amazon)
Warm water, which activates the brick faster than cold.
A bucket or large container to expand it in.
That is it. No store run mid-project, no heavy bag waiting in the garage all season.
How to make seed starting mix in 120 seconds
Set the brick in your bucket. One brick handles a full 16-quart batch of seed starting mix.
Pour warm water over it. Use the amount the package calls for, usually around a gallon.
Wait about 120 seconds. The brick swells and breaks apart into a fluffy, dark mix.
Fluff it with your hands or a hand trowel. Break up any remaining clumps. You should have 16 quarts of light, moist seed starting mix ready to use.
Fill your trays, pots, or jugs. Plant your seeds at the depth the seed packet recommends, water lightly, and you are good to go.
Why this seed starting mix holds moisture better
Compressed coir is processed coconut husk fiber. Once it expands, it forms a light, airy matrix that holds water through the whole pot rather than letting it pour straight out the bottom. For seedlings, that is a huge advantage. Young roots cannot survive a dry spell, and a mix that stays evenly damp without going soggy gives them the best start. It is a quieter benefit than the “no heavy bags” headline, but for actual germination rates, it matters more.
Using it for winter sowing in jugs
If you are starting seeds in outdoor jugs over winter, the well-loved winter sowing technique where you sow in cleaned milk jugs and set them outside to overwinter, this seed starting mix is ideal. The expanded coir is light enough to scoop easily into a jug, holds the seeds in place, and stays evenly moist through freezing-thawing cycles. Get the jugs prepped in late winter and the seeds wake up on their own as spring arrives.
Key takeaways
A compressed coir brick plus warm water makes 16 quarts of seed starting mix in 120 seconds.
Weighs a fraction of bagged mix and stores small until you need it.
Holds moisture better than typical bagged options, which means stronger seedlings.
Works for trays, pots, and outdoor winter sowing jugs.
Frequently asked questions
What is coconut coir and is it the same as seed starting mix?
Coconut coir is the fibrous material processed from coconut husks. When compressed and rehydrated it becomes a seed starting mix on its own or mixed with a little perlite.
How much water does a compressed coir brick need?
Follow the package directions, but most standard bricks take about a gallon of warm water to expand fully into roughly 16 quarts of seed starting mix.
Can I use this seed starting mix for transplanting too?
Yes. It works for starting seeds, potting up seedlings, and topping off containers. For larger established plants you may want to blend it with regular potting soil for more nutrients.
Does coconut coir have nutrients in it?
It is low in nutrients on its own, which is fine for germination since seeds carry their own starter food. Once seedlings get true leaves, feed them with a diluted liquid fertilizer.
How long do compressed coir bricks last in storage?
The bricks store almost indefinitely while compressed, as long as they stay dry. Keep one on a shelf and rehydrate it whenever you need fresh seed starting mix.
Can I use this for winter sowing in milk jugs?
Yes. The expanded coir is light, holds moisture through freeze-thaw cycles, and scoops cleanly into jugs, which makes it a good fit for winter sowing.
About Anna Katherine
I am a South Carolina gardener documenting a real cut-flower and pollinator garden, season by season. I share what works, what flops, and the small hacks like this one that make the biggest difference. Follow the garden on TikTok and YouTube.
Watch the original demo and follow more garden hacks on TikTok.
Last updated: June 5, 2026 · By Anna Katherine Page
This post contains affiliate links. If you buy through them I may earn a small commission, at no extra cost to you.
Quick answer: Here is how I launched a party rental business with AI and no ad budget. I started Keowee Event Company using AI to build the website, handle SEO and email automation, set pricing, and even write the Facebook Marketplace listings. Four days after launching the social page with a giveaway, it had over 400 followers.
I just launched a party rental business, and I am building almost all of it with AI. No paid advertising, no big team, no outside funding. I am documenting the entire journey from zero, episode by episode, as I build Keowee Event Company from scratch in a rural part of South Carolina. Here is how the launch actually went.
@ak_page I started a party rental business and I'm using AI to build everything and automate most of the work. From the website, SEO, email automation, pricing, even my Facebook Marketplace listings. Launched social media Saturday at 5pm with a giveaway and already hit 400+ followers in 4 days. Going live tonight to draw the winner. Documenting the entire journey from zero. Episode 1. #smallbusinesstiktok#aiautomation#startingabusinessoriginal sound – Anna Katherine Page
A party rental business rents out the gear that makes events happen, from backyard movie setups to games and styled pieces. It is a strong local side hustle because the inventory is reusable, the customers are in your own community, and demand runs year round through birthdays, holidays, and gatherings. I started Keowee Event Company the lean way: small, organic, and built around tools that let one person operate like a team.
Using AI to build and run the whole business
The reason a solo launch is even realistic now is AI. I am using it for the parts of a business that would normally need a whole team:
The website, built with Lovable, an AI app builder.
SEO and content.
Email automation.
Pricing.
Even the Facebook Marketplace listings.
On the data side I use Apify, a web scraping and automation platform, to gather the market and competitor information that informs decisions like pricing. What AI does not replace is the judgment, the customer relationships, and the actual logistics of running events. What it does is clear the busywork so a single founder can move fast. If you have an idea for a local service business, this is the part that has genuinely changed: the overhead of starting is lower than it has ever been.
The giveaway that grew the page 400+ followers in 4 days
Here is the timeline. I launched the business social media page on a Saturday at 5 p.m. with one follower, myself. Four days later it had over 400. The move behind that growth was a giveaway, and it is a strategy I first used 17 years ago running a Facebook page for a local business as my high school job. It worked then and it still works now. The giveaway post collected more than 900 comments and became the entire engine for getting eyes on the business, with no ad spend at all.
What’s in the backyard movie night package
The giveaway prize is a complete backyard movie night package: a projector, a projector screen, and a set of inflatable bean bag style chairs. The whole setup, given away free. A themed package like this is not a random prize, it is a filter. The people who enter to win a backyard movie night are exactly the people who later rent from a party rental business.
Want to put together your own movie night setup? I have linked the full package on my Amazon storefront.
Why a giveaway works so well for a brand-new business page
A new page has the same problem every time: no audience, and no budget to buy one. A giveaway solves both at once. It gives people a real reason to follow and engage, and every comment and follow signals the platform to show your post to more people. The result is reach you would otherwise have to pay for. This is not just my experience: marketing research finds that giveaway posts draw far more comments than regular posts and that accounts running them grow meaningfully faster. For a brand-new local business, it is the fastest organic way to get in front of your community.
How to run a giveaway for a new business page
Pick a prize your ideal customer actually wants. Not a generic gift card. A backyard movie night package attracts the exact people who would later rent party gear. The prize is a filter.
Make following and engaging part of entry. The giveaway should reward the actions that grow the page, so entering naturally means following and commenting.
Promote it organically. Share it everywhere you already have a presence. A strong prize and genuine engagement can carry a giveaway with no ad spend.
Document the journey. Posting the build of the business in real time gives people a reason to keep watching after the giveaway ends.
Key takeaways
A party rental business is a strong local side hustle with reusable inventory.
AI lowers the startup overhead enough for one person to launch alone.
A giveaway took a brand-new page from 1 to over 400 followers in 4 days.
Choose a giveaway prize that attracts your future customers, not just anyone.
Frequently asked questions
How do you get followers for a brand-new business page?
A giveaway is the fastest organic method. A prize your ideal customer wants gives people a reason to follow and engage, and that engagement pushes your reach further without any ad spend.
Can you start a party rental business with no money for ads?
Yes. I launched mine with no paid advertising. Organic growth through a well-chosen giveaway and consistent posting can build the early audience for free.
How can AI help you start a small business?
AI can build the website, handle SEO and email automation, set pricing, and even write marketplace listings, which lets a single founder operate at the pace of a much larger team. It supports the work but does not replace customer relationships or logistics.
What makes a good giveaway prize?
One that attracts your future customers specifically. A themed package tied to your service filters for the audience you actually want.
How long does it take to grow a business page with a giveaway?
It can move quickly. My page went from 1 to over 400 followers in four days. Most giveaways run for a set window of one to two weeks, with the biggest growth while the campaign is active.
Do you need an expensive prize for a giveaway to work?
No. The prize needs to be relevant, not expensive. A well-themed package that speaks to your ideal customer outperforms a costlier generic prize.
About Anna Katherine
I am a South Carolina founder building small businesses in real time and documenting the honest version: what works, what costs more than expected, and how AI is changing what one person can pull off. Follow the build of Keowee Event Company on TikTok and YouTube.
Last updated: June 5, 2026 · By Anna Katherine Page
This post contains affiliate links. If you buy through them I may earn a small commission, at no extra cost to you. I only recommend products I actually use.
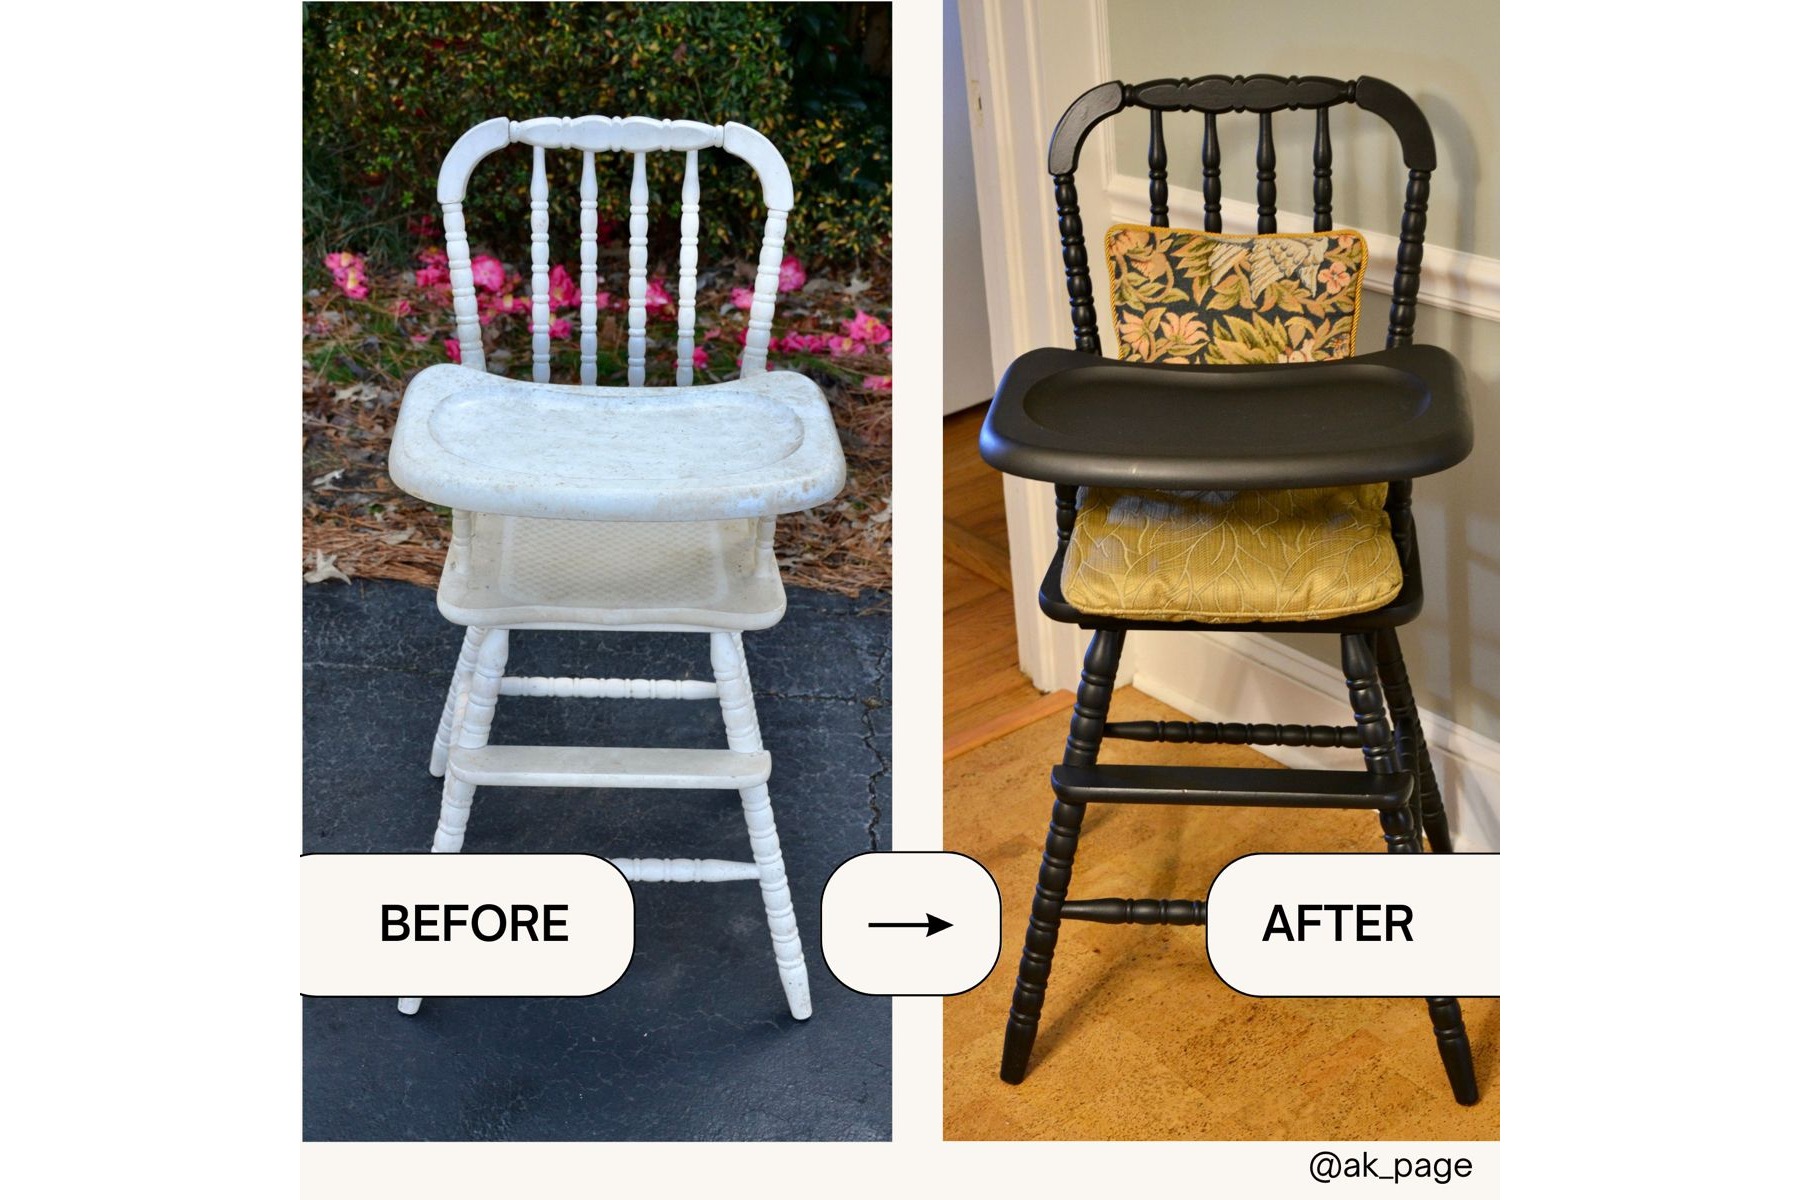
Quick answer: Here is the full Jenny Lind high chair makeover, the multi-year story of one piece. I bought this vintage 1980s chair at a thrift store for $10, painted it black to match my kitchen, then stored it in the barn for years. Recently I refinished it in white to use as a styled rental piece for my event business. This is the full multi-year makeover, paint and all.
Some pieces of furniture have more than one life in them. This vintage Jenny Lind high chair has had at least three. It started as a $10 thrift store gamble, became a black statement piece in my kitchen, sat forgotten in a barn, and is now a freshly painted rental item for first birthday parties. Here is the whole story, and how I refinished it each time.
Years ago I spotted a vintage 1980s Jenny Lind high chair at a thrift store and brought it home for just $10. A Jenny Lind is the classic style with the rows of decorative spindle turnings, and they have a timeless, slightly old-fashioned charm that is hard to find in modern furniture. At $10 it was an easy yes. I documented that very first flip on the blog back then: you can read the original Vintage 1980s Jenny Lind highchair furniture flip, and I filmed it in two parts on YouTube, Part 1 and Part 2.
Round one: painting it black
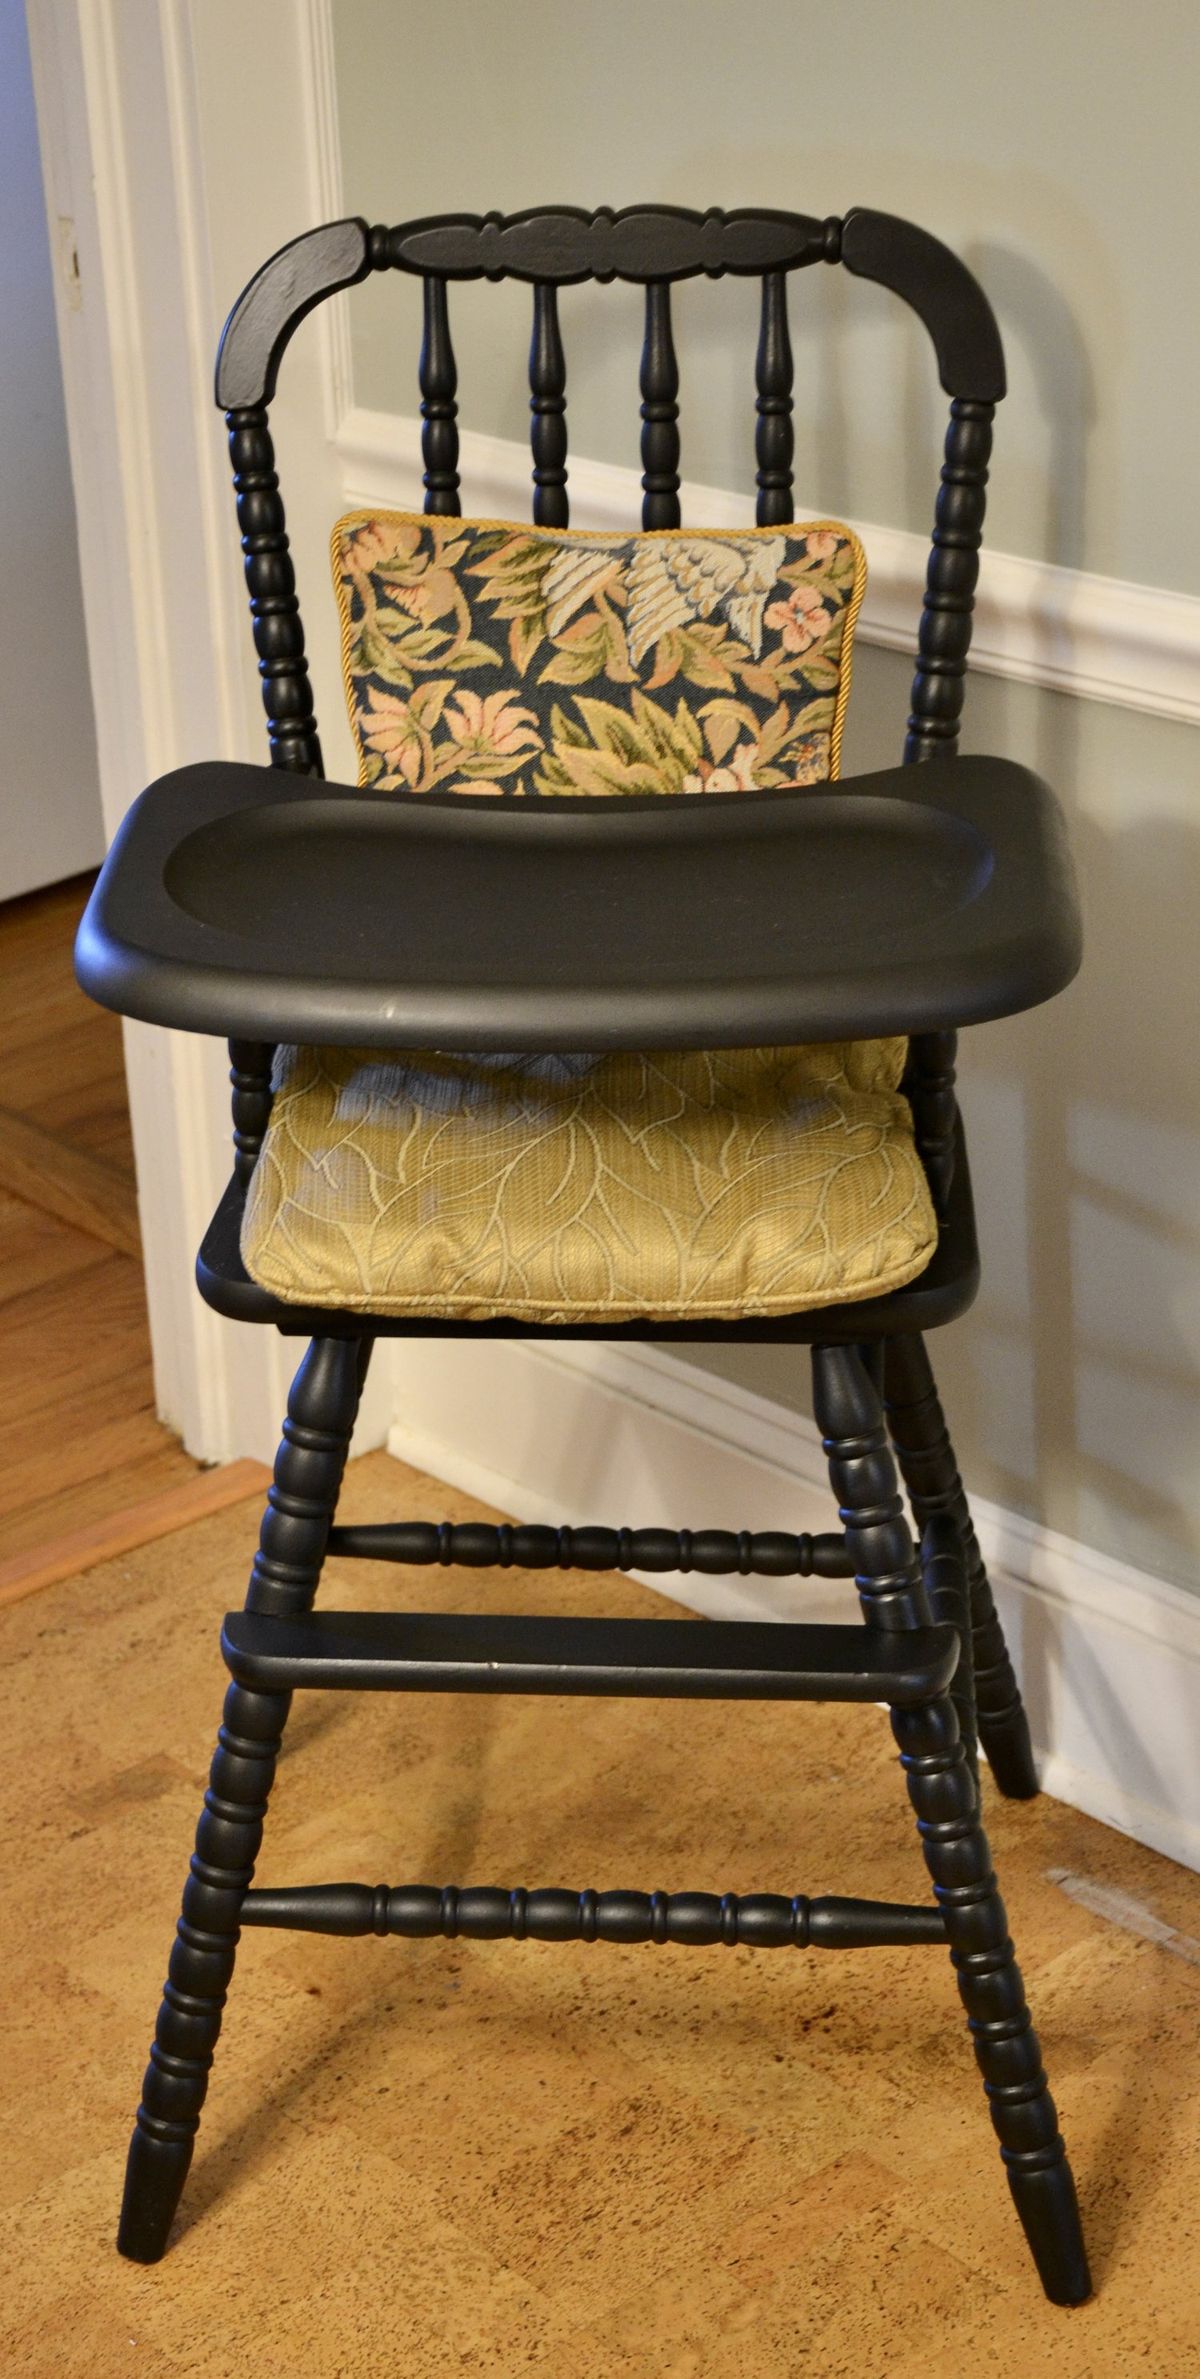
At the time, my kitchen was leaning moody and dark, so I painted the high chair black to match that vibe. It worked beautifully for that season of my home. That is the honest truth about decorating: your taste shifts, and a piece that was perfect one year can feel off the next. The high chair earned its spot for a while, then slowly stopped fitting the space.
Round one: the high chair painted black for a moodier kitchen.
Then it sat in the barn
When my style moved on, the high chair did what a lot of good furniture does. It went out to the barn for storage. It was too charming to give away and too out of step with the house to keep inside. So it waited. For a few years it was just a black vintage high chair under a dust sheet, holding its potential.
Round two: bringing it back in white
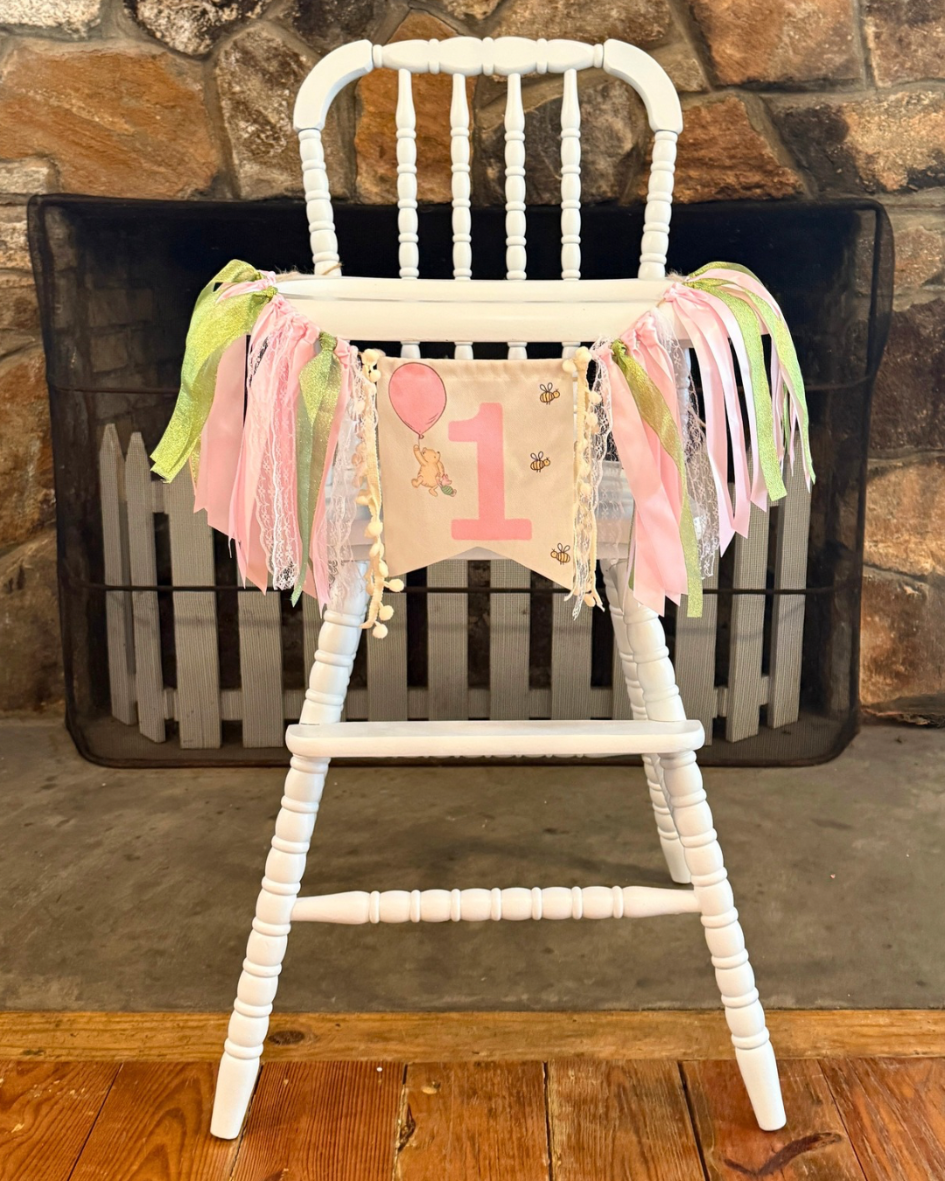
This spring it finally got its third life. I am building an event rental business, and a vintage high chair is exactly the kind of charming, photogenic piece families want for a first birthday celebration. So I pulled it out of the barn and refinished it, this time in a soft white to suit a styled party setup.
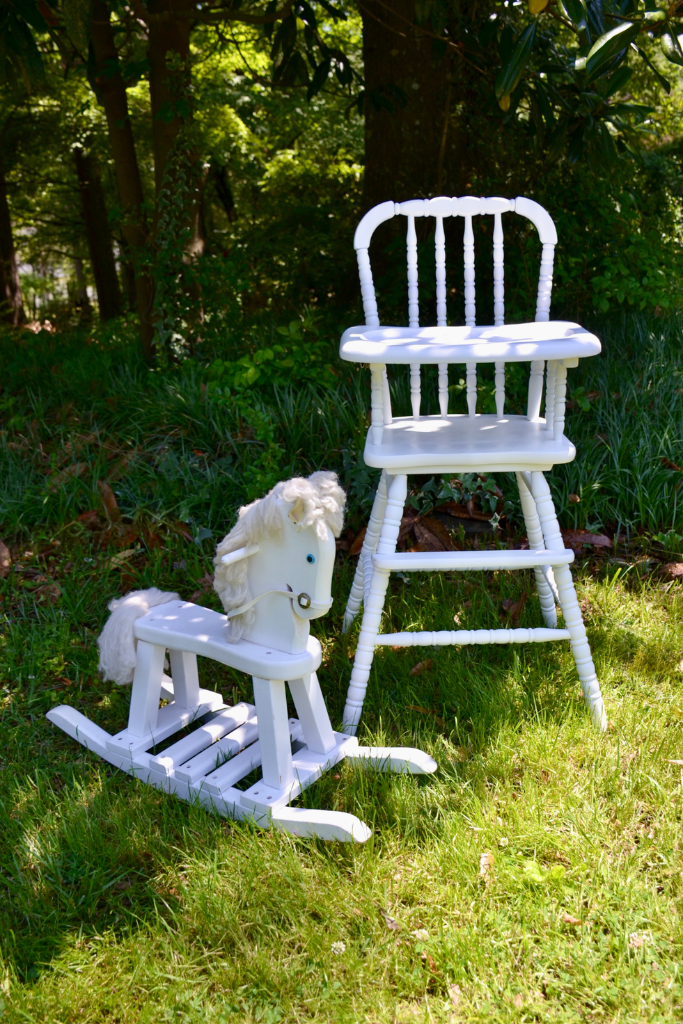
Here is how it turned out: the same $10 thrift store frame, the same charming spindles, now in a fresh white that photographs beautifully against any party backdrop.
The finished high chair in soft white, styled for a first birthday celebration.
Renting it out through Keowee Event Co
The high chair now lives a working life as a rental piece with Keowee Event Co, my event rental business. We rent backyard games and styled pieces that make gatherings feel special across Oconee and Pickens County, South Carolina. A vintage high chair is a perfect example of the kind of charming, photo-ready detail that turns an ordinary first birthday into something memorable, and giving an old piece a new purpose is exactly the point.
The high chair with a vintage rocking horse, both refinished as event rental pieces.
Pin this Jenny Lind high chair makeover
Saving this for your own thrift flip? Here are the pins from the project.
Key takeaways
A $10 thrifted vintage high chair has been refinished twice over several years.
Round one was black to match a moody kitchen; round two is white for event rentals.
The white refinish took three cans of satin spray paint applied in thin coats.
Old furniture is worth keeping. Its next purpose may just be a paint job away.
Frequently asked questions
What is a Jenny Lind high chair?
A Jenny Lind is a classic style of wooden high chair recognizable by its rows of decorative spindle turnings. The look has been made for generations, and vintage versions like this 1980s one are popular for their old-fashioned charm.
Can you repaint furniture that is already painted?
Yes. You can paint over an existing finish. Clean the piece well, give it a light scuff sand so the new paint grips, and then apply your paint in thin, even coats. This high chair went from raw wood to black to white over its life.
What kind of paint should you use on a wooden high chair?
A satin-finish spray paint works well on a spindled piece like this because it reaches into the turnings evenly. I used a satin enamel spray paint and built the color up with several light coats.
How much does it cost to flip a thrifted high chair?
This one cost $10 at the thrift store. The white refinish added three cans of spray paint, so the whole project stayed inexpensive, which is part of what makes thrift flips so satisfying.
How do you get a smooth finish when spray painting furniture?
Warm the can, shake it well, and use short sweeping strokes that start and end past the edges, building thin coats. The full method is in my spray paint tips guide.
Where can you rent vintage event pieces in Upstate South Carolina?
Keowee Event Co rents backyard games and styled event pieces, including this high chair, across Oconee and Pickens County, South Carolina.
About Anna Katherine
I refresh thrifted furniture, document real makeovers, and run Keowee Event Co, an event rental business in Upstate South Carolina. Follow the flips and the building of the business on TikTok and YouTube.
Follow the makeovers and the rental business on TikTok, or see what we rent at Keowee Event Co.