To price a bouquet, add up your stem cost and sundries, multiply by 3 for a market bouquet (2 to 3 times for markets, 4 to 5 times for weddings), then add your labor. Most mixed market bouquets land between $25 and $45. If you grow flowers to sell, you have probably held a finished bouquet and thought, “what is this actually worth?” Then you picked a number that felt safe and moved on. I did the same thing my first season, and safe almost always means too low.
Underpricing is the quietest way a flower business loses money. It is rarely carelessness. It is that nobody ever handed you the math. So here it is, the same way a florist or an experienced grower would run it. Want the math done for you? Plug your stems into the free Bouquet Pricing Calculator, or price every product at once with my Flower Farm Pricing Toolkit.
Quick answer: Price a market bouquet at (your stem cost x 3) + labor. Markets run 2 to 3 times your flower cost, weddings run 4 to 5 times. If you take one thing from this page: 2x is where most growers quietly lose money once labor is counted.
Step 1: Cost your stems
You cannot price a bouquet until you know what the flowers in it cost you. Sort your stems into three tiers, using what the stem would sell for wholesale. That is the honest way to cost your own flowers, even the ones you grew.
Filler (feverfew, statice, grasses): about $1 a stem
Mid-range (zinnias, snapdragons, cosmos): about $2 a stem
Hero (dahlias, ranunculus, peonies): about $3 a stem, and specialty varieties can run $4 or more
You grew it yourself, so it feels free. It is not. Your time, seed, soil, and land all went into that stem.
Step 2: Add up the bouquet
A typical mixed market bouquet might hold:
3 hero stems at $3 = $9
5 mid-range stems at $2 = $10
4 filler stems at $1 = $4
That is $23 in flowers, plus about $2 in sundries like wrap and a band. Call it $25 in materials.
Step 3: Multiply for your market
Now multiply your materials by the markup that fits how you are selling:
Farmers market or roadside stand: 2 to 3x
Weddings and events: 4 to 5x, plus a design fee
Using 3x on $25 in materials gives you $75. That is your starting retail price, before labor.
Step 4: Add your labor
Every time you touch a flower, that is money. Design time is real work and it belongs in the price. If you value your time at $30 an hour and the bouquet takes about 12 minutes to harvest, condition, and arrange, that is roughly $6 to $9 of labor.
Your bouquet lands around $80. If that number made you wince, that is the point. You were probably charging half of it.
Run your own bouquet
Same math as the steps above: materials times your markup, plus your time at $30 an hour.
$
min
$81
Your floor (materials plus time) is $31.00. Charge less than that and the bouquet loses money.
You just priced one recipe at $81. The Flower Farm Pricing Toolkit does it for bouquets, weddings, CSA shares and market tables, with your labor already in the price.
If you would rather not run this by hand for every recipe, the Flower Farm Pricing Toolkit does it for bouquets, weddings, CSA shares and market tables, with your labor already in the price. To check your cost per stem first, try the free Flower Pricing Reality Check.
The do and do not of bouquet pricing
Do:
Cost your own stems, even the ones you grew
Add labor on top, every single time
Charge more for weddings than for market bouquets
Price to your local market, not to your nerves
Do not:
Double your cost and call it a price. 2x barely covers materials once labor is in
Forget sundries, market fees, and gas
Use one price for every way you sell
Pick a number because you are afraid to say the real one out loud
Bouquet pricing cheat sheet
A rough guide by product, assuming solid materials and a 3x-ish retail markup:
Small market bunch, single variety: $12 to $18
Mixed market bouquet: $25 to $45
Premium or large designer bouquet: $50 to $85
Bridal bouquet: $150 to $350, depending on stems and design
Your local disposable income matters. A bouquet that sells for $35 in a small town may fetch $55 in an affluent suburb.
Extension research backs this up. Shoppers in a Utah State University Extension survey said they spend $9.75 to $151 on each flower purchase, $46 on average (Utah State University Extension, 2025). At one Virginia farmers market, most flowers sold for about $2 a stem, with a discount for buying several (Holly Scoggins, Virginia Tech), which lines up with the mid-range stem value above. Mississippi State University Extension suggests checking your prices against wholesale florist price lists and the USDA Ornamental Wholesale Market Report (MSU Extension, 2025).
Key takeaways: Cost your stems, multiply by 3 for markets and 4 to 5 for weddings, then add labor. Never stop at 2x. Price to your market, and charge what the flowers are actually worth.
Frequently asked questions
How much should I charge for a market bouquet?
Most growers land between $25 and $45 for a mixed market bouquet. Run your stem cost times 3, add labor, and adjust to your local market.
What markup should flower farmers use?
2 to 3 times your flower cost for markets, 4 to 5 times for weddings and events, with labor added on top.
How do I price a wedding bouquet?
Cost the stems, multiply by 4 to 5, then add a design and consultation fee. A bridal bouquet commonly runs $150 to $350.
Should I include my own labor if I grew the flowers?
Yes. Your time is the most valuable thing in the bouquet. Bill it every time.
What is the 3:5:8 rule for flowers?
It is a design rule, not a pricing rule. One common version builds a bouquet from 3 focal flowers, 5 stems of foliage and 8 filler stems, working from the center out (Daily Blooms). Other florists use it more loosely, grouping stems in 3s, 5s and 8s (Livingetc). For pricing, count every stem, foliage included, when you cost the bouquet.
Let the math do itself
Running these numbers by hand for every product gets old fast. I built a one-tap calculator that does exactly this. You enter your costs, and it tells you what to charge and whether that price is hobby money or real money. It is $7, one time. Price your bouquets in two minutes.
Want the whole system, with weddings, CSA shares, market bunches, and bloom bars all built out? The $27 Flower Farm Pricing Toolkit has it in one place.
You grew the flowers. Now charge what they are worth.
Nine cut flower garden cheat sheets with illustrated diagnostic and treatment guides for beginner cut flower gardeners in Zone 7b. Pin them, print them, save them to your phone. Every cheat sheet links to its full deep-dive guide.
Save these cut flower garden cheat sheets for the next time something looks off.
These cut flower garden cheat sheets are designed to be printable and Pinterest-pinnable. Hover any image, save it to your boards, or print and tape inside your garden shed.
This post contains affiliate links. If you buy through them I may earn a small commission, at no extra cost to you. I only recommend products I actually use.
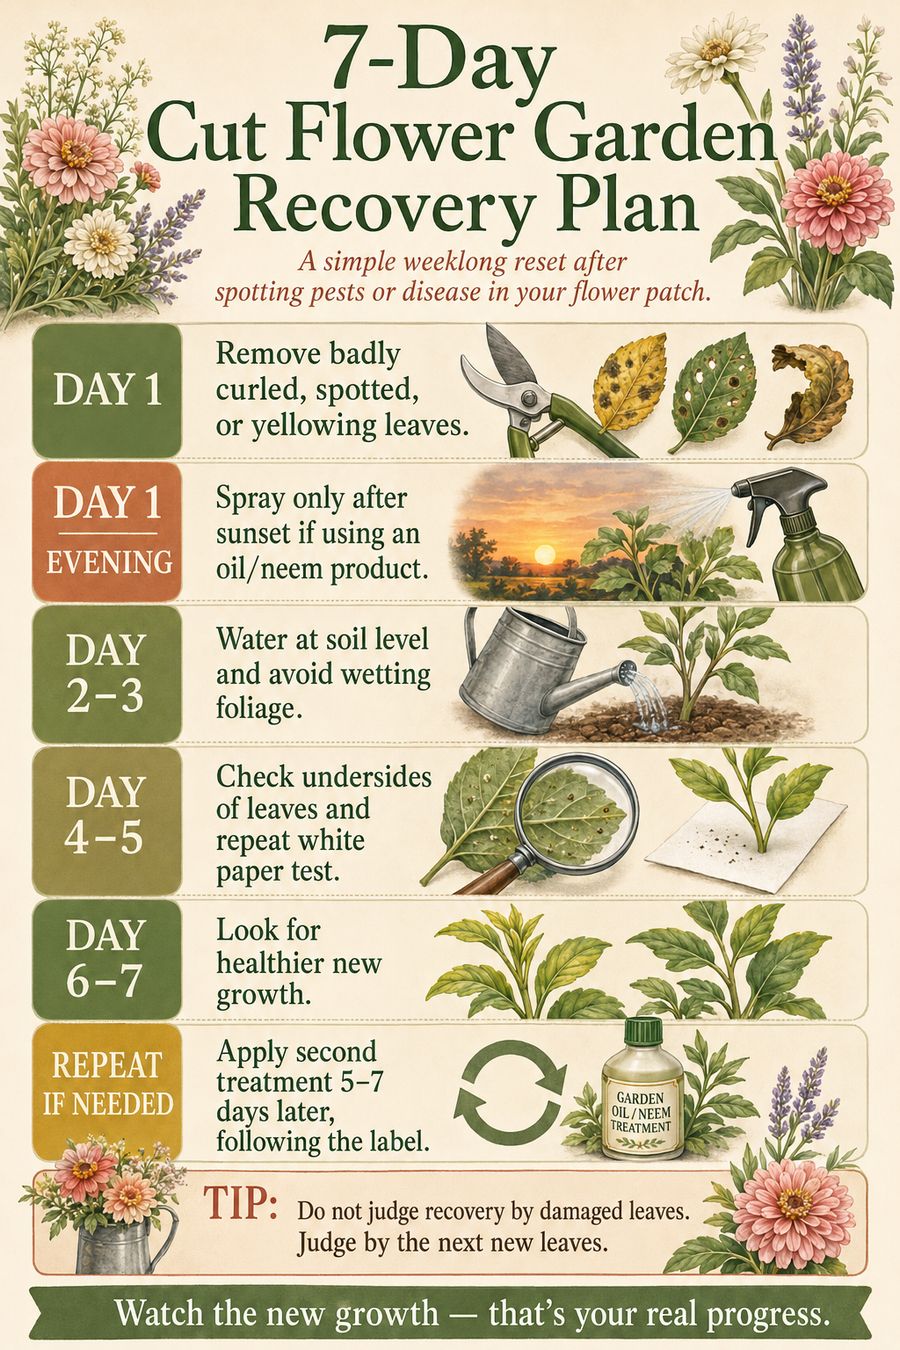
Quick answer: The simplest 7-day cut flower garden spray plan for a beginner is: Day 1 remove damaged leaves; Day 1 evening spray a 3-in-1 neem-based product after sunset; Day 2 to 3 water at soil level only; Day 4 to 5 inspect undersides and repeat the white paper test; Day 6 to 7 check for healthy new growth; repeat in 5 to 7 days if needed. Never spray oils above 85°F or in direct sun. Recovery is judged by new growth, not damaged leaves.
When you first start seeing pest or disease problems in your cut flower garden, it is easy to panic-buy every garden spray on the shelf. Neem oil. Horticultural oil. Insecticidal soap. Spinosad. Copper fungicide. Bt. Suddenly you have a cabinet full of products and still are not sure what to use.
For a beginner cut flower garden in Zone 7b with a mix of minor insect chewing, curled new growth, and fungal leaf spot, I would start much simpler. Here is the one-product-first approach I would use, plus the exact 7-day plan that pairs with it.
First: don’t spray before you inspect
Before treating the whole bed, spend a few minutes figuring out what you may be dealing with. Look for:
Holes in leaves
Brown or black spots
Curled new growth
Aphids on stems
Tiny insects under leaves
Webbing
Distorted buds
Yellowing or stunting
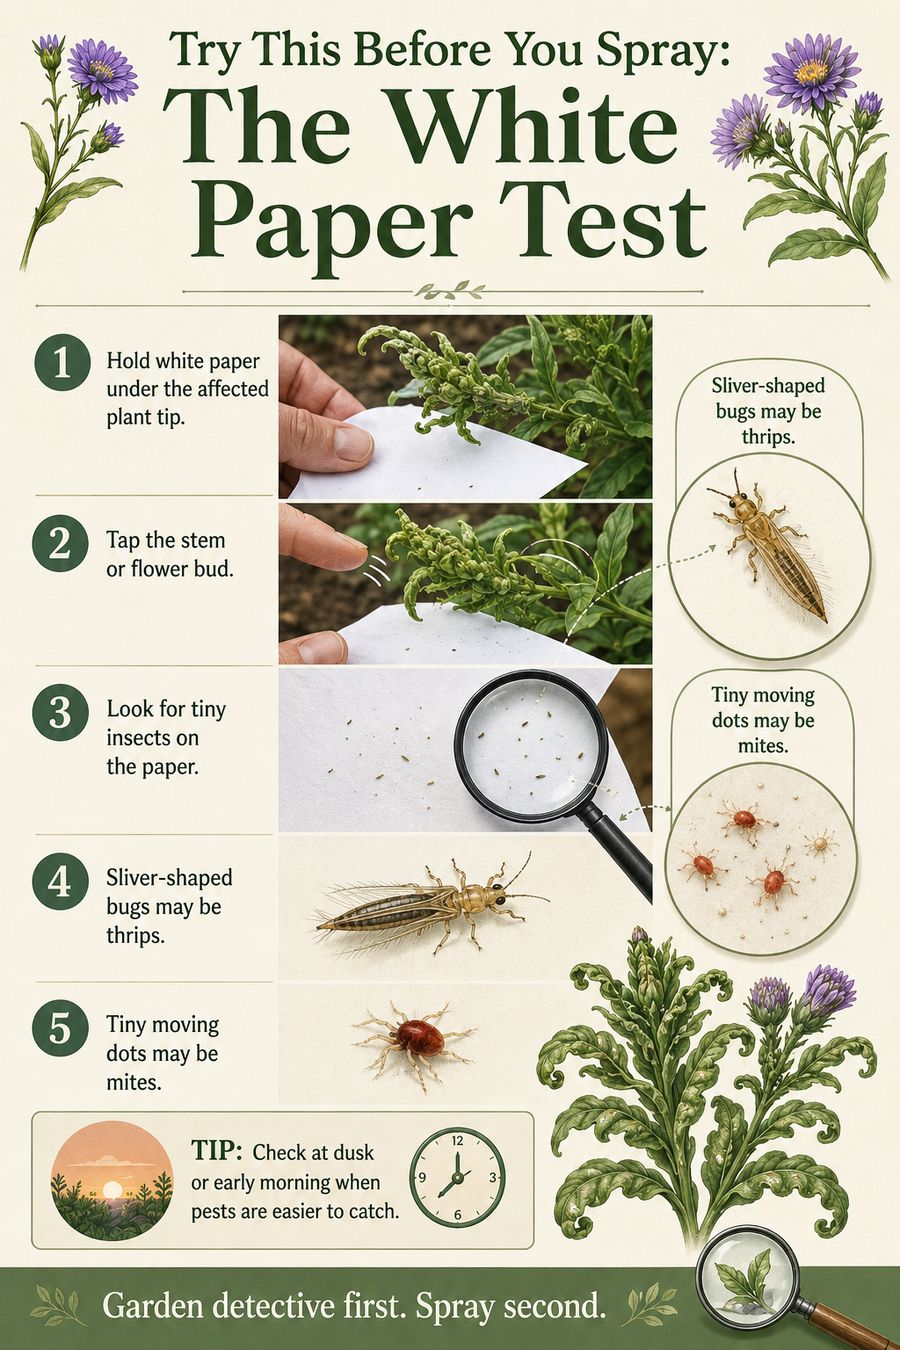
Then use the white paper test. Hold white paper under the affected plant and tap the stem. Tiny insects may fall onto the paper, making them easier to see. For a full walkthrough of diagnostic patterns, read my beginner pest and disease guide.
The one-product cut flower garden spray plan
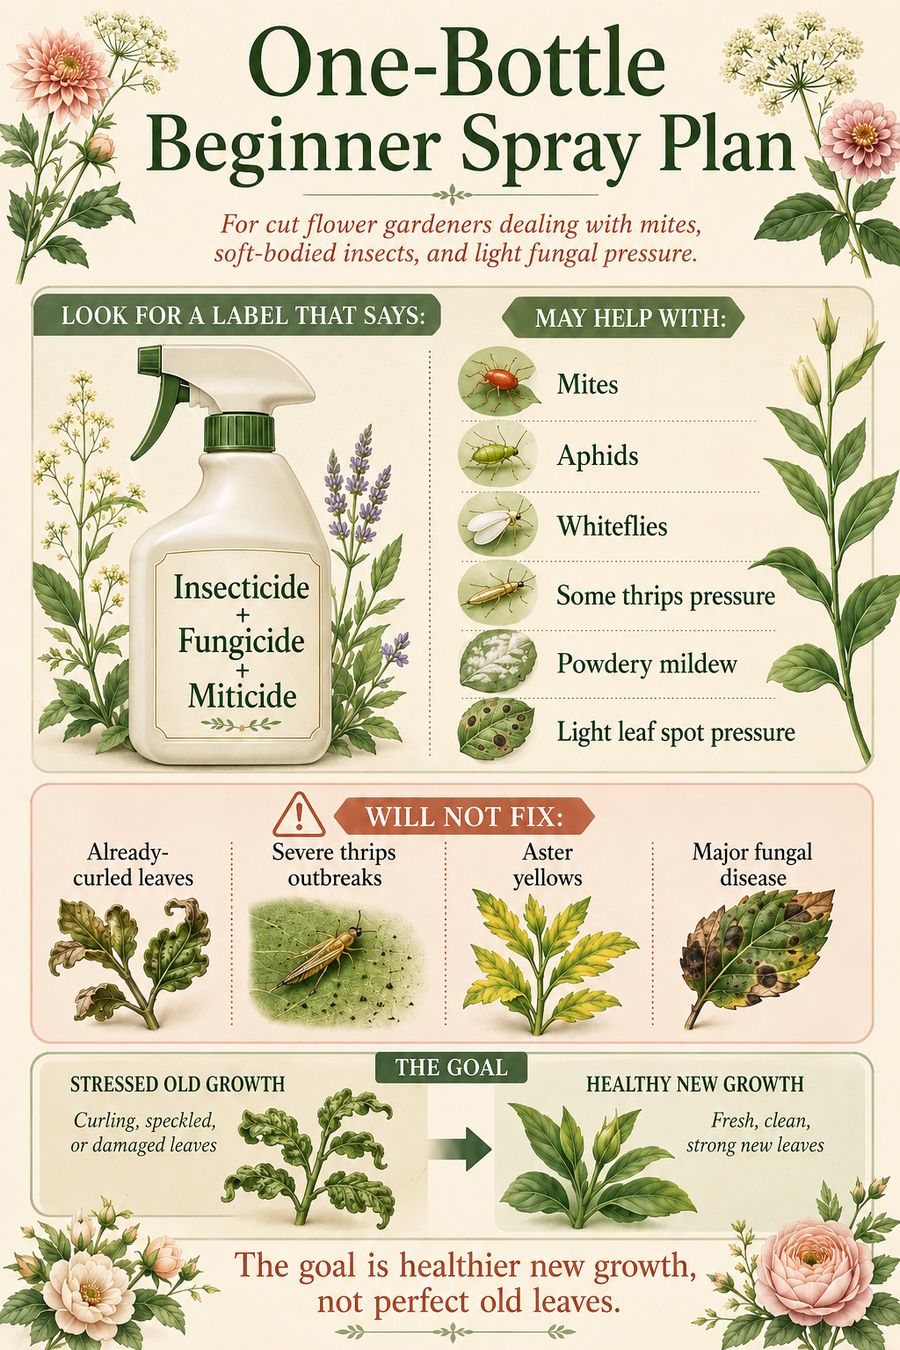
What a 3-in-1 product can and cannot do. Pin this for the next time you stand in the garden aisle.
If you want one product that covers the widest range of beginner issues, look for a spray labeled as Insecticide + Fungicide + Miticide. My go-to is Bonide Captain Jack’s Neem Max. It is a neem-based 3-in-1 that handles the bulk of beginner cut flower issues in one bottle.
It may help with:
Mites
Aphids
Whiteflies
Some thrips pressure
Powdery mildew
Some fungal leaf issues
A neem-based multi-purpose product is a reasonable first step for a beginner gardener because it covers several categories without requiring a complicated spray rotation. You will spray it with a Chapin 2-gallon pump sprayer, which gives you the pressure and reach to coat undersides and growing tips properly.
What one product cannot do
A multi-purpose neem or oil-based spray is useful, not magic. It will not fully control:
Damage that has already happened (already-curled leaves will not uncurl)
The goal is healthier new growth, not perfect old leaves.
Cut flower garden spray plan: hot weather safety rules
This matters most in the Upstate. Oil-based sprays — including neem and horticultural oils — can burn leaves in heat or full sun. This is the single biggest beginner mistake in Zone 7b.
Memorize the Do / Don’t list. Following this prevents 90 percent of spray-damage issues.
Only spray when:
After sunset
Temperatures are below 85°F
Plants are well-watered
Rain is not expected for several hours
Do not spray stressed, wilted, or drought-dry plants. Keep a garden thermometer in a shaded spot near your beds so you can verify temperature before you spray. A rechargeable headlamp keeps both hands free for evening spraying and is worth the $20.
Cut flower garden spray plan: where to spray
For pests like mites, thrips, and aphids, spraying the top of leaves is not enough. Focus on:
Undersides of leaves
Curled growing tips
New shoots
Stems
Flower buds
Lower leaves near the soil
Many pests hide where sprays do not easily reach. A pump sprayer with a thin wand lets you angle up under leaves where mites and thrips actually live.
Cut flower garden spray plan: how often to spray
For an active issue, I would typically spray every 5 to 7 days for 2 to 3 rounds, always following the product label. Then reassess. Do not spray endlessly just because you are nervous. Watch the new growth. If new leaves come out normal, the plant is recovering.
Cut flower garden spray plan: what to do alongside spraying
Sprays work better when paired with good garden habits:
Remove damaged foliage. Clip off heavily diseased or distorted leaves and trash them.
Mulch the bed. Mulch reduces soil splash and slows fungal disease.
Stop fertilizing temporarily. If pests appeared after fertilizing, pause for 3 to 4 weeks.
Improve airflow. Thin crowded plants where needed.
Water at the base. Avoid wetting leaves, especially in Zone 7b humidity.
Cut flower garden spray plan: when you might need a second product
A one-product approach is a good start, but sometimes you need something more targeted.
You may need a thrip-specific product if: you confirm thrips with the white paper test, buds are distorted, new growth continues to curl after treatment, or you see tiny sliver-shaped insects. Captain Jack’s Deadbug Brew (spinosad) is the standard escalation.
You may need a stronger fungicide strategy if: leaf spots spread rapidly, lower leaves are collapsing, zinnias are defoliating, or weather stays wet and humid for several days. Bonide Copper Fungicide is the standard escalation.
You may need a horticultural oil if: mites are confirmed via white paper test and loupe inspection. Bonide All-Seasons horticultural oil suffocates mite eggs and adults in one application.
For aphids-only pressure (large clusters of soft-bodied insects), Garden Safe insecticidal soap is the simpler answer than escalating to a 3-in-1.
You may need to remove plants if: aster yellows is suspected, flowers are severely deformed, the plant is stunted and worsening, or only one or two plants are affected and you want to protect the rest.
Key takeaways
One bottle to start: a 3-in-1 insecticide/fungicide/miticide (Captain Jack’s Neem Max).
Always inspect before you spray. The white paper test confirms thrips and mites in 60 seconds.
Never spray oil above 85°F or in direct sun. Wait until after sunset.
Focus on undersides, growing tips, and lower leaves — that’s where pests live.
Repeat every 5 to 7 days for 2 to 3 rounds. Then reassess.
Escalate to Captain Jack’s Deadbug Brew (spinosad) for confirmed thrips.
Escalate to Bonide Copper Fungicide for spreading leaf spot.
Recovery is judged by new growth, not damaged leaves.
Frequently asked questions
What is the best all-purpose spray for a beginner cut flower garden?
A neem-based 3-in-1 insecticide + fungicide + miticide like Bonide Captain Jack’s Neem Max. It handles the most common beginner problems (mites, aphids, whiteflies, light fungal pressure) in one bottle without requiring a complicated rotation.
Can you spray neem oil in hot weather?
Only with strict timing. Spray neem and other oil-based products after sunset when temperatures drop below 85°F. Spraying in direct sun or hot temperatures causes leaf burn (phytotoxicity) on tender cut flowers. This rule matters most in Zone 7b summers.
How often should you spray cut flowers for pests?
Every 5 to 7 days for 2 to 3 rounds during an active issue, then reassess. Continued spraying without reassessment wastes product and stresses plants. Watch the new growth; if it emerges normal, the plant is recovering and treatment can stop.
What kills thrips on flowers?
Spinosad-based products (Captain Jack’s Deadbug Brew) are the most effective home garden thrips control. Two to three applications 5 to 7 days apart usually clear an infestation. Spray in the evening, focusing on growing tips and flower buds where thrips hide.
Why didn’t my neem oil work?
Three usual reasons: timing (sprayed in direct sun, oil broke down), coverage (didn’t reach undersides where pests live), or wrong pest (neem suppresses mites and soft-bodied insects but is weak on heavy thrips and severe fungal disease). Escalate to spinosad for thrips or copper fungicide for serious leaf spot.
Should I rotate sprays?
For most beginners with low-to-moderate pressure, one rotation between a 3-in-1 (neem-based) and a targeted product (spinosad or copper) is plenty. Heavy rotation matters mostly for commercial growers managing chemical resistance over multiple seasons.
About Anna Katherine
I am Anna Katherine Page. I share garden, home, beauty, and resale tips from my home in Central, South Carolina (USDA Zone 7b). Follow along on TikTok and YouTube.
This post contains affiliate links. If you buy through them I may earn a small commission, at no extra cost to you. I only recommend products I actually use.
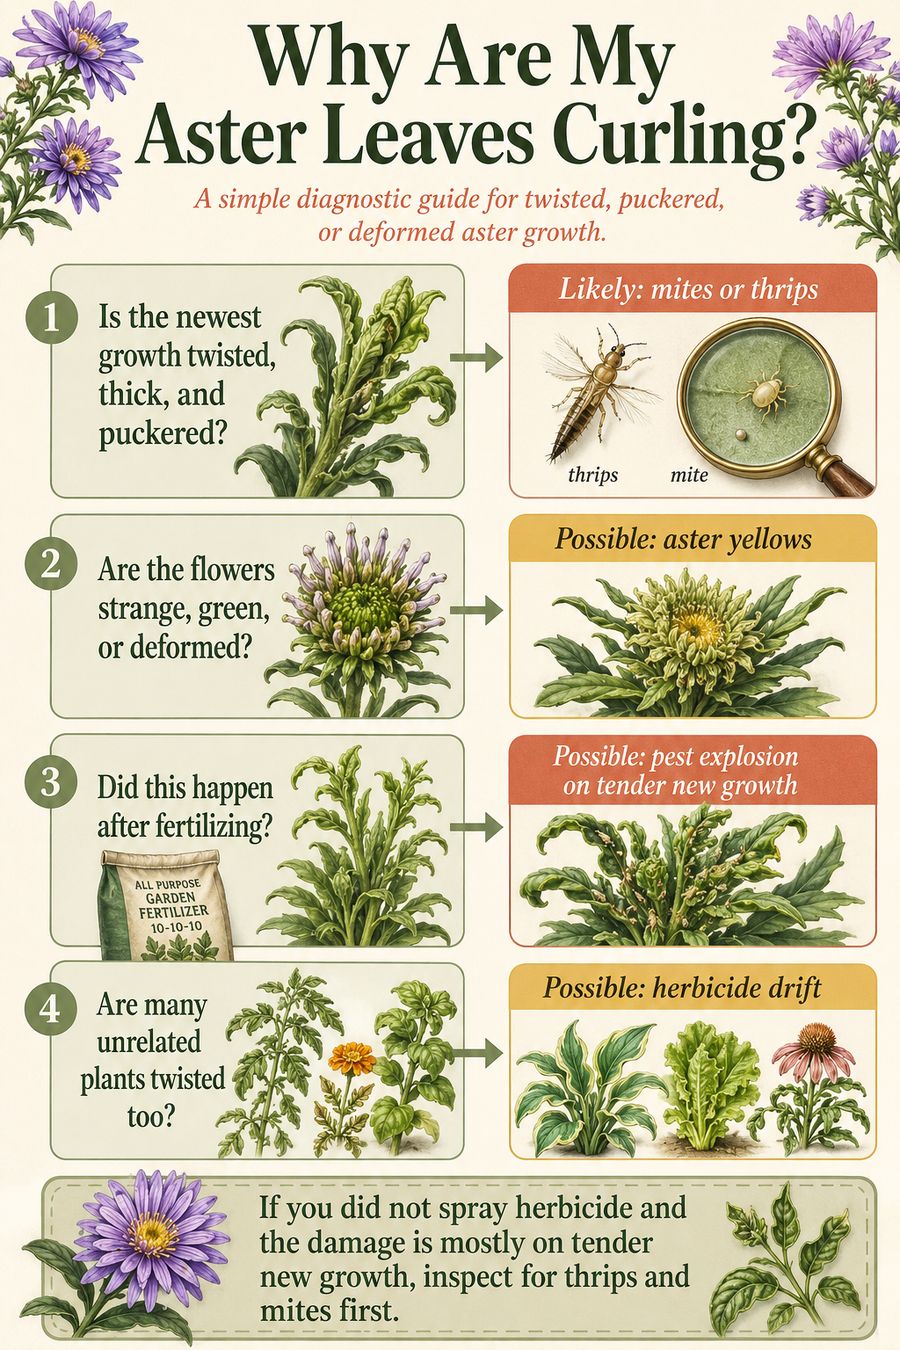
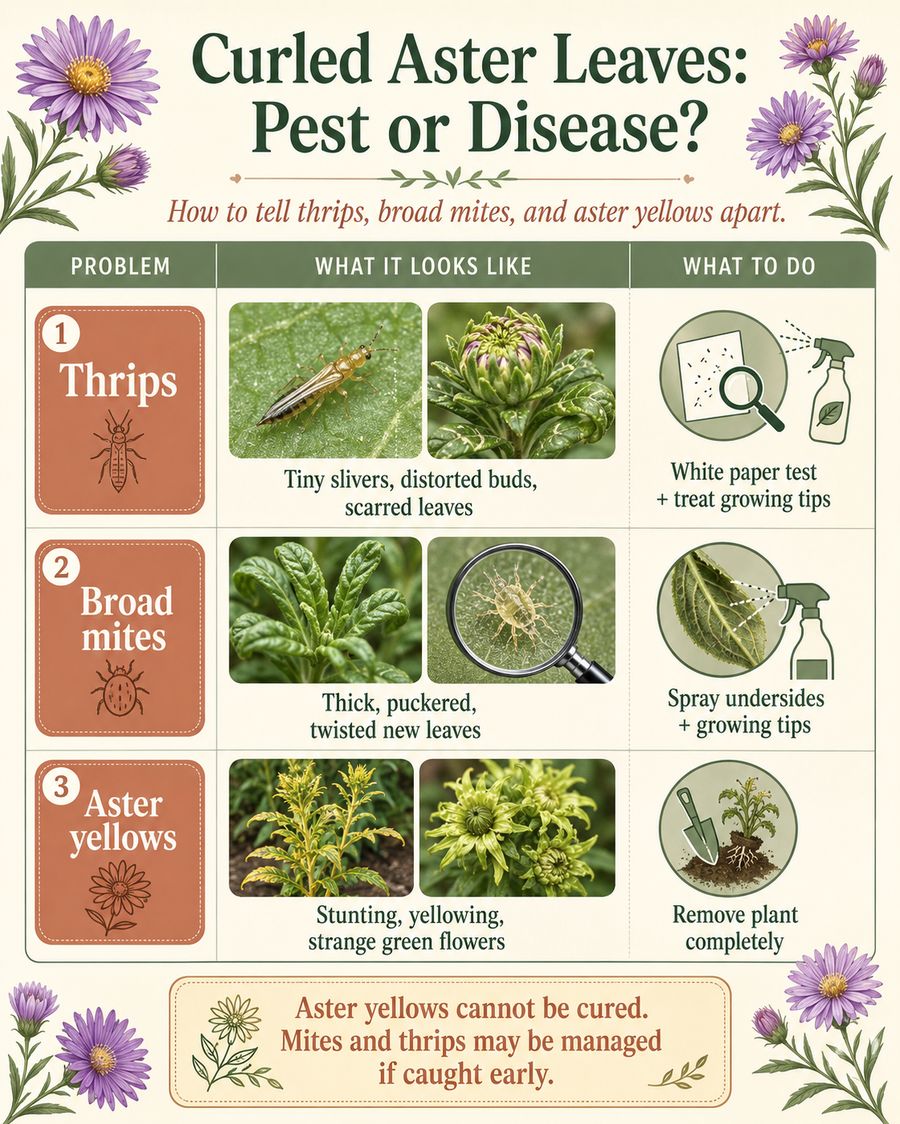
Quick answer: Curled aster leaves are usually caused by thrips, broad mites, aphids, herbicide drift, or aster yellows disease. If the newest growth is twisted, thick, and puckered and no herbicide was used nearby, mites or thrips are the most likely cause. Use the white paper test to confirm. Aster yellows shows up as stunting plus strange green flowers and cannot be cured — the plant must be removed.
Asters are beautiful cut flowers, but they can be a little dramatic when something goes wrong. One of the most confusing symptoms is when the leaves start curling, twisting, puckering, or drying up at the tips.
If your asters look like the new growth is deformed, do not automatically assume they need more water or more fertilizer. Curling leaves usually point to pest feeding, disease, or environmental stress. Here is how I would troubleshoot curled aster leaves in a beginner cut flower garden in Zone 7b.
What curled aster leaves can mean
When the newest leaves are curling or twisting, the problem is usually affecting the growing tip. The most common possibilities are:
Thrips
Broad mites
Cyclamen mites
Aphids
Aster yellows
Herbicide exposure
Fertilizer-related pest pressure
The exact cause depends on what the damage looks like and what has recently happened in the garden. Use the diagnostic flow above, then read the section that matches.
The three most-confused causes side by side. Match the symptom column to your plant before you treat anything.
1. Thrips
Thrips are tiny, slender insects that feed on tender new growth, flower buds, and leaves. They are hard to see because they hide inside curled leaves and buds. Thrips peak in Zone 7b from May through July, exactly when most cut flowers are flushing tender growth.
Signs of thrips
Distorted new leaves
Silvery or scarred patches on leaves
Buds that fail to open properly
Tiny black specks of waste on petals
Tiny tan, brown, or black sliver-shaped insects
How to check for thrips
Use the white paper test (see the next section). If tiny sliver-shaped insects fall onto the paper when you tap the stem or bud, thrips are likely involved.
What to do
Remove the worst distorted growth with bypass pruners. Then spray in the evening, focusing on growing tips and undersides of leaves. Neem-based sprays can help suppress thrips, but heavy infestations call for a spinosad product like Captain Jack’s Deadbug Brew. Spinosad is the most effective thrip-specific home garden option and the active ingredient most extension services recommend.
2. The white paper test
The white paper test is the single most useful diagnostic tool for confirming thrips and mites in a home garden. It costs nothing, takes 60 seconds, and tells you exactly what you are dealing with before you spend money on the wrong spray.
Steps 1 through 5 of the white paper test. Garden detective first. Spray second.
If you suspect mites specifically, pair the paper test with a 30x LED jeweler’s loupe. Broad mites are too small to see clearly without magnification. The loupe is $10 and pays for itself the first time it tells you broad mites instead of thrips (different sprays).
3. Broad mites or cyclamen mites
Broad mites and cyclamen mites are microscopic pests that feed on tender plant tissue. They are so small most gardeners never see them with the naked eye.
Signs of mite damage
New leaves look thickened or puckered
Growth tips look twisted
Leaves curl inward
Buds may be distorted
The plant looks stunted at the top
This can look very similar to disease or herbicide damage, which is why it can be frustrating to diagnose.
What to do
Bonide All-Seasons horticultural oil or a neem-based miticide can suppress mites. Spray thoroughly, especially into growing tips and undersides of leaves with a 2-gallon pump sprayer so you can get coverage on every surface. Plan on 2 to 3 applications 5 to 7 days apart; one spray rarely solves the entire problem.
For aphid-only pressure (large clusters of soft-bodied insects on stems), Garden Safe insecticidal soap is the simpler answer. Soap is contact-only, so coverage matters more than chemistry.
4. Aster yellows
Aster yellows is a disease spread by the aster leafhopper. It affects many plants in the aster family, including asters, zinnias, coneflowers, cosmos, daisies, marigolds, and chrysanthemums. In Zone 7b, aster yellows is endemic and shows up most often from June through September.
Signs of aster yellows
Stunted growth
Yellowing
Distorted leaves
Strange, deformed flowers
Excessive branching (witches’ broom)
Green or abnormal flower parts (called virescence)
Unlike pest damage, aster yellows is systemic. The whole plant is infected and there is no cure. According to the Clemson HGIC aster fact sheet, removal is the only response.
What to do
If a plant clearly has aster yellows, remove it completely and bag it for trash. Do not compost it; the phytoplasma can persist in plant tissue. However, if your plant only has dark green, puckered, curled new growth and no strange flowers or yellowing, mites or thrips are more likely than aster yellows.
5. Herbicide drift
Herbicide drift can also cause curled, twisted, or distorted growth, especially from lawn weed killers like 2,4-D or brush killers sprayed nearby.
Signs of herbicide injury
Multiple unrelated plant species are affected
Damage appears suddenly
New growth is twisted or strappy
Plants near the edge of the bed are worse
A neighbor, lawn company, or roadside crew recently sprayed
If no herbicide has been used nearby, this becomes less likely, but it is worth ruling out before you start treating for pests.
6. Recent fertilizer can make pests worse
In my own garden, the curling showed up shortly after fertilizing. That is an important clue. Fertilizer triggers a flush of soft, tender growth. Thrips, aphids, and mites love that kind of growth. The fertilizer may not be the direct cause, but it makes the plants more appealing to pests.
What to do
Pause fertilizing for 3 to 4 weeks while you diagnose and treat the issue. Too much nitrogen leads to leafy, soft growth instead of strong, resilient plants. For more on the fertilizer-pest connection, read the beginner pest and disease guide.
Why are my aster leaves curling? My troubleshooting plan
If your asters are curling and you are not sure why, here is the simple plan I would follow:
Remove the worst curled or dead tips.
Inspect the growing tips and undersides of leaves with a jeweler’s loupe.
Use the white paper test to check for thrips.
Stop fertilizing for 3 to 4 weeks.
Spray in the evening with a product labeled for mites and soft-bodied insects.
Repeat in 5 to 7 days if needed.
Watch the new growth over the next 7 to 14 days.
The old curled leaves will not uncurl. The goal is for new leaves to emerge normal.
Why are my aster leaves curling so badly I should remove the plant?
Remove the entire plant if any of these are true:
It is severely stunted
The flowers are deformed
The plant has strange green flower parts (virescence = aster yellows)
The problem continues after treatment
Only one or two plants are affected and you want to protect the rest of the bed
Sometimes pulling one sick plant saves the rest of the garden.
Key takeaways
Curled new growth points to pests (thrips, mites, aphids) more often than disease.
White paper test + jeweler’s loupe = the cheapest diagnostic toolkit in gardening.
Spinosad (Captain Jack’s Deadbug Brew) for thrips. Horticultural oil for mites.
Aster yellows = strange green flowers + stunting. Remove the plant. No cure.
Herbicide drift damages many unrelated plants at once. Mites and thrips target tender new growth only.
Pause fertilizer for 3 to 4 weeks while treating any curl problem.
Watch the next flush of growth. New leaves tell the truth.
Frequently asked questions
What is the fastest way to diagnose curled aster leaves?
The white paper test. Hold a sheet of white paper under the affected plant tip and tap the stem sharply. Tiny sliver-shaped insects falling onto the paper indicate thrips. Tiny moving dots indicate mites. No insects on the paper plus strange green flowers indicates aster yellows.
Can asters recover from leaf curl?
If the cause is thrips, mites, aphids, or fertilizer flush, yes. The old curled leaves will not uncurl, but the next flush of new growth should emerge normal once the cause is addressed. If the cause is aster yellows, no. Aster yellows is systemic and incurable; the plant must be removed.
What is the best spray for thrips on asters?
Spinosad-based products like Captain Jack’s Deadbug Brew are the most effective home garden thrips treatment. Spray in the evening, focusing on growing tips and undersides of leaves. Two to three applications 5 to 7 days apart usually clear an active infestation.
How do I know if it is aster yellows or just pest damage?
Aster yellows produces strange green flower parts (virescence), excessive branching (witches’ broom), and overall plant stunting in addition to leaf curl. Pest damage usually affects only new growth without flower distortion or whole-plant stunting. When in doubt, look at the flowers.
Should I pull asters with curl damage?
Only if you confirm aster yellows or if the plant continues to decline after treatment. For pest-caused curl that responds to treatment, leave the plant in place and wait for new growth.
How long until new aster leaves grow back normal?
7 to 14 days for visible new growth, longer for that new growth to mature into full leaves. Continue spraying weekly for 2 to 3 weeks after treatment to prevent reinfection. If the next flush still curls, escalate to a stronger product or remove the plant.
I am Anna Katherine Page. I share garden, home, beauty, and resale tips from my home in Central, South Carolina (USDA Zone 7b). Follow along on TikTok and YouTube.
This post contains affiliate links. If you buy through them I may earn a small commission, at no extra cost to you. I only recommend products I actually use.
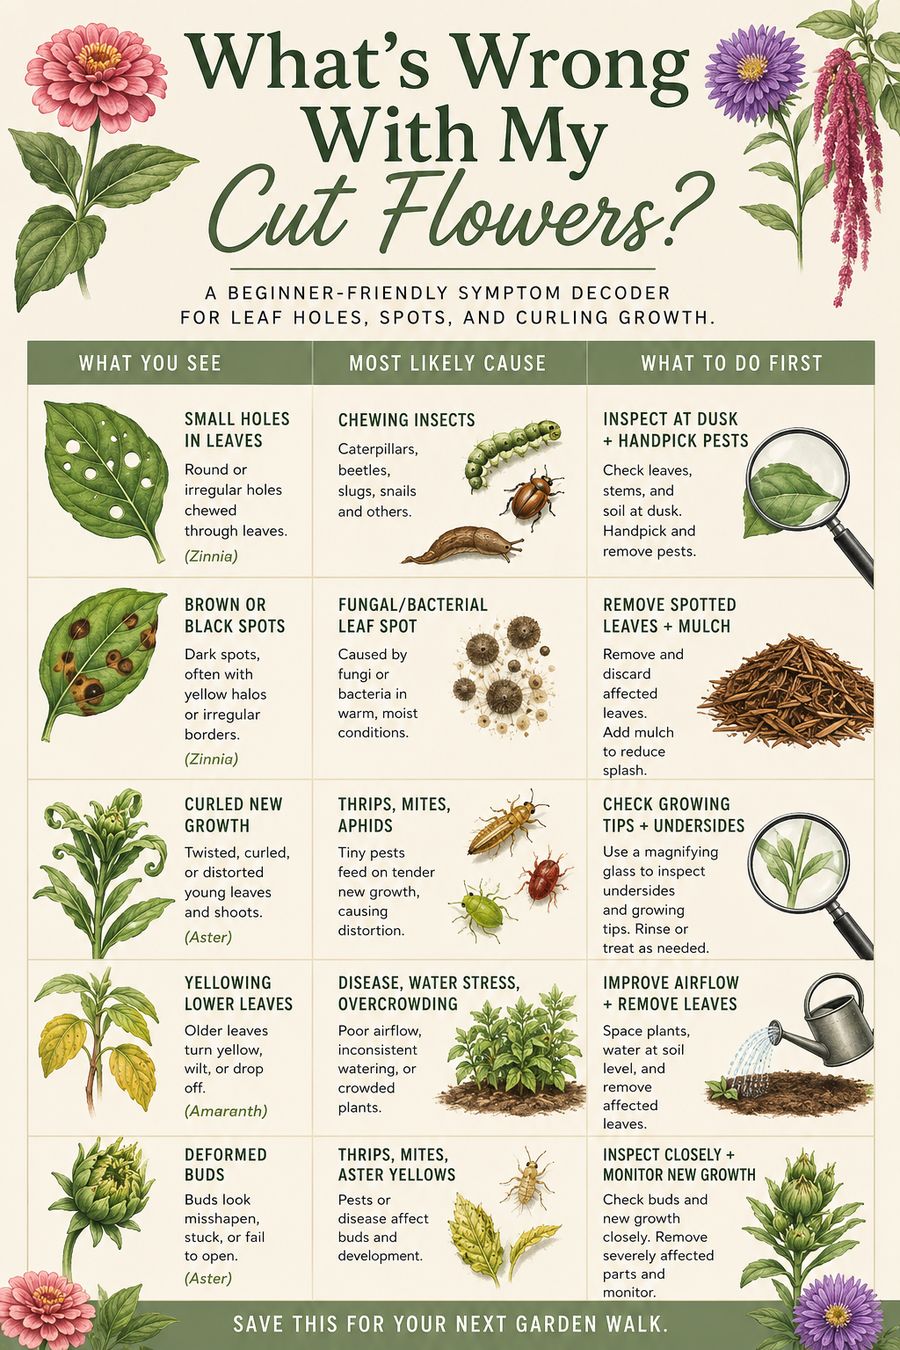
Quick answer: The most common cut flower garden pests in Zone 7b are chewing insects (flea beetles, Japanese beetles, caterpillars, slugs), fungal leaf spot on zinnias, and sap-sucking pests (thrips, broad mites, aphids) that cause curled new growth. Start with observation, remove damaged foliage, water at soil level, mulch to prevent soil splash, and only treat when you have confirmed the cause.
If you are new to growing cut flowers, there is a moment every gardener has: you walk outside excited to check on your flowers and suddenly notice holes in the leaves, brown spots, curled tips, or shriveling growth. It can feel like the whole garden is failing.
The good news? Most early summer cut flower garden problems are manageable, especially if you catch them early. In my own backyard cut flower garden in Upstate South Carolina (USDA Zone 7b), I started noticing a mix of leaf chewing, brown spotting, and curled new growth on zinnias, amaranth, and asters around late spring. Here is how to start identifying what is happening and what to do next.
Cut flower garden pests: Zone 7b timeline
Zone 7b in Upstate South Carolina has a long, humid growing season that creates ideal conditions for the full pest rotation. Here is what to expect month by month:
April to May: Aphids appear on tender new growth. Flea beetles arrive as soils warm.
May to July: Peak thrips and broad mite pressure. Japanese beetles emerge mid-June and feed for 4 to 6 weeks.
June to August: Fungal leaf spot peaks on zinnias as humidity rises. Slug pressure rebounds after rain.
August to October: Powdery mildew on zinnias and asters. Aster leafhoppers spread aster yellows.
Knowing the timeline lets you scout for the right problem at the right time instead of guessing.
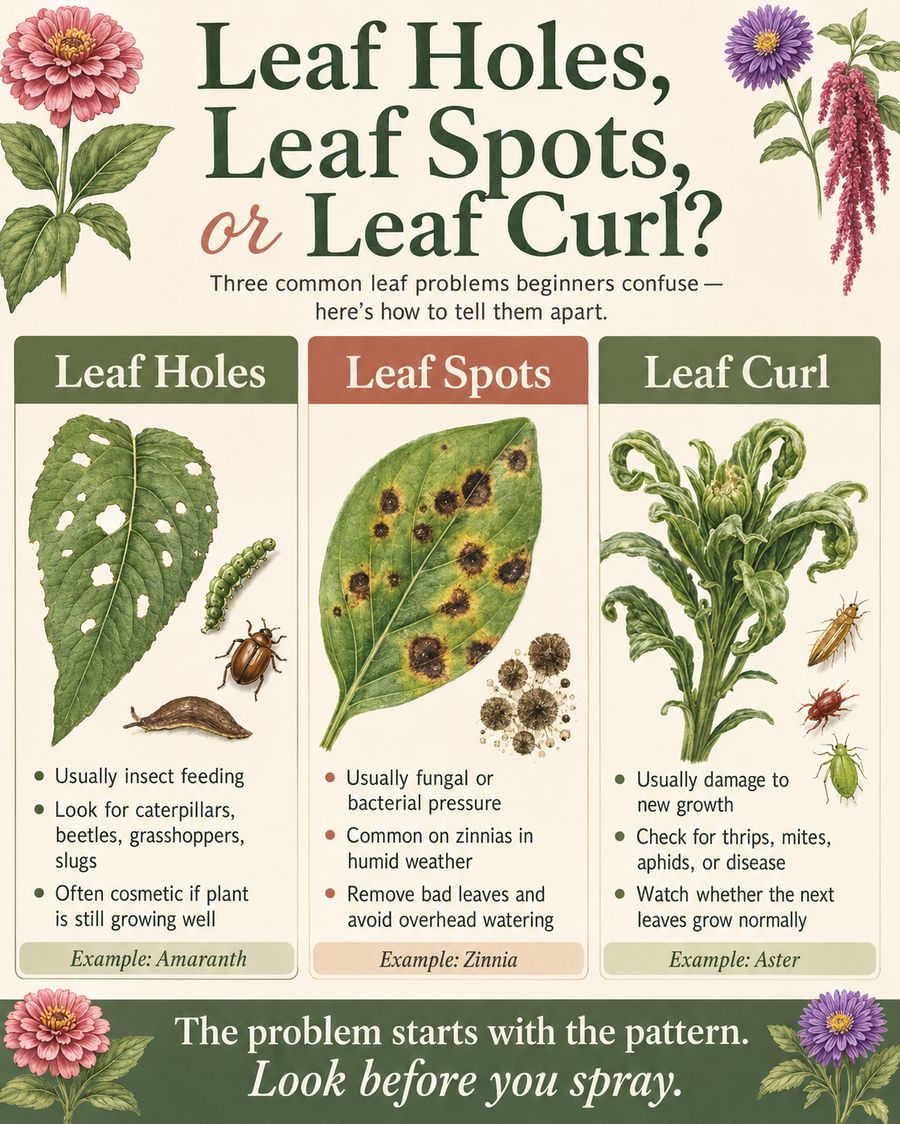
1. Holes in leaves: usually insect feeding
If you see small to medium holes in leaves on plants that otherwise look healthy, it is usually insect chewing damage. The common culprits in Zone 7b are:
Flea beetles (small round shotgun holes)
Caterpillars (irregular larger holes, often near leaf edges)
Japanese beetles (lacy skeletonized damage on zinnias and roses)
Grasshoppers (jagged larger holes)
Earwigs (overnight damage, especially in mulch)
Slugs and snails (slimy trails, ragged holes near the soil)
In my garden, the amaranth had leaf holes but the plant itself looked strong, green, and was actively blooming. That kind of damage is usually more cosmetic than catastrophic.
What to do
Start by inspecting plants in the evening or early morning. Some pests feed at night and hide during the day.
Handpick beetles and caterpillars directly off the plant in early morning when they are sluggish. Drop them in soapy water.
For caterpillar pressure,Bonide Thuricide (Bt) is the clean, target-specific solution. Bacillus thuringiensis only affects caterpillars and is safe for bees, birds, and beneficial insects.
For slugs, sprinkle Sluggo iron phosphate bait around the base of plants. It is pet-safe and breaks down into iron and phosphate (a soil amendment).
For Japanese beetles, install a Japanese beetle trap at least 30 feet from your cut flower beds (traps attract more than they catch when placed too close).
Hang yellow sticky traps near beds to monitor population pressure of small flying pests.
Avoid over-fertilizing, which encourages soft, pest-attracting growth.
For light chewing damage, do not panic or immediately spray everything. A few holes does not mean the plant is ruined.
2. Brown or black spots on zinnia leaves: likely fungal leaf spot
Zinnias are one of the most rewarding cut flowers to grow, but in the hot, humid Upstate they are also extremely prone to leaf spot. By early July in Zone 7b, expect to see brown, black, or purplish spots on lower leaves, especially after rain or overhead watering.
Common Zone 7b zinnia leaf issues include:
Alternaria leaf spot (dark brown spots with concentric rings)
Cercospora leaf spot (small dark spots with purple halos)
Bacterial leaf spot (water-soaked spots that turn dark)
Powdery mildew (white powdery coating, usually late summer)
Pattern matters. The three most common visual problems and how to tell them apart.
What to do
The best first step is sanitation. Remove leaves that are heavily spotted, yellowing, touching the soil, or more than 25 percent damaged. Do not compost diseased foliage; home compost piles rarely hit the temperatures needed to kill fungal spores. Bag and trash.
Then add mulch around the plants. Mulch is your biggest disease-prevention tool. It blocks fungal spores from splashing up from the soil onto lower leaves during rain. Good options for Zone 7b include:
Also, avoid overhead watering. Water at the base of plants using a soaker hose, drip irrigation, or a gentle stream at soil level. According to the Clemson HGIC zinnia disease fact sheet, drip-style watering reduces leaf-wetness duration, which is the primary driver of fungal pressure in our humidity.
3. Curling, twisted, or shriveled new leaves: sap-sucking pests
Curled new growth is different from basic insect holes. If the newest leaves are twisted, puckered, thickened, or dying back, the issue is happening at the growing tip of the plant. Possible causes include:
Thrips
Broad mites
Aphids
Cyclamen mites
Herbicide drift
Aster yellows disease
In my case, I had not sprayed herbicide and the plants were seed-started that year. The damage appeared shortly after fertilizing, which made pests like thrips and mites more likely than a systemic disease.
What to do
Inspect the curled growth closely. A simple test: hold a sheet of white paper under the affected plant tip, tap the stem or flower bud sharply, and look for tiny insects falling onto the paper. Thrips look like tiny tan, brown, or black slivers. Mites look like tiny moving dots and are hard to see without magnification.
Fertilizer is not bad, but too much nitrogen creates soft, lush growth that pests love. If you notice distorted growth about a week after fertilizing, pests may have moved in to feed on that tender new growth. The fertilizer did not cause the problem directly — it made the plants more attractive to insects and mites.
What to do
Pause fertilizing for 3 to 4 weeks while you treat the issue. Let the plants harden off a bit and focus on consistent watering, better airflow, removing damaged foliage, and monitoring new growth.
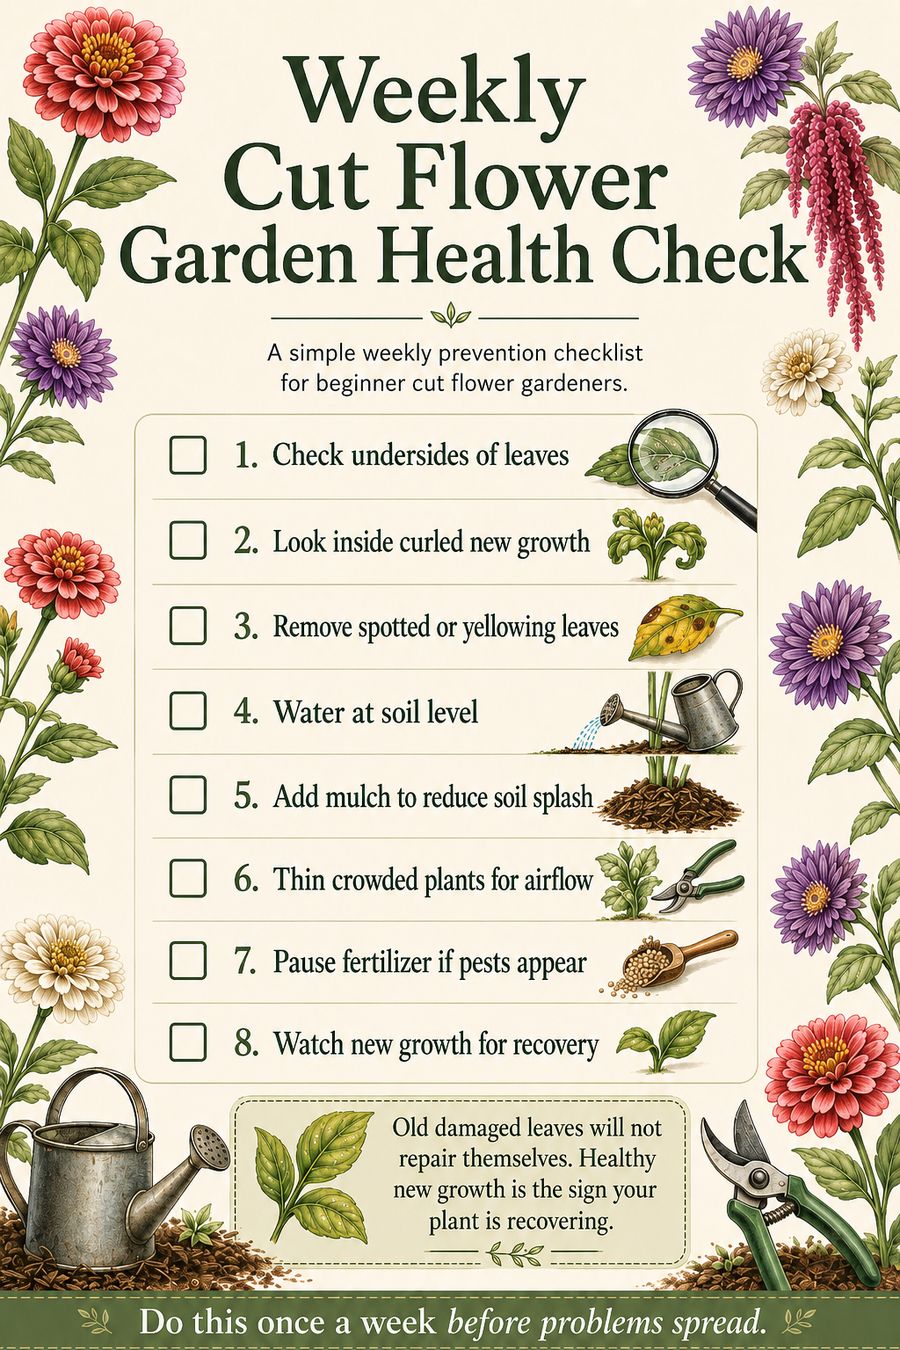
The best way to manage cut flower garden pests and disease is to make the garden less inviting in the first place.
Print this and tape it inside a garden shed. Eight checks every week and most problems never escalate.
Water at the soil level. Wet leaves invite fungal disease. Use drip irrigation or a soaker hose.
Mulch your beds. Mulch reduces soil splash, retains moisture, and keeps lower leaves cleaner.
Space plants properly. It is tempting to cram in as many flowers as possible, but crowded plants trap humidity. Zinnias, asters, cosmos, and dahlias all benefit from better airflow.
Remove damaged leaves quickly. Walk the garden every few days and clip off problem foliage before it spreads.
Avoid over-fertilizing. More fertilizer does not mean more flowers. Too much nitrogen leads to lush leaves and more pest pressure.
Watch the new growth. Old damaged leaves will not repair themselves. The real test is whether the next leaves emerge healthy.
Key takeaways
Holes usually point to chewing insects (handpick, Bt for caterpillars, Sluggo for slugs).
Brown spots on zinnias usually point to fungal leaf spot (sanitation + mulch + soaker hose).
Twisted new growth usually points to thrips, mites, herbicide drift, or aster yellows.
Pest problems after fertilizing usually mean pests are feeding on soft new growth.
Zone 7b pest pressure peaks May through August. Scout weekly during these months.
Treat only after you have identified the cause. Mulch, airflow, and soil-level watering prevent more problems than spraying ever cures.
Frequently asked questions
What are the most common cut flower garden pests in Zone 7b?
The most common Zone 7b cut flower garden pests are flea beetles, Japanese beetles, caterpillars, slugs, thrips, broad mites, and aphids. Fungal leaf spot on zinnias and aster yellows on asters are the dominant diseases. Pest pressure peaks May through August.
How do I know if my zinnia leaves have fungal leaf spot?
Fungal leaf spot on zinnias shows up as brown, black, or purplish spots on the lower leaves, often with yellow halos or concentric rings. It usually starts in mid summer in humid climates like Upstate South Carolina. Remove affected leaves, add mulch to block soil splash, and switch to soaker-hose watering.
What is the safest way to treat caterpillars on cut flowers?
Bacillus thuringiensis (Bt) products like Bonide Thuricide are the cleanest caterpillar solution. Bt only affects caterpillars and is safe for bees, beneficial insects, birds, pets, and people. Spray every 7 to 10 days while caterpillars are actively feeding.
Are Japanese beetle traps a good idea near my cut flowers?
Japanese beetle traps work, but only if placed at least 30 feet away from the flower bed you want to protect. The pheromone lure attracts more beetles than the trap catches, so a trap placed inside the bed makes the problem worse. Place traps at the property edge, downwind of beds.
How often should I scout my cut flower garden?
Every 3 to 5 days during peak Zone 7b pest season (May to August). A quick weekly walk with the checklist above catches most problems before they spread. Bring bypass pruners and a small bucket so you can remove damaged foliage and handpick visible pests on the same walk.
Will fertilizer fix my pest problem?
No, and it usually makes pest problems worse. Excess nitrogen creates soft, tender new growth that thrips, aphids, and mites prefer. Pause fertilizing for 3 to 4 weeks while you treat the issue and let the plant harden off.
I am Anna Katherine Page. I share garden, home, beauty, and resale tips from my home in Central, South Carolina (USDA Zone 7b). I grow a backyard cut flower garden every year and document the wins and the pest battles on TikTok and YouTube.
Last updated: June 5, 2026 · By Anna Katherine Page
This post contains affiliate links. If you buy through them I may earn a small commission, at no extra cost to you. I only recommend products I actually use in my own garden.
Quick answer: Here is how to propagate hydrangeas from cuttings: take a healthy stem cutting, dip the cut end in rooting hormone, and plant it in moist potting soil. Keep the cutting consistently damp in bright indirect light for the next few weeks while it grows roots. This is how I propagate hydrangeas every season to get endless free plants from the ones I already have.
If you want more hydrangeas in your yard without buying a single new plant, this is the way. Learning how to propagate hydrangeas from cuttings turns one shrub into many, costs almost nothing, and only takes a few minutes of hands-on work. I use the same three-step method every season and it works.
One mature hydrangea can give you a dozen new plants in a single afternoon. That is the math that makes propagation worth learning. Knowing how to propagate hydrangeas means you can fill a whole border for free, share rooted cuttings with friends and neighbors, or quietly multiply a favorite variety that is hard to find at the nursery. It is also the easiest way to keep a specific hydrangea going if the original plant ever gets damaged or dies.
When to take hydrangea cuttings
The best window is late spring through early summer, when the plant has put out new soft green growth but stems are not yet fully woody. These softwood cuttings root the fastest. Early morning is the best time of day because the stems are full of moisture before the heat sets in.
Take a stem cutting. Choose a healthy, non-flowering stem with new green growth. Cut a 4 to 6 inch section just below a leaf node. Strip the lower leaves so only the top two remain. If the top leaves are large, cut them in half to reduce water loss.
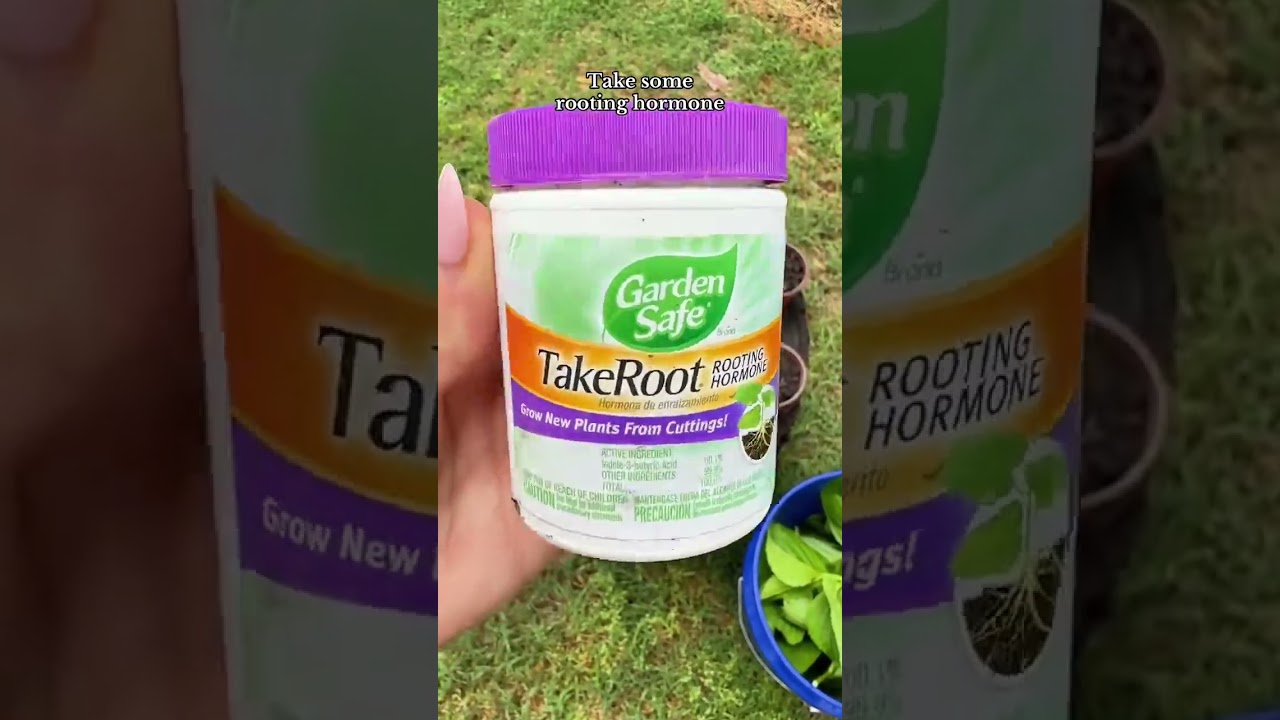
Dip the cut end in rooting hormone. Wet the bottom inch of the cutting and dip it into Garden Safe TakeRoot or another rooting hormone powder. Tap off the excess. The hormone is what tells the cutting to focus on producing roots instead of pushing out new leaves.
Plant in moist potting soil. Make a hole in damp potting soil, slide the dipped cutting in, gently press the soil around the stem to hold it upright, and water lightly to settle everything in.
After-care: keeping the cuttings alive
The next few weeks are about keeping the cutting consistently damp without rotting it. Place the pot somewhere with bright, indirect light. Direct afternoon sun will cook a fresh cutting before it has roots. Check the soil daily and water whenever the surface starts to dry. Some gardeners loosely cover the pot with a clear plastic bag or dome to keep humidity high, which can speed things along.
When to expect roots
Most hydrangea cuttings start producing roots within 2 to 4 weeks. You can do a very gentle tug test after about three weeks; if you feel a tiny bit of resistance, roots are forming. Wait until the cutting is well-rooted (usually 4 to 6 weeks total) before transplanting into a larger pot or directly into the garden.
Key takeaways
How to propagate hydrangeas comes down to three steps: cut, dip, plant.
Take softwood cuttings in late spring or early summer for the fastest results.
Rooting hormone like Garden Safe TakeRoot dramatically improves success rates.
Keep cuttings consistently damp in bright indirect light for 4 to 6 weeks.
Frequently asked questions
Can you propagate hydrangeas without rooting hormone?
You can, but success rates are noticeably lower. Rooting hormone signals the cutting to focus on producing roots, which is exactly what you want.
How long does it take to propagate hydrangeas from cuttings?
Most cuttings produce roots within 2 to 4 weeks, with a fully rooted plant ready for transplant around 4 to 6 weeks.
What is the best time of year to propagate hydrangeas?
Late spring through early summer is ideal, when stems are softwood (green and flexible, not yet woody).
Do hydrangea cuttings need direct sunlight?
No. Bright, indirect light is best. Direct afternoon sun will dry out a fresh cutting before it has roots.
Can I propagate hydrangeas in water instead of soil?
Yes, water propagation works. Transfer to soil once roots are about an inch long.
How many cuttings should I take to make sure some succeed?
Plan on 6 to 10 cuttings to virtually guarantee a few thriving plants. The math is easy when cuttings are free.
About Anna Katherine
I am a South Carolina gardener documenting a real cut-flower and pollinator garden, season by season. I share what works, what flops, and the small steps and hacks like this one that make the biggest difference. Follow the garden on TikTok and YouTube.
More garden tutorials and free-plant hacks on TikTok.
Last updated: June 5, 2026 · By Anna Katherine Page
This post contains affiliate links. If you buy through them I may earn a small commission, at no extra cost to you. I only recommend products I actually use.
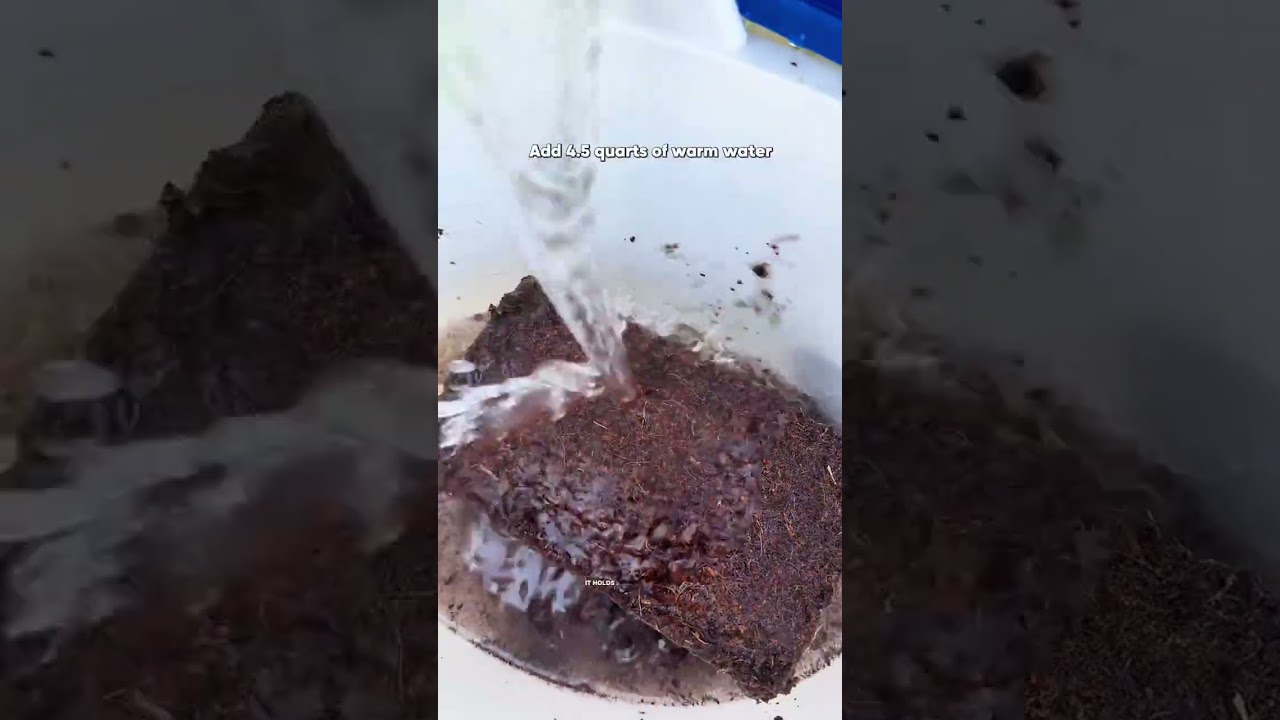
Quick answer: A compressed coconut coir brick expands into about 16 quarts of seed starting mix in 120 seconds with just warm water. No more hauling heavy bags of soil from the store or wrestling them out of the car, and this seed starting mix holds moisture noticeably better than most bagged options.
If you have ever lugged a 30-pound bag of soil out of a car for spring seed starting, this is the seed starting mix hack you have been waiting for. One compressed coir brick the size of a paperback book turns into 16 quarts of light, moisture-holding seed starting mix in 120 seconds. No back strain, no plastic bag of dust, and a better result for your seedlings.
The biggest barrier to starting seeds at home is the soil itself. Bagged seed starting mix shows up at the store as dense, heavy, plastic-wrapped bags. You haul one through the parking lot, wrestle it into the car, drive it home, and lug it out again. By the time you get to the actual planting, your back is already done. And the mix inside is often dried out, hard to wet evenly, and runs water right off the top of the pot.
This seed starting mix hack solves both problems at once: it weighs almost nothing, and it holds water like a sponge.
What you’ll need for this seed starting mix hack
A compressed coconut coir brick. Small, dense, paperback-sized. Look for one that expands to 16 quarts or more. (Shop compressed coir bricks on Amazon)
Warm water, which activates the brick faster than cold.
A bucket or large container to expand it in.
That is it. No store run mid-project, no heavy bag waiting in the garage all season.
How to make seed starting mix in 120 seconds
Set the brick in your bucket. One brick handles a full 16-quart batch of seed starting mix.
Pour warm water over it. Use the amount the package calls for, usually around a gallon.
Wait about 120 seconds. The brick swells and breaks apart into a fluffy, dark mix.
Fluff it with your hands or a hand trowel. Break up any remaining clumps. You should have 16 quarts of light, moist seed starting mix ready to use.
Fill your trays, pots, or jugs. Plant your seeds at the depth the seed packet recommends, water lightly, and you are good to go.
Why this seed starting mix holds moisture better
Compressed coir is processed coconut husk fiber. Once it expands, it forms a light, airy matrix that holds water through the whole pot rather than letting it pour straight out the bottom. For seedlings, that is a huge advantage. Young roots cannot survive a dry spell, and a mix that stays evenly damp without going soggy gives them the best start. It is a quieter benefit than the “no heavy bags” headline, but for actual germination rates, it matters more.
Using it for winter sowing in jugs
If you are starting seeds in outdoor jugs over winter, the well-loved winter sowing technique where you sow in cleaned milk jugs and set them outside to overwinter, this seed starting mix is ideal. The expanded coir is light enough to scoop easily into a jug, holds the seeds in place, and stays evenly moist through freezing-thawing cycles. Get the jugs prepped in late winter and the seeds wake up on their own as spring arrives.
Key takeaways
A compressed coir brick plus warm water makes 16 quarts of seed starting mix in 120 seconds.
Weighs a fraction of bagged mix and stores small until you need it.
Holds moisture better than typical bagged options, which means stronger seedlings.
Works for trays, pots, and outdoor winter sowing jugs.
Frequently asked questions
What is coconut coir and is it the same as seed starting mix?
Coconut coir is the fibrous material processed from coconut husks. When compressed and rehydrated it becomes a seed starting mix on its own or mixed with a little perlite.
How much water does a compressed coir brick need?
Follow the package directions, but most standard bricks take about a gallon of warm water to expand fully into roughly 16 quarts of seed starting mix.
Can I use this seed starting mix for transplanting too?
Yes. It works for starting seeds, potting up seedlings, and topping off containers. For larger established plants you may want to blend it with regular potting soil for more nutrients.
Does coconut coir have nutrients in it?
It is low in nutrients on its own, which is fine for germination since seeds carry their own starter food. Once seedlings get true leaves, feed them with a diluted liquid fertilizer.
How long do compressed coir bricks last in storage?
The bricks store almost indefinitely while compressed, as long as they stay dry. Keep one on a shelf and rehydrate it whenever you need fresh seed starting mix.
Can I use this for winter sowing in milk jugs?
Yes. The expanded coir is light, holds moisture through freeze-thaw cycles, and scoops cleanly into jugs, which makes it a good fit for winter sowing.
About Anna Katherine
I am a South Carolina gardener documenting a real cut-flower and pollinator garden, season by season. I share what works, what flops, and the small hacks like this one that make the biggest difference. Follow the garden on TikTok and YouTube.
Watch the original demo and follow more garden hacks on TikTok.
Last updated: June 5, 2026 · By Anna Katherine Page
This post contains affiliate links. If you buy through them I may earn a small commission, at no extra cost to you. I only link to products I actually use in my own garden.
Quick answer: Here is how to cold stratify milkweed seeds: fold them into a damp paper towel, seal it in a labeled plastic bag, and refrigerate for about two weeks before planting. This mimics winter and tells the seeds it is safe to germinate. Skip this step and most milkweed seeds stay dormant, which means fewer blooms and fewer monarch butterflies in your yard.
Every spring I plant milkweed to bring monarch butterflies into my garden, and there is one step almost everyone skips that makes the biggest difference in whether those seeds actually come up. It is called cold stratification, it takes less than five minutes of hands-on work, and it costs nothing. This year I am starting five different varieties of milkweed, and I prep every single one the same way. Here is exactly how to cold stratify milkweed seeds, why it matters, and the simple paper-towel method I use.
What is cold stratification, and why do milkweed seeds need it?
Cold stratification is a period of cold, moist conditions that a seed needs before it will germinate. Milkweed is native to North America, and in nature its seeds drop in the fall, sit on the ground through the cold, damp winter, and sprout in spring. That winter chill is a signal. It tells the seed that the dangerous cold has passed and it is safe to grow.
When you start milkweed seeds straight from a packet without that cold period, you are skipping the signal. The seeds do not know winter is over, so a large share of them simply stay dormant. If your milkweed seeds have ever failed to come up, this is the most likely reason. Conservation groups agree on the fix: the Xerces Society notes that germination is significantly improved by a period of cold, moist stratification before sowing. Get this step right and reliable milkweed is what fills a yard with monarchs.
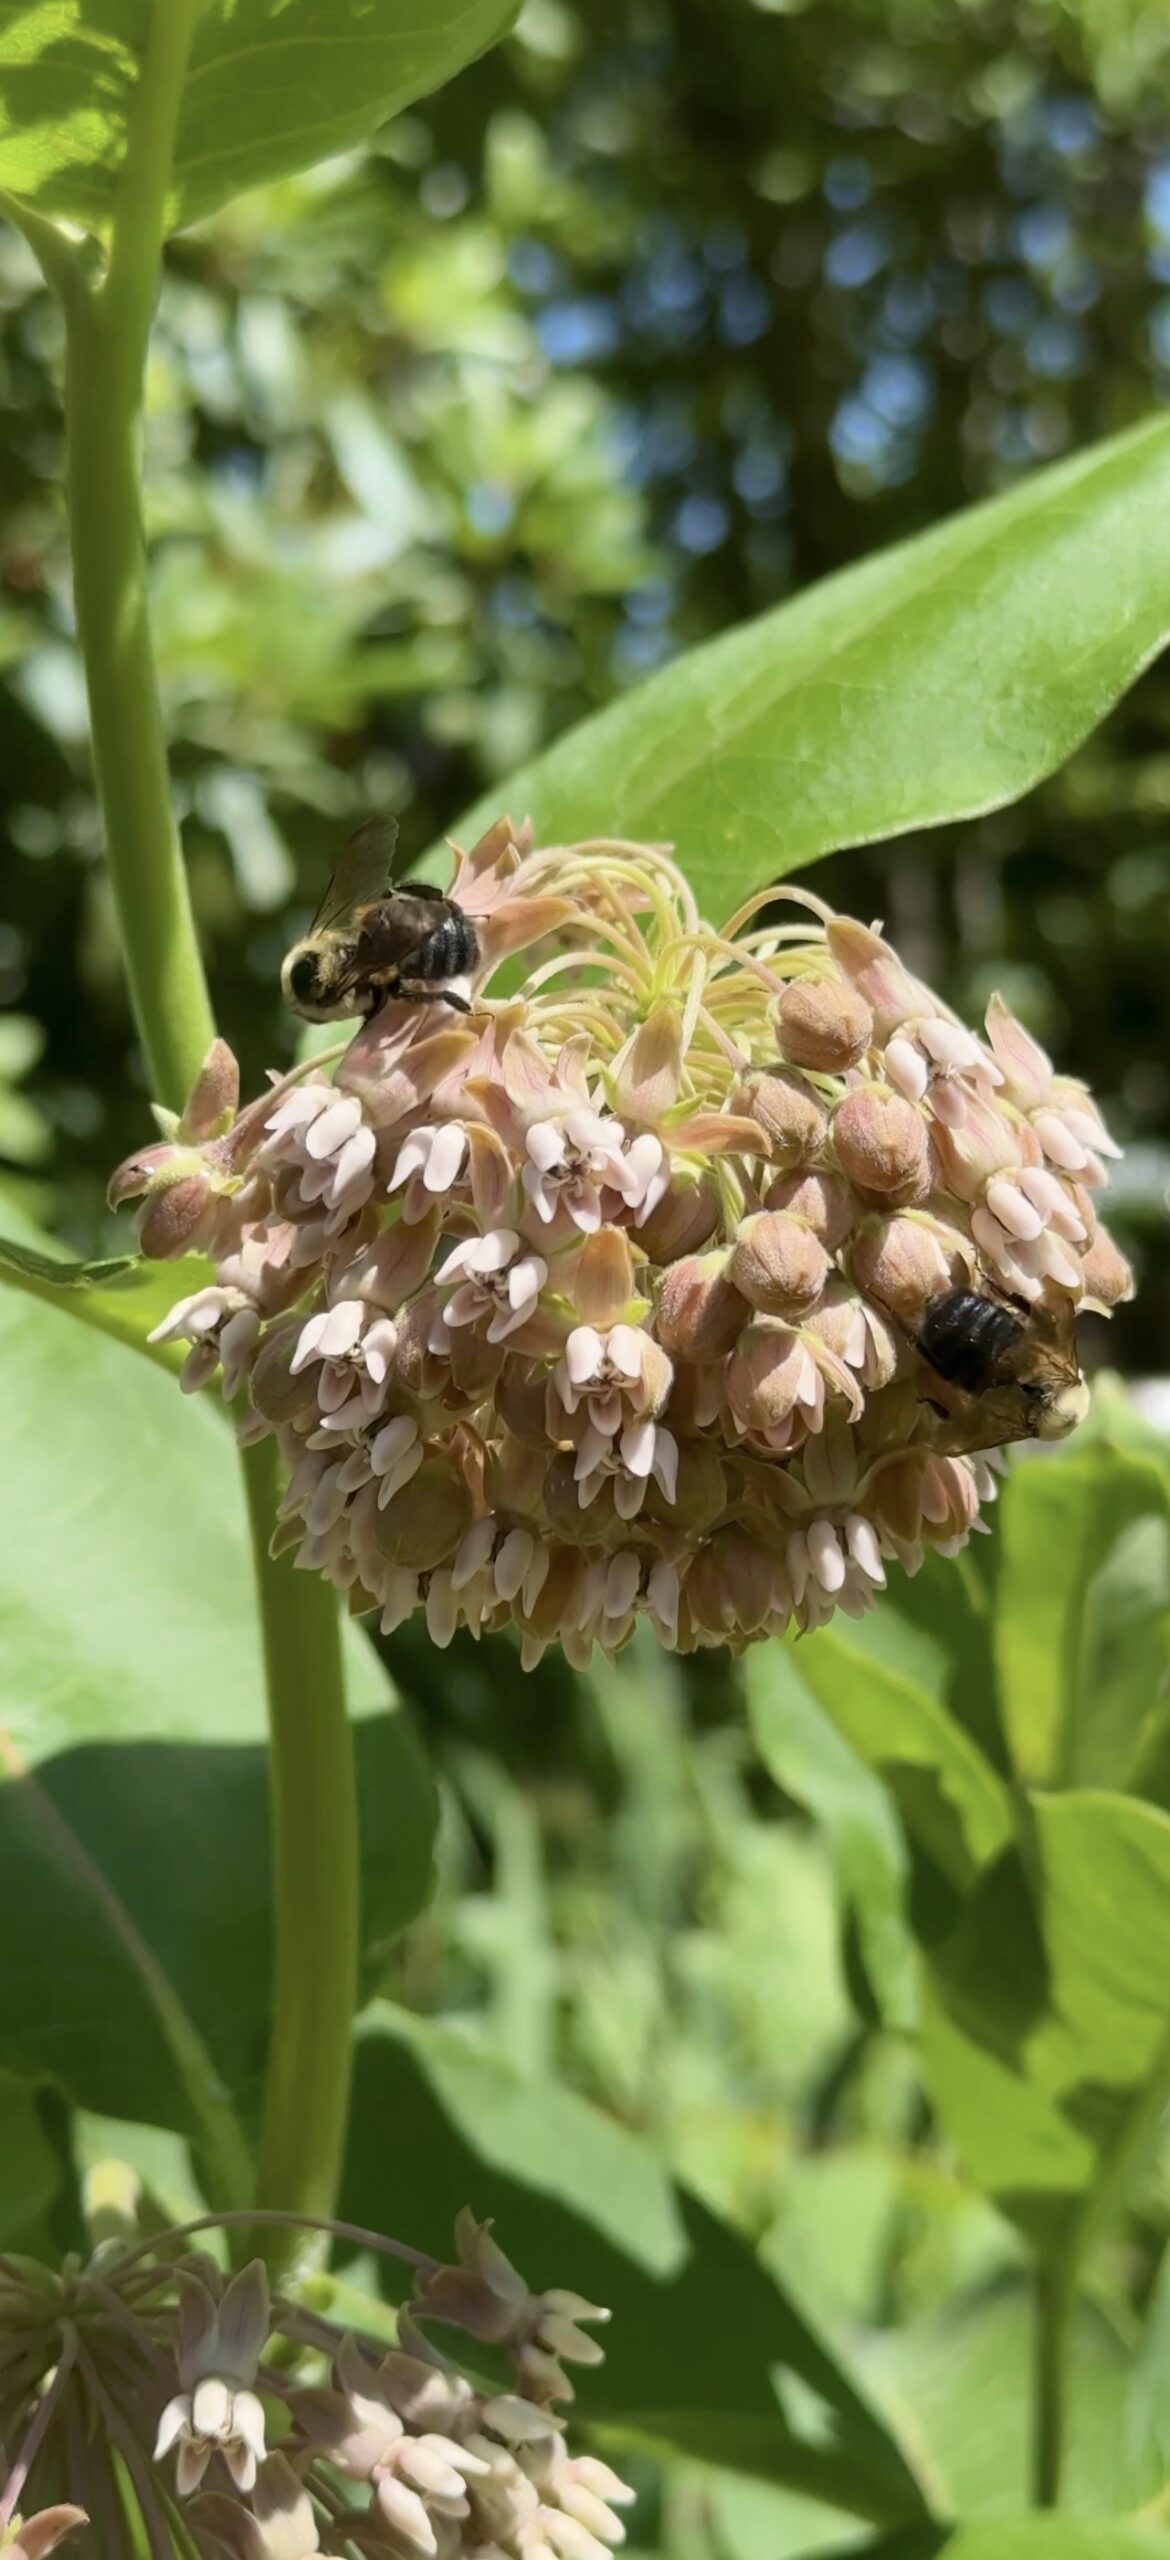
Milkweed in my own garden, doing exactly what it is meant to do: feeding pollinators.
A zip-top plastic bag (any freezer-style bag works)
A marker for labeling
That is it. No special equipment, no greenhouse, no grow lights. Just a spot in your refrigerator.
How to cold stratify milkweed seeds, step by step
Dampen the paper towel. Wet the paper towel, then squeeze out the extra water. You want it moist and damp, not dripping or soaking. Too much water is one of the easiest ways to ruin the process.
Fold it in half. A single fold gives you a clean surface to lay seeds on.
Add your seeds. Spread the milkweed seeds across one side of the towel. Keep them all together on the same side rather than scattering them, which makes them far easier to peel off later.
Fold it up. Fold the towel over the seeds a few more times, keeping the seeds gathered in one spot. Avoid rolling the towel and tucking seeds in at different points; they will be a nightmare to separate.
Re-check the moisture. Give it a quick feel. If it has dried out, dip it lightly again, keeping it damp but never soaked.
Bag and label it. Slide the folded towel into a zip-top bag and write the date on the bag with a marker. Labeling matters more than it sounds. In two weeks you will not remember when you started.
Refrigerate for about two weeks. Put the bag in your refrigerator and set an alarm or calendar reminder on your phone for 14 days out.
Plant. When the two weeks are up, take the seeds out and plant them. They are now ready to germinate.
One small tip: hang on to your original seed packets. They carry the planting depth and spacing instructions you will want when stratification is done.
How long do milkweed seeds need to be cold stratified?
About two weeks in the refrigerator is a dependable window, and it is the timing I use. Monarch conservation groups, including the Xerces Society, recommend going longer for the highest possible germination rates, in the range of 30 to 40 days of cold, moist conditions. Longer never hurts. The key is that the seeds spend that whole time cold and consistently damp, which is exactly what the paper-towel-in-a-bag method gives you.
When should you start?
Count backward from your last spring frost. Begin cold stratifying about two to three weeks before you intend to plant, so the seeds finish chilling right as your planting window opens. I start mine in early March, which lines the seeds up perfectly for spring planting in my area. Milkweed variety does not change the timing. Showy, common, swamp, or butterfly weed all get the same chill.
Common mistakes to avoid
Too much water. A soaking towel can rot seeds. Damp is the target.
Scattering seeds through a rolled towel. Keep them in one spot so you can actually retrieve them.
Not labeling the bag. Two weeks is long enough to completely forget your start date.
Skipping stratification entirely. This is the big one. It is the difference between a few sad sprouts and a yard full of milkweed.
What it looks like when it works
Get the seed-starting step right and milkweed becomes one of the hardest-working plants in the garden. A few months after planting, mine is covered in pollinators from morning to evening, as you can see in this clip from my own garden.
Yes. Every milkweed variety benefits from it, and the process is identical for all of them. Seeds bought fresh from a packet have not been through a natural winter, so they need the cold period before they will reliably germinate.
Can you cold stratify milkweed seeds in the freezer instead of the fridge?
Use the refrigerator, not the freezer. The goal is cold and damp, like winter ground, not frozen solid. The fridge holds the right temperature range.
What happens if you don’t cold stratify milkweed seeds?
Most of them stay dormant. You may get a few sprouts, but germination rates drop sharply, which means far fewer plants and fewer monarchs.
How long can stratified seeds stay in the fridge before planting?
Two weeks is the target, but leaving them a little longer does not harm them. Just plant them once your outdoor conditions are ready.
Can you cold stratify milkweed by planting seeds outdoors in fall?
Yes. Sowing milkweed seeds outdoors in fall lets the natural winter handle the cold, moist stratification for you. The refrigerator method simply gives you the same result on your own schedule when spring planting.
Does cold stratification work for other flower seeds?
Yes. Many native perennials such as coneflowers and lupine need the same treatment. The paper-towel-and-fridge method carries straight over.
About Anna Katherine
I am a South Carolina gardener documenting a real cut-flower and pollinator garden, season by season. I share what works, what flops, and the small steps like this one that make the biggest difference. You can follow the garden on TikTok and YouTube.
If you have ever scrolled 1stDibs and felt like the prices live in a parallel universe, the Saturday Sale is when that universe gets quietly accessible. The event is running now with discounts up to 60% off on vintage furniture, lighting, and decorative objects from designers and dealers around the world. I went through it the way I would go through any sale: looking for pieces I would actually live with, not pieces that just photograph well.
Quick answer: The 1stDibs Saturday Sale runs discounts of up to 60 percent off vintage furniture, lighting and decorative objects from dealers around the world. I pulled the seven pieces I would actually live with, including a circa 1950 Italian bamboo and linen table lamp and a Yule Paige lacquered brass North Star candlestick lamp.
This post contains affiliate links. I earn a small commission if you purchase through my link, at no extra cost to you. The 1stDibs Saturday Sale runs through this weekend.
Here are the seven pieces I would put in my own home if the budget allowed, grouped by what they would actually do in a room. If you saw my furniture flip work or spring home refresh, the through line will look familiar. Quiet luxury, mid-century roots, organic textures, and a willingness to splurge on the right anchor piece.
Lighting: Two Lamps That Anchor a Vignette
Lighting is where I would spend first in any room. The right table lamp does what art does, but with the lights on.
Louis Sognot Mid-Century Bamboo and Linen Table Lamp (circa 1950). Italian, vintage, with the slatted bamboo cage construction that reads as both architectural and organic. Place it on a console behind a sofa, on a writing desk in a quiet corner, or as the bedside companion to a clean linen quilt. This is the kind of piece that quietly elevates everything around it.
Yule Paige Lacquered Brass North Star Candlestick Buffet Lamp. Twenty-one inches of sculptural brass. The candlestick silhouette is having a moment for a reason. Use it on a sideboard, flanking a bed, or paired with a vintage mirror in an entry. Brass takes on a patina over years, which is the whole point.
Seating: The Anchor Pieces
If you are going to splurge during this sale, splurge here. These three pieces all carry pedigree, and pedigree holds value.
Cassina LC7 Leather Swivel Arm Chair by Le Corbusier, Perriand, and Jeanneret. A piece of design history at a price you can actually buy. The LC7 is one of the most enduring chair designs of the 20th century, and a leather Cassina edition is the version that holds. Put one in a corner with a reading lamp. Put two in a primary bedroom flanking a fireplace. Either way, it works.
White Eames EA208 Leather Soft Pad Chairs by Herman Miller (Set of 4). The dining or conference chair I would buy if I had a long table waiting. Eames soft pads in white leather are the rare design icon that scales: four of them around a walnut table look intentional, not staged. Authenticated Herman Miller editions only.
Franco Albini Mid-Century Rattan and Bamboo Round Ottoman (Italy, 1960s). The accent piece that pulls a room together. Use it as a side table next to a low sofa, as extra seating when guests arrive, or as a footrest in front of a reading chair. Franco Albini is one of the great Italian designers of the era, and rattan has officially come back around.
Decorative Objects: The Finishing Touches
The pieces that turn a styled room into a real one. Both of these are small in scale and big in personality.
Mid-Century Curved Leather Italian Picture Frame by Adnet (1970s). Adnet’s leather work is the kind of thing collectors quietly hunt. A curved leather frame on a bedside table, holding a vintage photo or a small piece of art, reads like you have been collecting for decades. The patina alone is worth the price.
Cenedese Pair of Mid-Century Italian Round Black and Clear Murano Glass Vases (1970s). Murano glass is having a sustained moment, and Cenedese is one of the names that holds value. This pair in black and clear can sit on a mantel, on a console, or split between rooms. Fill them with branches in winter, hydrangeas in summer, nothing at all the rest of the year.
If You Can Only Buy One Thing
Louis Sognot Bamboo Lamp. Highest character per dollar in this list. A real designer piece at a price that lets you actually buy it.
Cenedese Murano Vases (Pair). Two pieces, multiple staging options across rooms and seasons. The accessory layer most people skip.
Cassina LC7 Swivel Chair. The long game. Pedigree, design history, and a piece that gains value over time instead of losing it.
Why Vintage at 1stDibs Works for an Organic Modern Home
The organic modern look (linen, stone, oak, brass) reads expensive because of materials, not maximalism. Vintage pieces from designers like Franco Albini, Charlotte Perriand, and Jacques Adnet sit in this aesthetic naturally because the originals were built from the same material vocabulary 60 years ago. Mixing one or two real vintage pieces into a room of newer furniture is the easiest way to make a space read collected rather than ordered-on-the-same-day.
If you want to browse beyond my picks, the full 1stDibs Saturday Sale runs through this weekend. I keep my favorite vintage picks in my ShopMy collection, and I will be adding more from this sale through the weekend. Save this post on Pinterest if you want to come back to it, and DM me on Instagram if you want help picking between two pieces. I respond to every one.
There is a specific kind of weekend that signals the season has shifted. The back door stays open all afternoon. The first real dinner gets eaten outside. Someone says the word “tomatoes” with feeling. That weekend is here, and it is almost always the moment I start thinking about how I want the house to live for the next four months.
Quick answer: The Studio McGee Memorial Day Sale 2026 runs up to 30 percent off sitewide. I went through the entire sale and pulled the 15 pieces I would spend my own money on: four outdoor anchors and eleven smaller accessories. The largest single saving is the Pomeroy Outdoor Sofa at $2,308.60, down from $3,298.00.
If you saw my outdoor patio finds last month, you already know Studio McGee is one of the brands I keep coming back to. Their Memorial Day sale just opened with up to 30% off sitewide, and I went through the entire thing and pulled the 15 pieces I would actually spend my own money on. I organized them by how steep the discount is, because if you are going to buy something at any price point, the 30% tier is where it bites the most. This post contains affiliate links. I earn a small commission if you purchase through my link, at no extra cost to you. Sale runs through May 26.
30% Off Picks: The Deepest Discount Tier
This is where the real math is. Most of the Pomeroy outdoor pieces, all of the indoor bedding, the colorful pillows, the small accessories. Eleven of my fifteen picks fall here, which is unusual for a Memorial Day sale and the reason I am writing about this one specifically.
The Outdoor Anchors
If you are the kind of person who plans a patio the way other people plan a kitchen, this is the corner of the sale to read first.
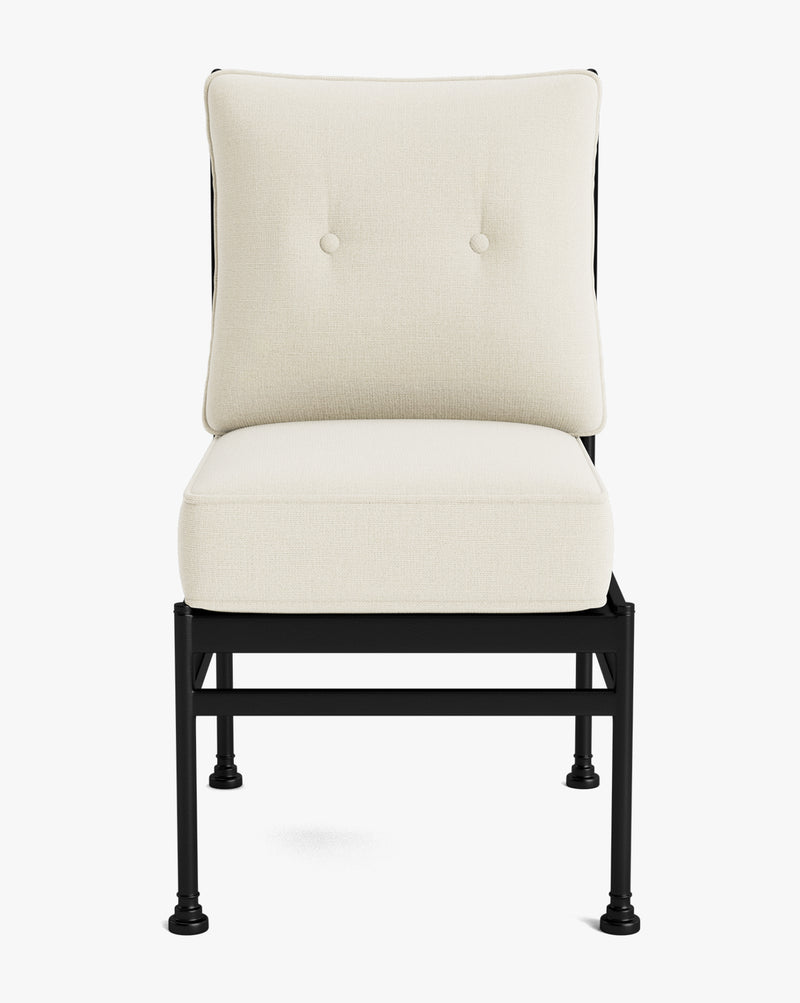
Pomeroy Outdoor Sofa 81.5″. $2,308.60, down from $3,298.00. The flagship. Made to order, which is why the 30% bites so hard at $989 off. I keep coming back to this silhouette because it does what most outdoor sofas cannot: it sits low enough to feel relaxed, deep enough to actually nap on, and the frame reads architectural instead of patio-set. If I were starting an outdoor living room from zero, this is what I would build around.
Pomeroy Outdoor Lounge Chair. $1,048.60, down from $1,498.00. Buy them as a pair. Most outdoor seating arrangements fail because a single sectional eats the space and forces everyone to sit facing the same direction. Two of these flanking a coffee table reads like a real room, not a setup.
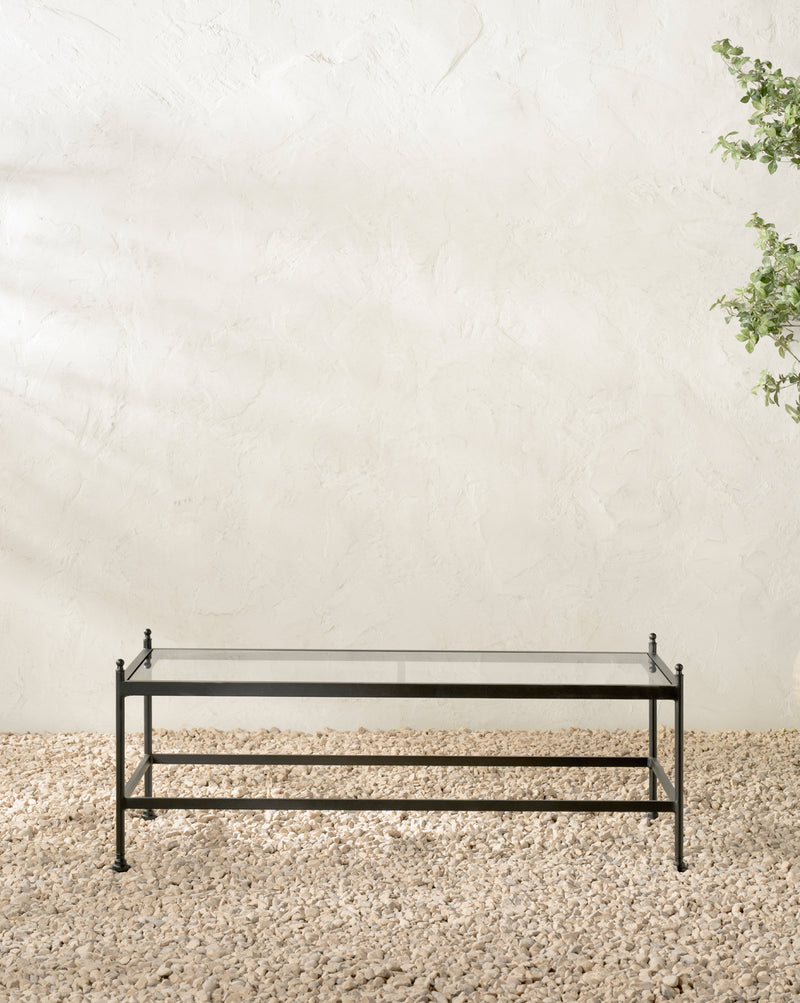
Pomeroy Outdoor Coffee Table. $488.60, down from $698.00. This is the piece that pulls the whole outdoor vignette together. Black metal frame, low profile, the right scale for a pair of lounge chairs. If you are buying the Pomeroy seating, do not skip this.
Pomeroy Outdoor Dining Chair. $278.60, down from $398.00. The outdoor dining chair for the people who do actually host outdoor dinners. Buy four for a real table, six if you have the linear footage. They stack but they do not look like they stack, which is the whole trick.
The Bedroom Refresh
Studio McGee told me directly that bedding is their hottest demand right now, and after looking at what made the sale, I understand why. Both of these are at 30%, which is the version of a McGee bedding discount you do not normally see.
Ellerby Linen Stripe Duvet Cover. $320.60, down from $458.00. Stripe bedding is one of those things that sounds risky and then settles in like it was always there. The Ellerby is a soft natural stripe on linen, which means it gets better with every wash. If your bed has been white-on-white for two years and you are ready to layer in a quiet pattern, this is the easy entry.
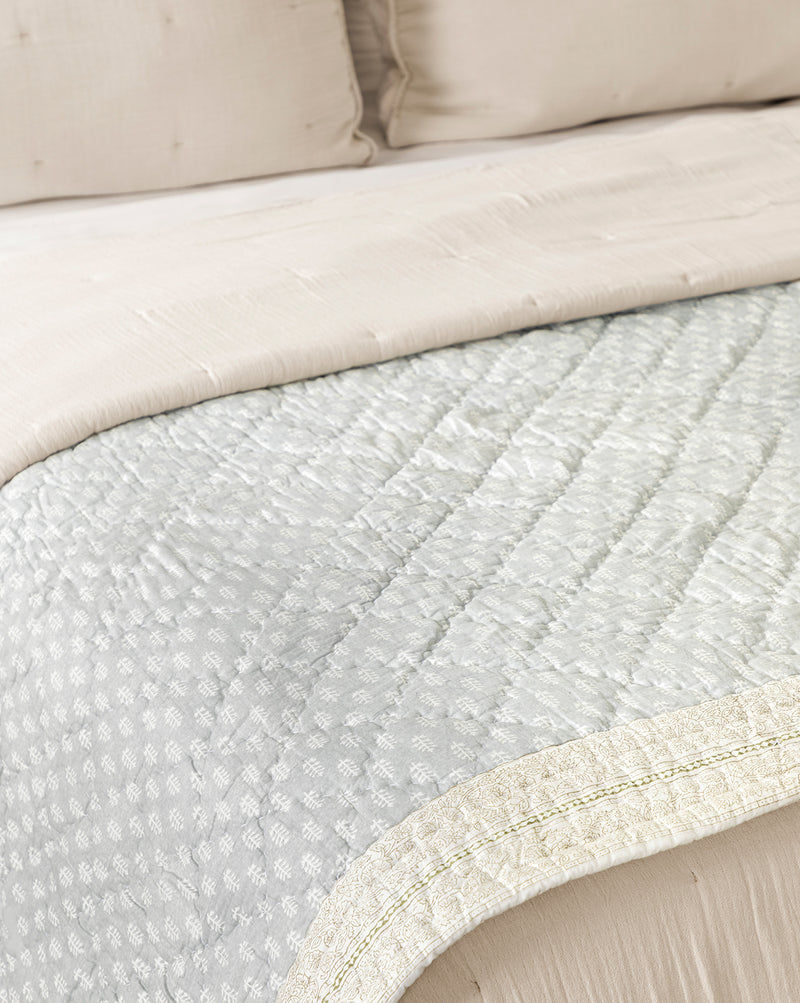
Regatta Block Print Quilt. $243.60, down from $348.00. Block print is pattern without committing to wallpaper. The Regatta reads multi-color but the palette is grounded enough that it works over white sheets, over the Ellerby stripe, folded at the foot of a guest bed. I would put this in a kids room and a primary bedroom in the same house and not blink.
The Colorful Pillows and Rug
This is the section that exists because not everything beautiful is beige. Three picks under $100 that bring real pattern into the room.
Poisson Indoor/Outdoor Pillow. $51.80, down from $74.00. The Poisson is a fish-pattern pillow in rust, sage, and cream, and it is the highest personality per dollar in the entire sale. Throw it on an outdoor lounge chair, throw it on an indoor sofa, throw it in the back of a porch swing. People will ask where it is from.
Striped Indoor/Outdoor Bolster Pillow. $61.60, down from $88.00. Navy and cream stripe, classic shape. Use it on a bench, the foot of an outdoor sofa, or as a back rest on a daybed. The bolster shape reads more curated than a square pillow, which is why I keep reaching for it.
Greek Key Handwoven Indoor/Outdoor Rug. $47.60, down from $68.00. The price is absurd in the best way. Blue and cream Greek key pattern on a real handwoven indoor-outdoor weave. Use it in a kitchen, a bathroom, the threshold of a back door. It is the kind of rug that looks like it cost four times what it does.
The Small Upgrades
Two picks that are not glamorous on paper and absolutely earn their spot in real rooms.
Aldridge Handwoven Indoor/Outdoor Rug. $208.60, down from $298.00. The runner-sized real-room outdoor rug for a covered porch, a screened-in patio, or the hallway from a back door to a mudroom. Tonal natural fiber, made to survive humidity. The version of an outdoor rug that does not announce itself.
Sanibel Acrylic Goblets (Set of 4). $29.40, down from $42.00. Outdoor dining without the wedding-crystal anxiety. The Sanibel set in green is on my counter all summer. Use them for cocktails, water, whatever you are drinking out of a goblet because the night called for it.
20% Off Picks: Ready-to-Ship Outdoor
The Pomeroy collection is made to order, which is why it is at 30%. The Glenwood collection ships fast, which is why it is at 20% and worth its own section if you do not want to wait six weeks for a sofa.
Glenwood Outdoor Chaise. $1,998.40, down from $2,498.00. Ready-to-ship single-piece statement. If you only buy one big outdoor thing this summer, this is the version that arrives at your door first. Cream cushion, woven rattan frame, the silhouette that makes any covered porch look like it was photographed for a magazine.
Glenwood Outdoor Lounge Chair (Ready to Ship). $1,118.40, down from $1,398.00. Lower profile than the Pomeroy, which makes it the right answer for shorter porches and rooms where sight lines matter. Same rattan-and-cream language as the chaise, ships in a normal amount of time.
15% Off Picks: The Small Indoor Refreshes
Two pieces that are not at the deepest discount but earn the spot because of what they do for a room.
Two-tone Striped Cotton Throw. $49.30, down from $58.00. Blue and cream two-tone stripe cotton throw at fifty bucks. Drape it over a sofa arm, fold it at the foot of a bed, throw it in a basket near the back door for unexpectedly cool evenings. The kind of textile you stop noticing because it is already part of the room.
Betsy Pillow Cover. $74.80, down from $88.00. Blue patterned indoor pillow with enough movement to keep a neutral sofa from going flat. The Betsy adds depth without going floral, which is the line I find myself navigating most often. Two of these on a sofa, one on a reading chair, done.
If You Can Only Buy One Thing
Three picks ranked, because decision fatigue is real and the sale runs through Tuesday.
Poisson Indoor/Outdoor Pillow ($51.80 at 30% off). For the highest personality per dollar in the entire sale. The fish pattern is the conversation piece. If you have never bought from McGee, start here.
Regatta Block Print Quilt ($243.60 at 30% off). For the easiest summer bedroom refresh with real color. Wash it once, layer it over white sheets, done. The piece that turns a flat bed into a styled bed.
Pomeroy Outdoor Lounge Chair ($1,048.60 at 30% off). For the long game. This is the piece you will still be glad you bought in 2031. Made to order, so it takes time, which is also why the 30% off is the version you want to catch.
Shop the Sale
If you want to browse beyond my picks, the full Studio McGee Memorial Day sale runs through May 26 with discounts up to 30% off across outdoor, bedding, lighting, and decor. I keep all my favorite Studio McGee picks (including these 15) in my ShopMy collection, and I will be adding more to it as the sale runs. Save this post on Pinterest if you want to come back to it, and feel free to DM me on Instagram if you want help picking between two pieces. I respond to every one.
(function(){var m=document.getElementById('bq-mat'),n=document.getElementById('bq-min'),k=document.getElementById('bq-mk'),o=document.getElementById('bq-out'),s=document.getElementById('bq-sub'),t=document.getElementById('bq-one');
function v(e){var x=parseFloat(e.value);return isFinite(x)&&x>0?x:0}
function u(){var mat=v(m),lab=v(n)/60*30,mk=parseFloat(k.value)||3,p=Math.ceil(mat*mk+lab-0.0001),f=mat+lab;
if(mat<=0){o.textContent='$0';s.textContent='Enter what the flowers and sundries cost to see your price and floor.';t.textContent='Run one recipe above.';return;}
o.textContent='$'+p;s.innerHTML='Your floor (materials plus time) is <span class="floor">$'+f.toFixed(2)+'</span>. Charge less than that and the bouquet loses money.';
t.textContent='You just priced one recipe at $'+p+'.';}
[m,n,k].forEach(function(e){e.addEventListener('input',u);e.addEventListener('change',u)});u();})();
(function () {
var c = document.body.className;
c = c.replace(/woocommerce-no-js/, 'woocommerce-js');
document.body.className = c;
})();